Additional Contributors: Antoine Amarger, Aurélia Azéma, Francesca G. Bewer, Nicolau Escanilla Artigas, Laurence Garenne-Marot, Joachim Kreutner, Andrew Lacey, Elisabeth Lebon, Jeffrey Maish, Mathilde Mechling, Benoît Mille, Lorenzo Morigi, Peta Motture, Barbara Plankensteiner, Dominique Robcis, Brice Vincent
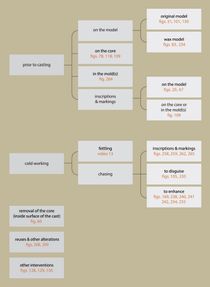
This section discusses and provides examples of the different types of tool marks that might be encountered on either the interior or exterior of a sculpture. It outlines the working processes that can create tool marks, and focuses on how these marks may be identified and associated with a specific action. A flowchart summarizes the different possible tool marks (fig. 233). Features derived from the casting and fabrication process are discussed in I.1.
1 What types of tool marks and how they occur
Since the external surface of a sculpture is more accessible than its internal surface, a large majority of the tool marks mentioned below will be found on the exterior. However, a number of marks may also appear on the inside. If a mark is specific to an action associated with either the interior or exterior surface, its location will be indicated. Tool marks can derive from four different stages in the fabrication of a bronze: those made in the ; those made in the ; those made directly on the metal surface after casting; and those stemming from later intervention(s). Although technically similar to many other tool marks, inscriptions are treated as a separate category of features (fig. 233).
1.1 Tool marks made prior to casting
1.1.1 Tool marks made in the original model and/or the
inter-model
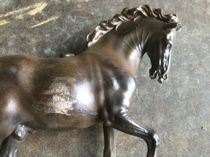
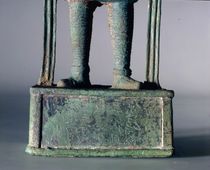
In creating a model or a wax for an indirectly sculpture, a variety of generic tools and/or tools specific to a particular medium might be utilized (tool marks made in the original model will predate those in the inter-model). The associated marks would be transferred to the external surface of the finished sculpture, whether the model was made in wax (fig. 51), wood (fig. 101), clay, plaster, stone, or another material (fig. 130).1 The fidelity with which these marks are transferred to the cast-metal surface will reflect the physical properties and composition of its and/or alloy, including the latter’s , as well as the success of that particular casting, the subsequent working of the surfaces, and possible later interventions.
Most marks appear on the external surface of the finished work. However, those that appear on the internal surface usually derive from the tools used to work the interior surface of a hollow wax model (figs. 83, 234) or, occasionally, the surface of the for a .

1.1.2 Tool marks made in the mold
In indirect casting, the artist or has the opportunity to work the interior surface of the mold either to introduce new details or to reinforce features not sufficiently well reproduced from the original model. How those marks then transfer to the casting will depend upon the technique utilized. If a wax inter-model is created, the tool marks will be transferred to its surface, with the artist then being able to assess the fidelity of the tooling with the option of further reworking. In sand casting, any alteration within the mold would be transferred directly to the casting.2 All of these marks appear only on the external surface and can be very difficult to differentiate from one another.
1.1.3 Tool marks made in the casting core
Marks made on the surface of the casting core will be transferred to the internal surface of the bronze.3 Some of the most common marks result from shaping the core (figs. 78, 118). Obvious examples are the parallel lines cut into a bell’s core during its shaping on a lathe, with individual tools or with a strickle cut into the shape of the required form.
1.2 Marks of manufacture in the metal
After casting, the sculpture is generally cold worked with a variety of tools used to disguise manufacturing features, to sharpen and/or modify details transferred from the model (some of which may not have been sufficiently defined in the ), and/or to decorate the surface.
1.2.1 To disguise
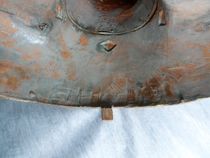
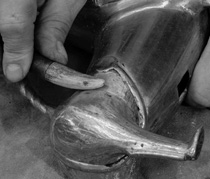
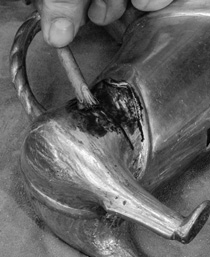
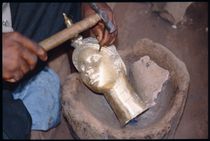
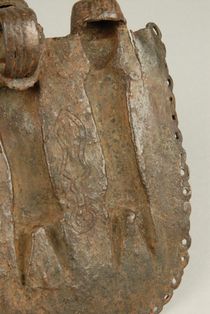
When the casting is removed in its raw state from its mold or , it will retain its or gating system now translated into metal, and possibly , as well as flaws such as or (figs. 104, 235, 236). If there are separately cast elements joined together, the joints also may need to be disguised. In modern art foundries, the multistep process of removing or disguising coarse exterior features is divided into two separate steps: and . Fettling is usually carried out directly after casting to remove the bulk of those features that have become superfluous and in the way—that is, sprues, pins, flashing, and so on (videos 11, 13 Open viewer).4 The person carrying this out may be less trained than the chaser and might use saws, hammers, chisels, and/or coarse files.5 Power tools such as grinders, power files, rotary tools, drills, and air- or electric-powered pencils with various stones and burrs have been used for fettling since the second half of the twentieth century (fig. 237).6 Once fettled, the chasing may begin.
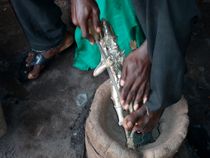
1.2.2 To remove the core
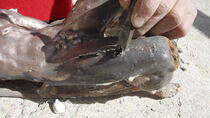
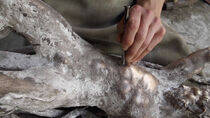
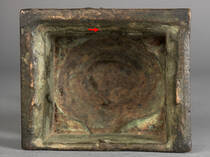
The core is frequently removed after the casting using a variety of tools, potentially leaving scratches or chisel marks on the internal surface of the statue (fig. 60). It is often difficult to identify exactly what implements were used. Dipping the bronze into an acid bath has also been a way to break down plaster-based investment, but that does not tend to leave traces.
1.2.3 To sharpen, enhance, or decorate
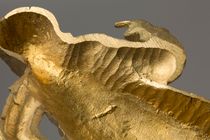
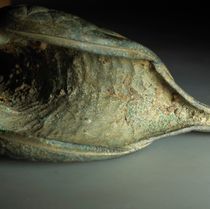
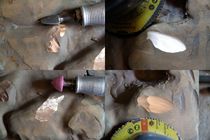
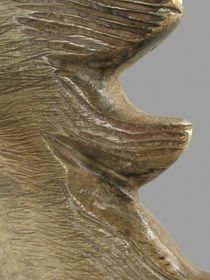
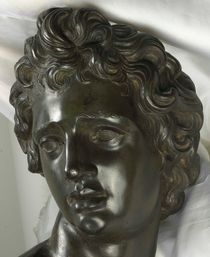
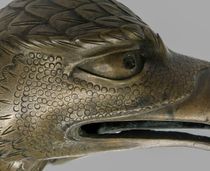
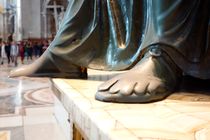
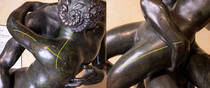
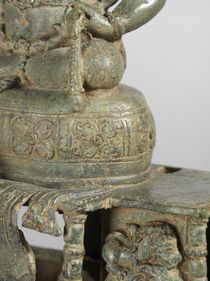
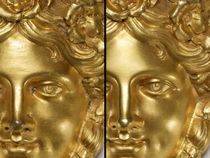
The amount of work required to bring a casting to its finished state depends upon the quality of its . While it is possible that no significant chasing will be necessary,7 more usually the founder, chaser, or artist will finish all of the broadly modeled surfaces and introduce or reinforce details, textures, and patterns (figs. 105, 238, 239, 240, 241, 242, video 10 Open viewer).8 All evidence of such working would be restricted to the external surface.
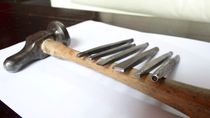
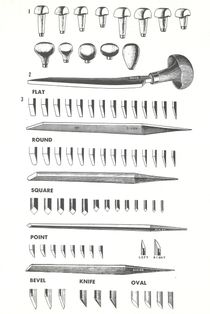
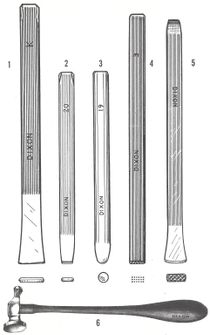
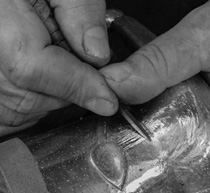
The tools used to finish a cast surface can be divided into two broad groups: those that remove metal and those that compress metal. The former category includes files, chisels, scribes, gravers, burins, scorpers, scrapers, and abrasives, while the latter encompasses hammers, planishers, , grounders, and burnishers.9 The number of variants within each group and tool type is potentially vast, since chasers often make the precise tools they need for the job at hand (figs. 243, 244, 245).
Expediency might dictate flexibility in the use of a tool. For instance, a graver or a chisel could be used to remove metal and then as a punch to create a decorative pattern or a line, respectively. , which involves the use of a small ball-peen hammer with a rounded head, can be used both to disguise or other surface flaws as well as to enliven the bronze surface with myriad compressed facets that catch and reflect light (figs. 238, 246).
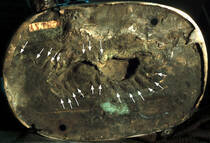
Broad, undecorated metal surfaces with imperfections such as flashing or porosity might first be cut back with files (figs. 247, 248), chisels (fig. 249), and scrapers (fig. 250). Sometimes these tools produce incidental textures, such as chatter marks (fig. 251), which should not be confused with file marks. Subsequently, the metal might be compressed by hammering, punching, and/or burnishing (figs. 238, 239, 252). A final polish could then be achieved by soft metal brushes or a series of graded abrasives, the scratches from which might be readily observable to the naked eye or under a microscope (fig. 253). A variety of natural abrasive substances might be used, potentially including a range of stones with varying degrees of hardness or coarseness, shave grass, and powdered stones or clays (table 14 Open viewer). More recent are a variety of sandpapers and air abrasives.
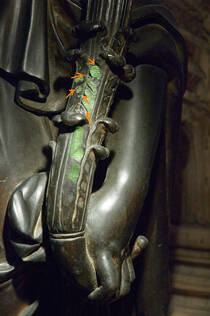
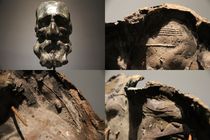
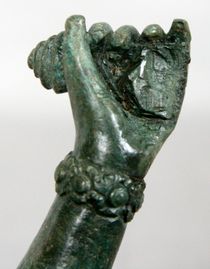
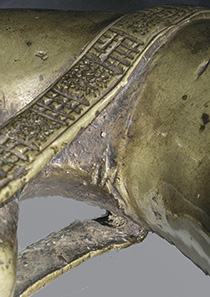
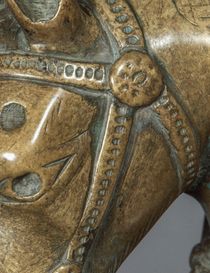
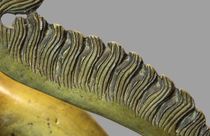
Reliefs, designs, or details such as strands of hair, eyelids, and fingernails or toenails may be reinforced, underscored, highlighted, or created by chasing, that is by punching, , and/or (figs. 169, 254, 255). An added design element might first be drawn or incised on the surface with a pointed tool such as a scribe.
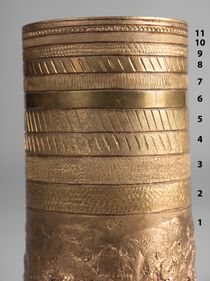
Further decorative surface textures and finishes might be struck into the metal by any variety of punches (figs. 239, 240, 242, 256).
 Open viewer
Figure 105
Open viewer
Figure 105
 Open viewer
Figure 238
Open viewer
Figure 238
 Open viewer
Figure 239
Open viewer
Figure 239
 Open viewer
Figure 240
Open viewer
Figure 240
 Open viewer
Figure 241
Open viewer
Figure 241
 Open viewer
Figure 242
Open viewer
Figure 242
 Open viewer
Video 10
Open viewer
Video 10
 Open viewer
Figure 243
Open viewer
Figure 243
 Open viewer
Figure 244
Open viewer
Figure 244
 Open viewer
Figure 245
Open viewer
Figure 245
 Open viewer
Figure 246
Open viewer
Figure 246
 Open viewer
Figure 247
Open viewer
Figure 247
 Open viewer
Figure 248
Open viewer
Figure 248
 Open viewer
Figure 249
Open viewer
Figure 249
 Open viewer
Figure 250
Open viewer
Figure 250
 Open viewer
Figure 251
Open viewer
Figure 251
 Open viewer
Figure 252
Open viewer
Figure 252
 Open viewer
Figure 253
Open viewer
Figure 253
 Open viewer
Figure 169
Open viewer
Figure 169
 Open viewer
Figure 254
Open viewer
Figure 254
 Open viewer
Figure 255
Open viewer
Figure 255
 Open viewer
Figure 256
Open viewer
Figure 256
1.3 Additional marks, including inscriptions
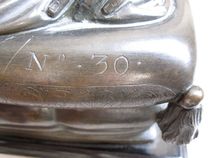
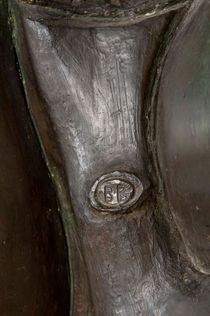
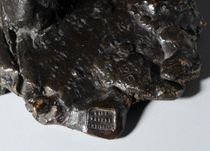
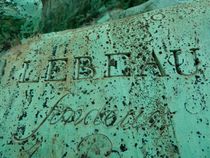
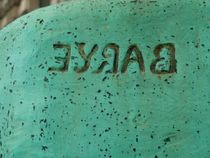
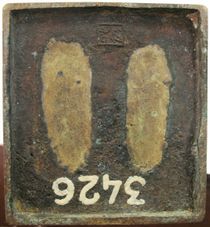
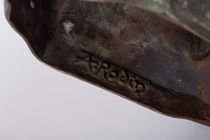
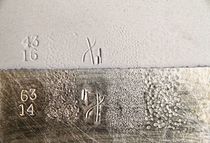
Marks may have been added during the fabrication process to serve as aids in assembly (see I.5)10 or registration; as votive inscriptions (fig. 257); or to identify the model or title of the piece (fig. 258), the owner (for instance for an inventory number; fig. 259), the commissioner, the artist (fig. 260), the process (fig. 261), the number (fig. 261), the date, and/or the founder or foundry (figs. 14, 262, 263, 264).11
Inscriptions may be added at any stage of a model’s production. These might be drawn in a wax or clay model, allowing for the easy creation of fluid, curved shapes that might displace the wax into slightly raised lips along their edges. Marks could also be made by stamping or scoring the core or mold prior to casting, with the understanding that these will result in raised markings (figs. 264, 109). Marks of various kinds can also be punched, chiseled, or engraved in the cast piece. This requires more force and a different set of skills, especially to shape smooth, curved lines. They all produce letters or shapes with very crisply defined edges, and in the case of chiseled letters, for instance, may still preserve the fine stepped (chatter) marks representing the piecemeal progression of the tool’s edge as it is propelled along by each hammer blow (figs. 259, 262, 263, 265). As with decorative marks, it is not always easy to establish exactly how an inscription was made, since a signature drawn in wax, for instance, might be reworked in the metal.12

1.4 Later intervention
1.4.1 Reuses and other alterations
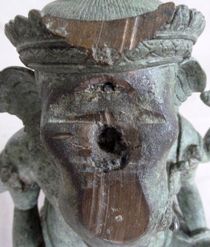
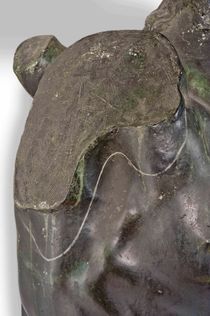
Cleaning, polishing, and wear can introduce scratch patterns and/or erode or etch the surface either in localized areas or across the entire surface (figs. 266, 267).13 A sculpture might have been reworked at a later date due to its being damaged or reinterpreted. The “reuse” of statues may be accompanied by a number of specific tool marks, including saw or chisel marks left as a result of a statue’s removal from its initial position or base, scratches from a file used to eradicate an inscription, or marks from modern tools used to deface an object (fig. 268)14 or rework or reintegrate a blemished area. Such alterations might also involve dismemberment or fragmentation of the statue; a connection to or combination with new elements (for instance in remounting) or marriage with pieces from other works; and/or the removal of marks of ownership, such as when changing hands. Ritual sculptures might undergo multiple alterations, including the application of repeated surface over time, thereby obscuring original tooling, or deconsecration, generating new tool marks such as those associated with the removal of an attribute (fig. 269), or when they might be otherwise altered to become an “artwork” in a collection.
1.4.2 Other interventions
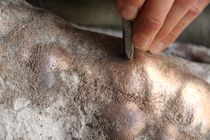
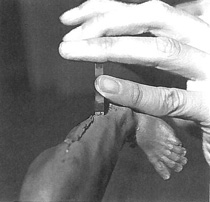
Marks on the surface might equally relate to deliberate actions associated with technical examination. For instance, to identify an alloy or the generic type of the metal (for instance unalloyed copper or ), a might have been scratched to reveal the metal below, or a sample drilled (fig. 156) or incised with a graver or scalpel. These marks may be found on internal and external surfaces.
Taking a mold from an existing bronze to produce an may result in scratches in the patina or coating, or even into the metal of the bronze model along the of that new mold (fig. 128). Such damage can occur in the process of finessing the walls needed to define the boundaries of the mold pieces. Other traces of the after-casting process such as sketched outlines (fig. 129) or the remains of molding materials may also provide evidence that such an operation occurred. This may either confirm the relationship between a group of objects or lead to a search for one or more matching after-casts.
A sculpture’s patina may have been removed deliberately in order to repatinate the work, potentially destroying or affecting existing tool marks as well as creating new ones. Archaeological bronzes have often been mechanically cleaned of surface mineralization products to find or to re-create the “original” surface, and these treatments may leave marks as well. Although not directly generated by “tools,” electrochemical and acid treatments can etch the surface, leaving distinctive marks, typically tiny holes in the surface or a visibly enhanced grain structure.
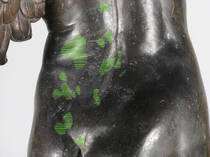
Finally, other markings may provide invaluable clues to an object’s life cycle and provenance. These may include painted, stenciled, or printed inventory numbers, lot numbers from auction sales, customs stamps inked directly on the metal or on labels adhered to the underside or back of a bronze, and exhibition labels.
Risks of misidentification/misinterpretation
-
Air abrasives using grit, sand, glass beads, and so on are often used to remove a patina. The resulting surface can seem softened by this action, resulting in “cold worked” tool marks in the metal appearing very similar to as-cast tool marks made in the wax (fig. 270).
-
Large or monumental sculptures are sometimes cleaned using very coarse abrasives resulting in a heavily abraded surface, which can have the appearance of sand casting.
2 Why investigate tool marks? and other FAQs
Investigating tool marks on a bronze sculpture may address a number of issues, some of which are listed below.
2.1 Can tooling on the model be distinguished from cold
working?
Several models may precede casting—typically clay and wax models. These models may generate as-cast tool marks in the bronze (fig. 130). There are several ways to distinguish between as-cast marks and cold working:
-
Usually, the tool marks made on the model prior to casting have a more fluid feel than those made in the metal due to the relative ease with which the materials can be worked (especially on a clay or wax model), with the edges being softened during casting as the more or less viscous liquid metal flows and solidifies (figs. 51, 52, 271, 272, Case Study 4). Under the microscope, it may be possible to observe that the mark retains its as-cast surface (fig. 273).
-
Conversely, during cold working, significantly greater force is required to remove or deform the metal, with the resulting mark having a sharper, more defined profile that is likely to have eliminated all or most traces of the as-cast surface (fig. 254).
-
Marks made prior to casting on the model(s) and/or on the mold might be deepened or reinforced in the metal, potentially leaving traces of both as-cast and chased detailing still visible on the surface.
-
If decorative details on a part of a cast appear inaccessible to a tool, it suggests the tooling was made on the model and that the model was made in different parts that were decorated before being assembled prior to casting. Alternatively, the sculpture may have been cast in parts that were chased in the metal after casting and then assembled.
-
When tool marks overlay work carried out after casting, such as repairs, it is obvious that the decoration has been made or at least enhanced by cold working (figs. 168, 169).
Risks of misidentification/misinterpretation
-
Identifying the origins of a tool mark can be complicated by the fact that, over time, wear and cleaning can erode the surface significantly, thereby smoothing or softening its details (figs. 266, 274, 275, 276).
-
If multiple castings are similar in every other respect but have different detailing, one may be tempted to suppose that the additional detailing was made either in the model or in the mold, but variable detailing can also be added during chasing.
2.2 Can as-cast surfaces be distinguished from cold-worked
surfaces?
-
In many instances, an as-cast surface will exhibit porosity, bumps, flashes, and other surface blemishes (fig. 104).15 The most efficient way to detect an is to find the associated surface imperfections that are often retained in areas of the casting that would have been difficult to access for subsequent tooling (fig. 277).
-
Transitional areas from as-cast surfaces to chased surfaces or between adjacent areas with intentionally different finishes or textures can retain tool marks associated with earlier steps in the finishing process (fig. 278).
Risks of misidentification/misinterpretation
If there is visual access to the interior of the casting, it may be tempting to use those raw surfaces as an indication of the original appearance of the exterior surface. However, the composition of the core and the investment may have been different, potentially imparting different textures to the internal and external surfaces of the metal.
2.3 Can cold working marks be differentiated?
-
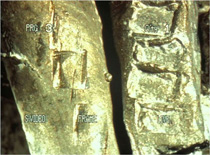
The cross section of a tool’s working face can help characterize the kind of mark it might leave (figs. 243, 245). Gravers, chisels, and scrapers have sharp cutting edges (figs. 276, 279). Other tools used in chasing have rounded faces or blunt edges.
-
Depending upon the amount of metal to be removed, a V-shaped burin or graver might be held in the hand and a delicate line incised into the surface of the metal in one continuous cut, leaving a tapering entry and exit mark (figs. 276, 279).
-
Increasing the depth of the cut might require rocking the graver back and forth, creating a faceted quality to the line that can serve a decorative function as well.
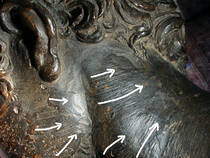
-
More depth yet might entail using a hammer, with each successive strike eliciting a jump in the graver and a consequent step in the cut channel. As a line changes direction or turns to create an arc, the frequency of the strikes increases, leaving a greater density of corresponding steps (fig. 280). Irrespective of the depth of the incised line, the tool creates a curl of metal at its cutting face. If the cut truncates abruptly, that curl will break off, leaving a slight nub at the end of the cut.
-
All punch work is performed with the aid of a hammer. Generally, the tool is held perpendicular to the surface, with each strike compressing the metal (video 10 Open viewer). If the tool is used to define a linear pattern, each individual strike in the series will leave a mark variable in its depth and imparting a pattern similar to that left by a graver, but much subtler (fig. 169).
Risks of misidentification/misinterpretation
-
The final shape/aspect of the tool mark may depend on the hardness of the metal surface (figs. 281, 282, 283). Also, tool marks become obscured and/or altered over time.
-
Peening and punch marks are similar in shape—compare for instance figure 238 and figure 242 with figure 246. Although the latter are usually smaller, large punches exist as well. There is no definitive way to distinguish between them.
2.4 Can original cold working be distinguished from later
interventions, including reuse and wear?
See I.6§1.4 above.
2.5 Can different hands be distinguished?
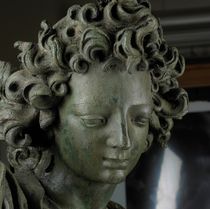
Experienced scholars may recognize chasing associated with a specific period or style (fig. 284). Identifying the hand of a particular artist or workshop based on tool marks is generally more complex. The fact that most sculptors and founders make and alter their own tools (see Case Study 7) is useful when comparing decorative punch marks, for instance.16 But this avenue of research is complicated for a number of reasons:
-
the generic nature of both the tools and the techniques of surface working (with the possible exception of identifiable punches; see figs. 242, 285, 286);17
-
the fact that multiple people may have worked on the same object;18
-
the possibility that tools, models, molds, et cetera might have been passed down or on to others.19
Such a quest is only possible with the systematic cataloguing of all working processes. Surface metrology techniques may provide an appropriate methodology for documenting the repertoire of tools (see I.6§3.1 below), and particularly those marks that might serve as a fingerprint.
2.6 Is it possible to assess technical aptitude?
Prehistorians, and particularly those studying fabrication techniques of lithics, have developed methods to quantify technical ability based on the statistical analysis of tool traces.20 The objective is to evaluate the level of tool control and techniques in order to infer a number of socio-anthropological aspects linked to the activity: degree of specialization, modes of transfer of know-how, and so on. While there are numerous technical studies of bronze sculpture cataloguing a specific work’s creation, an artist’s working processes, and the evolution of specific technologies, to date there have been no attempts to apply such a statistical model to bronze sculpture. It may well be that the number of steps involved, the multiplicity of skills required, the potential involvement of multiple artisans, and the complexity of an artist’s intention are too varied for objective analyses.
2.7 Can electric tooling be distinguished from manual
tooling?
Marks from rotary electric tools will usually produce parallel curved lines if they are not removed by finer grits or filing (fig. 237).
3 Checklist: How do we investigate tool marks?
See table 5 Open viewer for a summary of available techniques. See tables 10, 13 Open viewer, and associated chapters in volume II for details of the techniques.
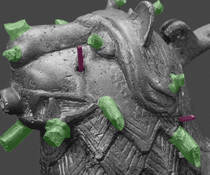
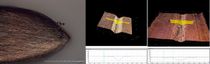
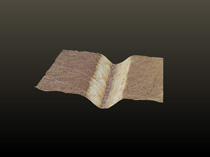
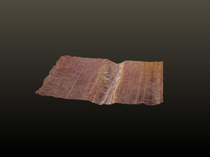
3.1 Visual examination and surface metrology
The dimensions of tool marks are mostly small, often requiring classical stereomicroscopy and digital microscopy for their examination and characterization (figs. 273, 279, see also II.4§2.2). If the surface of the sculpture has been painted or patinated, possibly multiple times, the original tool marks will be masked or obscured. The surfaces of archaeological sculptures may be obscured by layers of passive and/or active products, which can either hide tool marks or diminish their legibility. Details can also be softened by handling. Under certain circumstances, it may be appropriate to selectively clean a discreet area to determine the nature of the retained tool marks.
Specific light sources, including raking light and reflectance transformation imaging (fig. 241), can enhance the reading of the surface.
In addition to digital microscopy, an increasing number of approaches and techniques are being developed that enable measurement of precise profiles of tool marks. Such details can be derived either by noncontact methods such as interferometric microscopy and photogrammetry, or by contact methods such as profilometers. Some of the methods are limited to either horizontally oriented or planar surfaces.
Silicone rubber impressions have been utilized to record surface metrology in numerous instances.21 The technique may have the potential to record tool marks on sculpture. Analogous techniques used in other disciplines that could be applied to sculpture include technical studies of goldsmiths’ work, bones, and lithics as well as the forensic sciences generally.22
3.2 Nondestructive testing
Radiography, whatever the source (X-rays, gammas, neutrons), might help to detect tool marks not otherwise visible. Other nondestructive techniques (thermography, ultrasonic testing) used for surface inspection may be useful as well, although the authors do not know of any application to bronze sculpture to date.
3.3 Identification/measurement of mechanical stress on the
metal
Cold working induces stress on the metal, which alters its microstructure and thus also its hardness and other properties. The presence of stress can be identified and measured by a variety of methods, including hardness testing, metallography, and/or neutron or X-ray diffraction. Such measurements have been fruitfully applied to the study of hammer-hardened protohistoric bronze axes, and these experiments may serve as a potential model for sculptural bronzes.23 Be warned that later interventions and wear may also induce stress on a bronze surface, thus complicating the reliability and interpretation of such measurements.
Notes
-
See for example Theophilus. (ca. 1122) 1979. On Divers Arts: The Foremost Medieval Treatise on Painting, Glassmaking, and Metalwork. Translated by John G. Hawthorne and Cyril Stanley Smith. New York: Dover., 135, which describes the incising of the wax model. See also all the possible preparation of sockets for described in I.9§1.3. ↩︎
-
In traditional bell casting, the decoration is added to the wax model of the bell, or to the clay “false bell,” and is thereby translated into the inner surface of the cope or investment. However, it is common practice in England (and occasionally elsewhere) to create the decoration by punching the motifs into the interior surface of the loam cope (or outer mold) in reverse, so as to produce decoration on the exterior of the bell. See Motture, Peta. 2001. Bells and Mortars and Related Utensils: Catalogue of Italian Bronzes in the Victoria and Albert Museum. London: V&A Publishing., 28, 57n14. ↩︎
-
For an example inside a bell see Motture, Peta. 2001. Bells and Mortars and Related Utensils: Catalogue of Italian Bronzes in the Victoria and Albert Museum. London: V&A Publishing., 159, cat. 49, fig. a. ↩︎
-
For examples from the Italian Renaissance naming those who worked in different roles on a specific bronze, including fettling, see Heikamp, Detlef, and Beatrice Paolozzi Strozzi, eds. 2014. Baccio Bandinelli. Scultore e Maestro (1493–1560). Florence: Museo Nazionale del Bargello., 380–85, cat. 34 and cat. 35 (Volker Krahn) and Heikamp, Detlef, and Beatrice Paolozzi Strozzi, eds. 2014. Baccio Bandinelli. Scultore e Maestro (1493–1560). Florence: Museo Nazionale del Bargello., 300–301, cat. 15 (Dimitrios Zikos). ↩︎
-
This is at least the case in a number of modern art foundries, personal communication between Andrew Lacey and David Reid and the authors, 2018. ↩︎
-
Personal communication between Jean Dubos, former director of the Fonderie de Coubertin, and the authors, 2018. ↩︎
-
For example Giorgio Vasari (Vasari, Giorgio. (1550) 1960. Vasari on Technique; Being the Introduction to the Three Arts of Design, Architecture, Sculpture and Painting, Prefixed to the Lives of the Most Excellent Painters, Sculptors and Architects. Translated by Louisa S. Maclehose. New York: Dover., 166, sec. 69) wonders at the quality of figures that do not need any cold work after casting. ↩︎
-
For a medieval European description of the finishing of a cast censer, see for example Theophilus. (ca. 1122) 1979. On Divers Arts: The Foremost Medieval Treatise on Painting, Glassmaking, and Metalwork. Translated by John G. Hawthorne and Cyril Stanley Smith. New York: Dover., 138, also 86–98, 102, 149. See also Dandridge, Pete. 2006. “Exquisite Objects, Prodigious Technique. Aquamanilia, Vessels of the Middle Ages.” In Lions, Dragons, and Other Beasts: Aquamanilia of the Middle Ages, Vessels for Church and Table, edited by Peter Barnet and Pete Dandridge, 35–56. New Haven, CT: Yale University Press. for medieval aquamaniles. A variety of authors have described the chasing of European Renaissance bronzes. See for example Edilberto Formigli’s essay on Ghiberti’s Gates of Paradise in Florence (1425–52) (Formigli, Edilberto. 2007. “Ghiberti and the Art of Chasing.” In The Gates of Paradise: Lorenzo Ghiberti’s Renaissance Masterpiece, edited by Gary M. Radke, 118–33. Atlanta: High Museum of Art.). Modern European treatises on chasing are numerous; see for example Garnier, Jean. 1903. Nouveau manuel complet du ciseleur, contenant la description des procédés de l’art de ciseler et repousser les métaux ductiles. Paris: Encyclopédie-Roret; L. Mulo. http://gallica.bnf.fr/ark:/12148/bpt6k6576990q/f17.image.r=roret ciseleur#.; De Bois, Guy. 1999. La ciselure et ses techniques. Paris: H. Vial.. ↩︎
-
Untracht, Oppi. 1968. Metal Techniques for Craftsmen: A Basic Manual on the Methods of Forming and Decorating Metals. New York: Doubleday., 84–85, 111–13. For a more detailed version, see Untracht, Oppi. 1982. Jewelry: Concepts and Technology. London: Robert Hale.. See also McGrath, Jinks. 2005. The Jeweler’s Directory of Decorative Finishes: From Enameling and Engraving to Inlay and Granulation. London: KP Books.. ↩︎
-
See for example assembly marks on Andrea Riccio’s (Italian, 1470–1532) Paschal Candelabrum (1507–16) in the Basilica of Saint Anthony in Padua (Sturman, Shelley G., Simona Cristanetti, Debra Pincus, Karen Serres, and Dylan Smith. 2009. “‘Beautiful in Form and Execution’: The Design and Construction of Andrea Riccio’s Paschal Candlestick.” Burlington Magazine 151 (October): 666–72.). ↩︎
-
It is not the scope of this section (nor of I.1) to identify when the signature of an artist or founder might have been introduced into a mold or what relevance that might have in copyright issues, the dating of a cast relative to the life or death of the artist, et cetera. For a useful series of nineteenth-century signatures see Beale, Arthur. 1975. “A Technical View of Nineteenth-Century Sculpture.” In Metamorphoses in Nineteenth-Century Sculpture, 28–55. Cambridge, MA: Harvard University Press., 50–53, and also Berman Harold. 1974. Bronzes: Sculptors and Founders, 1800–1930. Chicago: Abage. for signatures and foundry marks. Founder’s marks can change over time, vary in style, and/or include numbers. ↩︎
-
Some pieces signed by an artist in the model, mold, or cast might provide a means of differentiating the marks on other, lesser-known examples. Similarly, there are sculptures where the working method is known that can be used for comparison. For instance, the sculptor Chaim Jacob Lipschitz, known as Jacques Lipchitz (Lithuanian French American, 1891–1973), used to mark the wax model with his thumb just before casting in order to distinguish each edition and to prove he personally oversaw the casting (Wilkinson, Alan G. 2000. The Sculptures of Jacques Lipchitz. London: Thames and Hudson.). ↩︎
-
To the authors’ knowledge, existing studies focus on how wear can indicate the function of utilitarian objects, but none have focused on sculpture (Dolfini, Andrea, and Rachel J. Crellin. 2016. “Metalwork Wear Analysis: The Loss of Innocence.” Journal of Archaeological Science 66 (February): 78–87.). ↩︎
-
See for example the damnatio memoriae: the names of prominent figures in ancient Egypt and Rome were often erased from their bronze portraits when the individuals represented fell from favor. ↩︎
-
For a study focused on distinguishing cold worked from as-cast surfaces see Van Langh, Robert. 2012. “Technical Studies of Renaissance Bronzes: The Use of Neutron Imaging and Time-of-Flight Neutron Diffraction in the Studies of the Manufacture and Determination of Historical Copper and Alloys.” PhD diss., Delft University of Technology. http://resolver.tudelft.nl/uuid:3898ae1c-7934-4d85-a0db-628760739b50., 65–74. ↩︎
-
See Formigli, Edilberto. 2007. “Ghiberti and the Art of Chasing.” In The Gates of Paradise: Lorenzo Ghiberti’s Renaissance Masterpiece, edited by Gary M. Radke, 118–33. Atlanta: High Museum of Art.. ↩︎
-
The dimensions of clearly similar punch marks on the neck of the Medusa head of Benvenuto Cellini’s (Italian, 1500–1571) Perseus with the Head of Medusa, now in the Loggia de’ Lanzi, Piazza della Signoria, Florence, and the forehead of his bust of Bindo Altoviti (see fig. 242) have been shown to match with the use of a caliper. The punch was probably a square rod filed in a crosshatch pattern of two-by-two grooves. The nine-points pattern was used in two slightly different ways: keeping the tool parallel and running along an ideal line on the Perseus to create a defined texture, and more freely on Bindo’s forehead to obtain a more confused texture imitative of skin. Personal communication between Lorenzo Morigi and the authors, 2018. ↩︎
-
In 2002, 2004, and 2006, CAST:ING member Barbara Plankensteiner witnessed a division of tasks in contemporary brass casting workshops in Benin City, Nigeria, and Foumban, Cameroon, where several individuals might be involved in the process. While one single individual creates the wax model—and thus may be identified through marks made in wax—several others might work on the casting, potentially erasing part or all of the model designer’s marks in the wax. Such distribution of workload and/or collaboration is a historically common practice in the production of bronze (notably large-scale) sculpture. For instances in the Italian Renaissance, see, for example, Avery, Victoria. Vulcan’s Forge in Venus’ City: The Story of Bronze in Venice 1350–1650. Oxford: Oxford University Press, 2011., ch. IX; Motture, Peta. 2019. The Culture of Bronze: Making and Meaning in Italian Renaissance Sculpture. London: V&A Publishing., ch. 4. ↩︎
-
Among the numerous examples in the Renaissance is Vasari’s claim that Donatello (Italian, ca. 1386–1466) passed his “equipment, designs and models” for reliefs in the Basilica of Saint Anthony in Padua to his follower Bartolomeo Bellano (Italian, 1437–1496) (Vasari, Giorgio. (1550) 1996. Lives of the Most Eminent Painters, Sculptors and Architects. Translated by Gaston du C. de Vere. New York: Everyman’s Library., 1:433). Giambologna’s (Flemish, active Florence, 1529–1608) workshop and models were passed on to his successors (Zikos, Dimitrios, ed. 2012. Marks of Identity: New Perspectives on Sixteenth-Century Italian Sculpture. Boston: Isabella Stewart Gardner Museum., 389), with a 1687 inventory citing Giambologna and Pietro Tacca’s (Italian, 1577–1640) models inherited by Giovanni Battista Foggini (Italian, 1652–1725) (Lankheit, Klaus. 1962. Florentinische Barockplastik. Die Kunst am Hofe der letzten Medici, 1670–1743. Italienische Forschungen, III, No. 2. Munich: Bruckmann., 269, doc. 258). ↩︎
-
See Rivero, Olivia. 2016. “Master and Apprentice: Evidence for Learning in Palaeolithic Portable Art.” Journal of Archaeological Science 75:89–100. for a study of 280 engraved pieces of Cantabrian and Pyrenean Middle Magdalenian portable art. Marks considered accidents or errors in the tracing were counted negatively, and those that reflected control of a tool were counted positively. ↩︎
-
See Larsen, E. B. 1987. “SEM-Identification and Documentation of Tool Marks and Surface Textures on the Gundestrup Cauldron.” In Recent Advances in the Conservation and Analysis of Artifacts, edited by James Black, 393–409. London: Summer Schools Press.; Gwinnett, John, and Leonard Gorelick. 1998. “A Brief History of Drills and Drilling.” Beads: Journal of the Society of Bead Researchers 10:49–56.; Li, Xiuzhen Janice, Marcos Martinón-Torres, Nigel D. Meeks, Yin Xia, and Kun Zhao. 2011. “Inscriptions, Filing, Grinding and Polishing Marks on the Bronze Weapons from the Qin Terracotta Army in China.” Journal of Archaeological Science 38 (3): 492–501.; Li, Xiuzhen Janice, Marcos Martinón-Torres, Nigel Meeks, and Yin Xia. 2012. “Scanning Electron Microscopy Imaging of Tool Marks on Qin Bronze Weapons Using Silicone Rubber Impressions.” In Historical Technology, Materials and Conservation: SEM and Microanalysis, edited by Nigel Meeks, Caroline Cartwright, Andrew Meek, and Aude Mongiatti, 62–68. London: Archetype and the British Museum.. ↩︎
-
Burd, David Q., and Roger S. Greene. 1948. “Tool Mark Comparisons in Criminal Investigations.” Journal of Criminal Law and Criminology 39 (3): 379–91.; Baldwin, David, John Birkett, Owen Facey, and Gilleon Rabey. 2013. The Forensic Examination and Interpretation of Tool Marks. Chichester, West Sussex: Wiley-Blackwell.. ↩︎
-
Artioli, G., M. Dugnani, T. Hansen, L. Lutterotti, A. Pedrotti, and G. Sperl. 2003. “Crystallographic Texture Analysis of the Iceman and Coeval Copper Axes by Non-Invasive Neutron Powder Diffraction.” In La mummia dell’età del rame. 2. Nuove ricerche sull’uomo venuto dal ghiaccio, edited by A. Fleckinger, 9–22. Bolzano, Italy: Folio Verlag.. ↩︎