Chicago
Barbosa, Carlota, Leonora Burton, Kristin Rattke, Kate Seymour,
Eva Tammekivi, and Jos van Och. “53. Relining
The Menagerie van Prince Willem V.” In
Conserving Canvas, by
Cynthia Schwarz, Ian McClure, and Jim Coddington. Los Angeles:
Getty Conservation Institute, 2023.
https://www.getty.edu/publications/conserving-canvas/viii-posters/53/.
MLA
Barbosa, Carlota, et al. “53. Relining
The Menagerie van Prince Willem V.”
Conserving Canvas, by
Cynthia Schwarz et al., Getty Conservation Institute, 2023,
https://www.getty.edu/publications/conserving-canvas/viii-posters/53/.
Accessed DD Mon. YYYY.
Carlota Barbosa,
Paintings Conservator and Freelance Paintings
Conservator,
Portugal
Leonora Burton,
Paintings Conservator and Freelance Paintings
Conservator,
United Kingdom
Kristin Rattke,
Paintings Conservator and Freelance Paintings
Conservator,
Germany
Kate Seymour,
Head of Education,
SRAL, Maastricht, the Netherlands
Eva Tammekivi,
Paintings Conservator and Freelance Paintings
Conservator,
Estonia
Jos van Och,
Senior Conservator (retired),
SRAL, Maastricht, the Netherlands
The treatment of five large-scale paintings by Dutch artist
Aart Schouman (1710–1792) from the series The Menagerie van
Prince Willem V is discussed. The paintings are part of the
collection of Palace Huis ten Bosch, The Hague. They were
rediscovered in the 1970s and subsequently wax-resin lined.
Display environments over forty years caused structural
deformations to develop. The current treatment consisted of
the removal of this wax-resin lining, tear mending, and the
application of an innovative cold-lining support with an
integrated glass-fiber interleaf.
The Menagerie van Prince Willem V series consists of five
large-scale paintings by Dutch artist Aart Schouman
(1710–1792) (fig. 53.1). Prince Willem
V van Oranje-Nassau (1748–1806) commissioned the series for
his private chambers in the Stadhouderlijk Kwartier, The
Hague. The continuous landscapes depict Prince Willem’s
private collection of exotic animals. Transferred to Palace
Huis ten Bosch at an unknown date, they languished, rolled up
and folded in the attic until their rediscovery in 1975.1
That same year, the paintings were restored by Nico van
Bohemen Sr. and team, then installed in the palace.
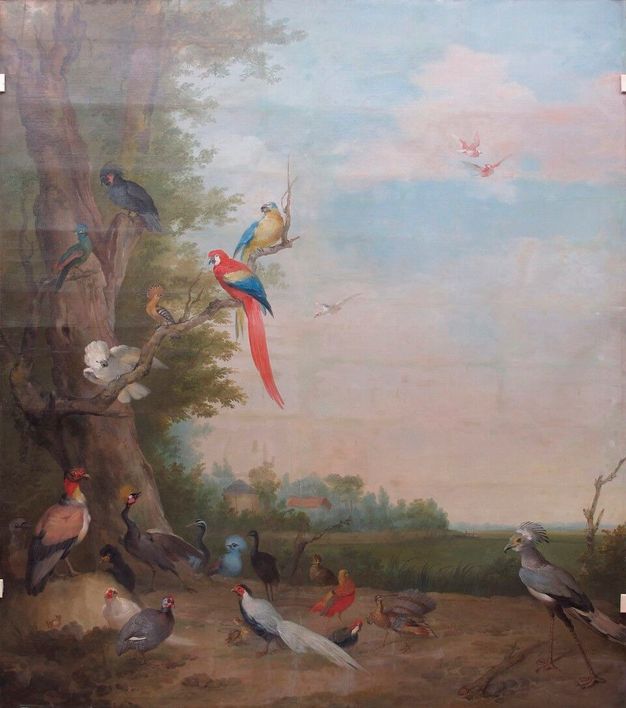
ExpandFigure 53.1Aart Schouman (Dutch, 1710–1792), Birds I, in
the Menagerie van Prince Willem V series, 1786. Oil on
canvas, 312 × 260.5 cm (122 5/6 × 102 1/2 in.). Collection
of the Royal House of the Netherlands. Picture taken
before treatment.Image: SRAL
Unfortunately, little documentation of the 1975 treatment
remains, but luckily one of the restorers, Nico van Bohemen
Jr., was available to be interviewed as part of the current
project and was happy to answer our questions.2
He had treated the paintings under the supervision of his
father, Nico van Bohemen Sr., who was a successful self-taught
restorer in The Hague. Van Bohemen Jr. recalled that the
Schouman paintings were wax-resin lined using a mixture of
raw, yellow beeswax and powdered resin and were lined on a
vacuum hot table facedown on top of a sheet of Melinex.
As the paintings were larger than the table, they had to be
lined in sections. The middle section was ironed by hand. The
wax-resin adhesive was warmed and brushed onto the reverse of
the original canvas and onto the lining canvas.3
The content of the wax-resin adhesive was confirmed.
Fourier-transform infrared spectroscopy–attenuated total
reflectance (FTIR-ATR) analysis carried out in 2015 by Ana
Pereira indicated the presence of beeswax and natural resins,
most likely elemi and colophony.
2015–16 Treatment
By 2015, planar distortions in the supports and the
degradation of the restoration materials applied in the 1970s
dictated that retreatment was required. The structural
stability and aesthetic appearance of the paintings had been
greatly impacted. Two types of planar deformation were
present: bulges caused by the weight of the lining and creep
due to the temperature sensitive adhesive, as well as slight
lifting along the fold lines, caused by insufficient adhesion.
That same year, the Palace Huis ten Bosch underwent extensive
renovation and Schouman’s paintings were sent to Stichting
Restauratie Atelier Limburg (SRAL) for treatment. Considering
the paintings’ size and their display in a historic building
without environmental controls, the decision to reline was
crucial to improve stability and flexibility and to prevent
long-term deformations from recurring. Recent research shows
that wax-resin lined paintings are heat and moisture sensitive
(Andersen et al. 2014Andersen, Cecil Krarup, Marion Mecklenburg, Mikkel
Scharff, and Jørgen Wadum. 2014. “With the Best
Intentions: Changed Response to Relative Humidity in
Wax-Resin Lined Early 19th-Century Canvas Paintings.” In
ICOM 17th Triennial Conference Preprints: Melbourne,
Australia, 17–19 September 2014, edited by Janet Bridgland. Paris: ICOM Committee for
Conservation.). A cold-lining system practiced at SRAL using an acrylic
dispersion was chosen, as it would avoid the use of heat,
moisture, and excessive pressure during lining.4
This system also allowed the needs of each individual painting
within the series to be accommodated.5
The acrylic dispersion lining adhesive was rolled rather than
sprayed onto the lining support. This also facilitated the use
of a glass-fiber interleaf material, which added stiffness to
the lining system while minimizing the addition of weight.
This lining system is approximately 570 g lighter per square
meter than the 1975 wax-resin lining. In addition, a weaker
application of adhesive was used between the glass-fiber
interleaf and the original canvas—compared to that between the
interleaf and lining fabric—to facilitate future
reversibility, if necessary.6
Lining Adhesive
The lining adhesive consisted of 70% Dispersion K 360 (pH
neutralized with ammonium hydroxide) and 30% Plextol D540,
thickened with Rohagit SD 15, all v/v. Plextol acrylic
dispersion products have been used for lining since the 1970s,
and extensive research has established their aging properties
(Down et al. 1996Down, J. L., M. A. MacDonald, J. Tétreault, and R. S.
Williams. 1996. “Adhesive Testing at the Canadian
Conservation Institute: An Evaluation of Selected
Poly(Vinyl Acetate) and Acrylic Adhesives.”
Studies in Conservation 41, no. 1: 19–44.;
Witte, Florquin, and Goessens-Landrie 1984Witte, E. de, S. Florquin, and M. Goessens-Landrie. 1984.
“Influence of the Modification of Dispersions on Film
Properties.” Studies in Conservation 29, supp1:
32–35.;
Mehra 1984Mehra, V. R. 1984. “Cold Lining and Its Scope: Some Case
Histories.” In
ICOM-CC: 7th Triennial Meeting, 10–14 September
1984, edited by D. Froment. Copenhagen: ICOM.). However, these products are subject to market influences;
thus, since the product formulations and availability have
changed, the reported results may no longer be valid for
products mentioned in this essay.7
Dispersion K360 is too soft, sticky, and flexible to make a
satisfying lining adhesive alone. Combining it with Plextol
D540, which has a higher molecular weight and an accordingly
higher glass transition (Tg) temperature, achieves the desired
stiffness of the lining adhesive. The ratio of the two acrylic
dispersions is 70:30 (v:v). Adding an emulsifier, Rohagit
SD 15 (also a polymethacrylic acid), increased the viscosity
of the mixture, thus improving application properties and
preventing impregnation of the lining adhesive into the
original canvas and the lining fabric during the reactivation
process. The pH of the adhesive mixture was raised to 7 using
ammonium hydroxide (NH4OH).
Interleaf Fabric
Glass-fiber fabric was selected for its high tensile strength,
dimensional stability, low moisture absorption, and high
resistance to solvents and chemicals, all of which contribute
to its great durability (A. Boissonnas 1961Boissonnas, Alain. 1961. “Relining with Glass-Fiber
Fabric.” Studies in Conservation 6, no. 1:
26–30.). It is also lightweight and provides extra strength without
introducing additional tension, weight, or thickness to the
new lining system (P. Boissonnas 2003Boissonnas, Pierre. 2003. “Comparisons of Dimensional
Stability between Woven Glass Fibre Fabric and
Conventional Linen Canvas as Lining Supports for
Paintings.” In
Lining Paintings: Papers from the Greenwich Conference
on Comparative Lining Techniques, edited by Caroline Villers, 32–34. London:
Archetype.). Glass-fiber fabrics use bundles of monofilament glass
threads to create the weave. This woven textile does not have
a nap, and a nap cannot be created without disrupting the
weave draft. The lining-adhesive mixture, therefore, is best
applied by rolling it onto the stretched fabric. This produces
an even, textured surface, promoting adhesion. The moisture
content is then allowed to evaporate. The dried adhesive
produces a soft and elastic film, which encases the interleaf
material and is stiff enough to prevent creep formation (Seymour and van Och 2005, 99Seymour, Kate, and Jos van Och. 2005. “A Cold-Lining
Technique for Large-Scale Paintings.” In
Big Pictures: Problems and Solutions for Treating
Outsize Paintings, edited by Sally Woodcock, 96–104. London:
Archetype.). This fabric is available in widths of up to 90 cm; bands
of the prepared material were used.
Lining Fabric
A spun-yarn polyester fabric was considered a good lining
fabric due to its availability in a wide loom width, its low
crease potential, dimensional stability, and high
abrasion-resistance properties (Young and Jardine 2012, 251Young, Christina, and Suzanne Jardine. 2012. “Fabrics for
the Twenty-First Century: As Artist Canvas and for the
Structural Reinforcement of Easel Paintings on Canvas.”
Studies in Conservation 57, no. 4: 237–53.). Trevira CS was selected due to its built-in flame
resistance. The Trevira CS fabric has a modified polyester
molecule, which means it is permanently flame retardant, which
is an important feature considering the paintings’
unconditioned, historic-home environment.8
To ensure sufficient bonding with the impregnated glass-fiber
interleaf, a solution of 20% Plextol D540 and 20% Dispersion
K360, diluted with 60% distilled water, was brushed onto the
stretched fabric.
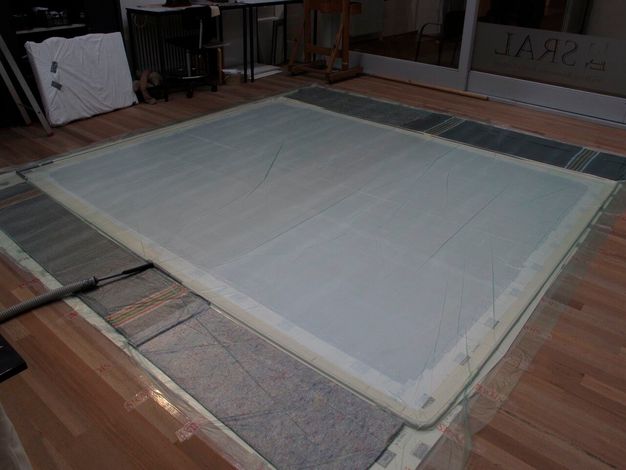
Lining Table
A stiff, solid support was desired during the lining process
to assist in mitigating the planar distortions present in
original support. As a conventional low-pressure table would
have been too small, a makeshift adaptive lining table was
constructed (fig. 53.2). The lining
table described is an adaptation of the low-pressure envelope
used in the mist-lining process (see
Seymour, Strombek, and Van Och
in this volume). Vinyl flooring was laid on the wooden floor,
creating a firm, smooth surface with sufficient cushioning for
any painted impasto areas. This was covered with a thick HDPE
plastic sheet. This sheet extended beyond the vinyl and was
stretched and secured taut to the floor with tape to prevent
movement during lining. This sheet was punctured with holes to
ensure that the painting, placed facedown, and lining canvas
conform to the vinyl substrate during lining. This provided
the required resistance during lining to apply pressure to
high points, such as the raised edges of the folds of the
original canvas. This plastic sheet provides the lower side of
the lining table. A piece of open-weave cotton cheesecloth was
placed over this plastic sheet to increase airflow within the
lining envelope.
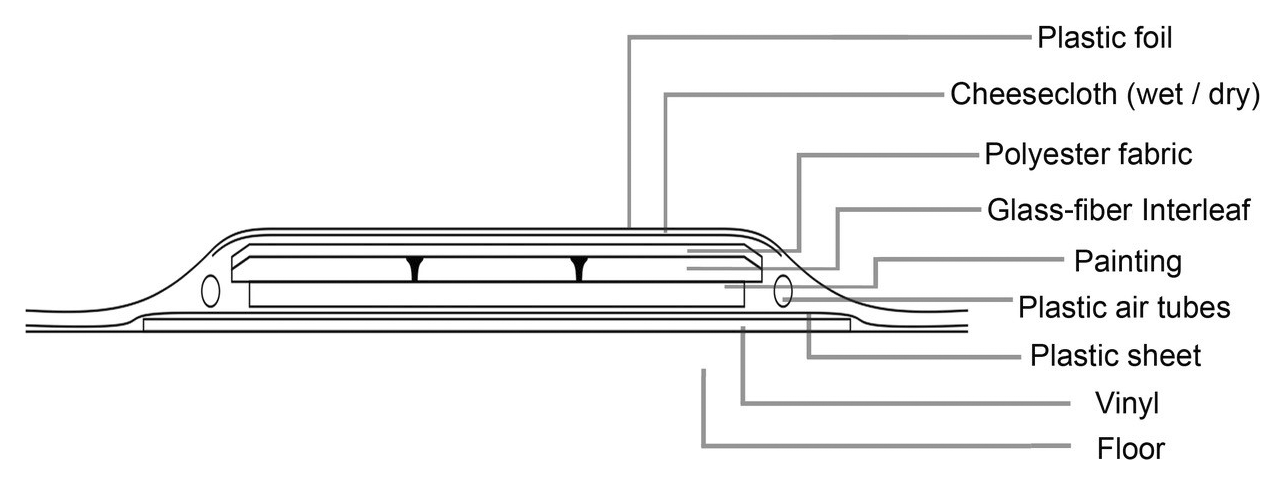
ExpandFigure 53.2Cross-section of the construction of the lining system
used for Birds I, Birds II,
Mammals, and Deer.Image: Leonora Burton
Lengths of plastic PVC tubing were connected together using
90-degree elbows to create a peripheral ring slightly smaller
than the plastic sheeting described above. A T-splitter was
included on one side, which connected to a motor (a vacuum
cleaner). Small holes were drilled into the inner side of the
pipes to facilitate air extraction from within the lining
envelope. The pipes were shrouded with an open-weave fabric
(cheesecloth) to prevent the upper plastic from closing off
these holes. The lining envelope was completed using a single
piece of (green) lightweight polyethylene plastic, which was
placed on top, sealing the system. A motor controlled with an
inverter9
was used to draw air through the tubing, maintaining an even,
low air pressure. The holes punched into the lower plastic
sheet ensured that the upper, more flexible lightweight HDPE
plastic conformed to the surface topography of the vinyl and
the material within the envelope.
Relining
To begin the relining, the lightweight HDPE plastic sheeet
throughout was rolled back; the painting was placed facedown
on the lining table; the stretcher, old lining fabric, and
adhesive were removed; and holes and tears in the canvas were
secured. The tears were mainly butt-joined using Beva 371 film
as the adhesive. Bridging glass-fiber strips were applied over
the tear for additional support and adhered using Beva 371.
Bands of glass-fiber interleaf were laid onto the painting’s
reverse, slightly overlapping one another (fig. 53.3). The lining fabric was then rolled out on top of the
interleaf, and the lightweight HDPE plastic sheet was
repositioned (fig. 53.4). Before
relining proceeded, a dry run ensured that the air would be
evacuated quickly and evenly, and any irregularity in the
structure was evaluated using raking light.
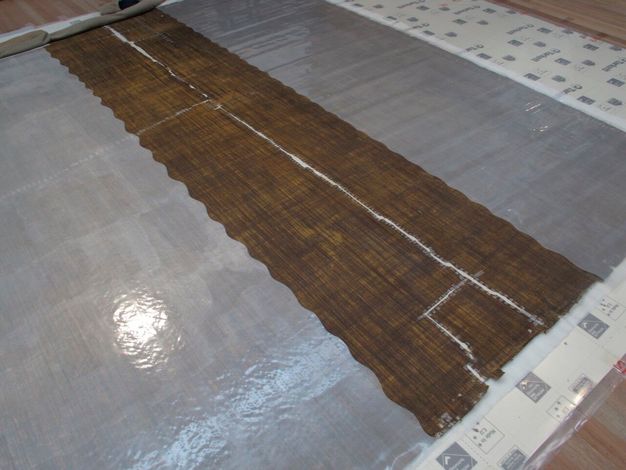
ExpandFigure 53.3Placing strips of glass-fiber fabric interleaf on the
reverse of the painting. The overlapping edges were cut
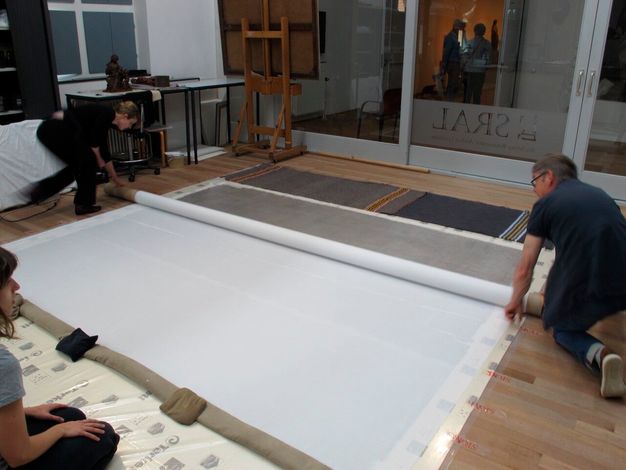
wavy to avoid straight lines.Image: SRALExpandFigure 53.4Placing the lining fabric on top of the glass-fiber
fabric interleaf.Image: SRAL
The activation of the adhesive bonding the lining canvas to
the interleaf and the interleaf to the original support was
done in situ. The dry adhesive was reactivated using solvent
vapors: xylene and ethanol (30:70). Cheesecloth was chosen as
a carrier for the vapors due to its ability to absorb polar
solvents easily. The solvent delivery cloth measured slightly
larger than the surface area of the applied adhesive. The
cloth was rolled into a tight bundle and wrapped with cling
film (Saran wrap). A precalculated amount of solvent was then
injected (75–80 ml per m2), and the roll was
clamped for several hours to guarantee an even distribution of
the solvents within the roll. At that point, the roll was
unwrapped and placed quickly (to reduce evaporation loss) on
top of the prepositioned, lining canvas. A string was attached
to each corner of the solvent delivery cloth before the cloth
was folded, rolled, and wrapped to help speed distribution
over the reverse.
To ensure the tightest possible contact between lining fabric
and cheesecloth, the lightweight HDPE plastic sheet was
repositioned and the motor activated (50 mbar). After
approximately twenty minutes, the motor was deactivated and
the cheesecloth replaced with a heavy woolen fabric to absorb
any excess solvent vapors present within the envelope, thus
accelerating the bonding process. The package was then
re-covered with the lightweight HDPE plastic sheet, and the
motor was reactivated (110 mbar) (fig. 53.5). After about two hours, the motor was switched off and the
upper lightweight HDPE plastic sheet was removed to allow the
remaining solvent vapors to evaporate.10
The treatment was designed to be both lasting and reversible.
Relining with an acrylic adhesive mixture and glass-fiber
interleaf provided a lighter, more rigid alternative to
traditional lining systems and excluded the use of heat,
moisture, or excess pressure. Developing this kind of
treatment was possible by building on the experience of other
large-scale lining projects undertaken at SRAL and can be used
as a paradigm for the treatment of similar paintings (Schlotter 2009Schlotter, A. 2009. “Het plafondstuk op doek uit de Grote
Zaal van Huys Amerongen & Onderzoek naar het bedoeken
van een plafondstuk.” SRAL archives, unpublished treatment
report.).
Acknowledgments
The complex lining system described in this text was developed
by author Jos van Och. It is an adaptation of the mist-lining
system. The cold-lining system using acrylic dispersions and a
glass-fiber interleaf was first used for a large-scale ceiling
painting from Huys Amerongen, Utrecht, in 2009, and further
evolved for this particular series of paintings. The unique
approach to solving structural problems presented by
wax-resin-lined legacy paintings is the outcome of van Och’s
thirty-year expertise in treating canvas paintings. This
experience was shared by the co-authors who were fellows at
SRAL for the duration of this project. The mist-lining system
is sill practiced today, though van Och is retired, and is
discussed elsewhere in this publication (see particularly
“Demystifying Mist-Lining,” paper 9).
The authors thank Ana Pereira for the FTIR-ATR analysis, Ilona
Jaaranen and Bascha Stabik for helping with practical work,
and Nico van Bohemen Jr. for the interview.
Notes
This is probably the only set of Schouman’s wall
hangings still remaining in the Netherlands (Bol 1991, 9Bol, L. J. 1991.
Aart Schouman: Ingenious Painter and
Draughtsman. Doornspijk: Davaco.). ↩︎
Interview with Nico van Bohemen Jr., November 28, 2015,
Stichting Restauratie Atelier Limburg (SRAL) archives,
unpublished audio file. For transcription, see
Barbosa et al. 2015Barbosa, C., L. Burton, K. Rattke, and E.
Tammekivi. 2015. “Conservation and Restoration
Treatment of Five Paintings by Aart Schouman
(1710–1792): The Menagerie van Prins Willem V.” SRAL
archives, unpublished treatment report.. ↩︎
For treatment steps other than the lining interventions,
see
Barbosa et al. 2015Barbosa, C., L. Burton, K. Rattke, and E.
Tammekivi. 2015. “Conservation and Restoration
Treatment of Five Paintings by Aart Schouman
(1710–1792): The Menagerie van Prins Willem V.” SRAL
archives, unpublished treatment report.. ↩︎
The cold-lining practiced was developed under Jos van
Och’s expertise and is inspired by the mist-lining
system. The mist-lining system is reported elsewhere in
this volume; see Seymour, Strombek, and van Och.
↩︎
For a detailed description, see
Seymour and van Och 2005Seymour, Kate, and Jos van Och. 2005. “A
Cold-Lining Technique for Large-Scale Paintings.” In
Big Pictures: Problems and Solutions for Treating
Outsize Paintings, edited by Sally Woodcock, 96–104. London:
Archetype.. ↩︎
For treatment steps other than lining, see
Barbosa et al. 2015Barbosa, C., L. Burton, K. Rattke, and E.
Tammekivi. 2015. “Conservation and Restoration
Treatment of Five Paintings by Aart Schouman
(1710–1792): The Menagerie van Prins Willem V.” SRAL
archives, unpublished treatment report.. ↩︎
For example, Plextol D360 is no longer available; it has
been replaced by Dispersion K360. Plextol D540 was
discontinued after this project was completed.
↩︎
Fuji FVR 022 K7S-7EX electric inverter. This instrument
allowed the team to measure the pressure within the
lining envelope.
↩︎
Three paintings (Birds I, Birds II, and
Mammals) were lined with the technique
described. The remaining two (Rodents and
Deer) are much smaller, so the lining technique
was adapted accordingly. The materials used were the
same. For a detailed description, see
Barbosa et al. 2015Barbosa, C., L. Burton, K. Rattke, and E.
Tammekivi. 2015. “Conservation and Restoration
Treatment of Five Paintings by Aart Schouman
(1710–1792): The Menagerie van Prins Willem V.” SRAL
archives, unpublished treatment report.. ↩︎
Figure 53.1Aart Schouman (Dutch, 1710–1792), Birds I, in the
Menagerie van Prince Willem V series, 1786. Oil on canvas, 312
× 260.5 cm (122 5/6 × 102 1/2 in.). Collection of the Royal
House of the Netherlands. Picture taken before treatment.
Image: SRAL
Figure 53.2Cross-section of the construction of the lining system used
for Birds I, Birds II, Mammals, and
Deer. Image: Leonora Burton
Figure 53.3Placing strips of glass-fiber fabric interleaf on the reverse
of the painting. The overlapping edges were cut wavy to avoid
straight lines. Image: SRAL
Figure 53.4Placing the lining fabric on top of the glass-fiber fabric
interleaf. Image: SRAL