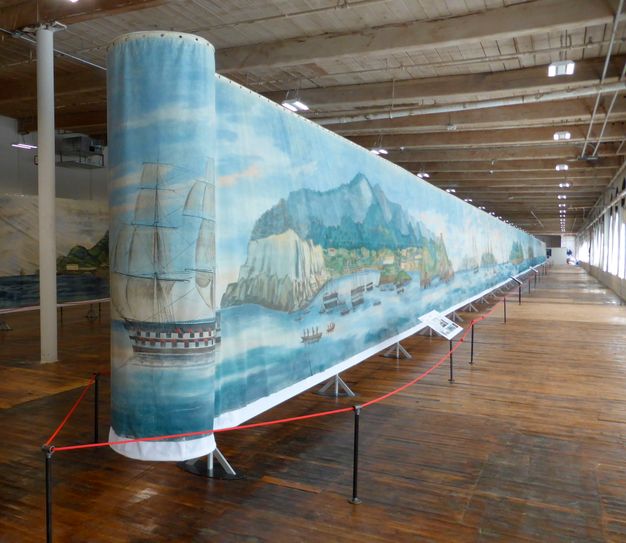
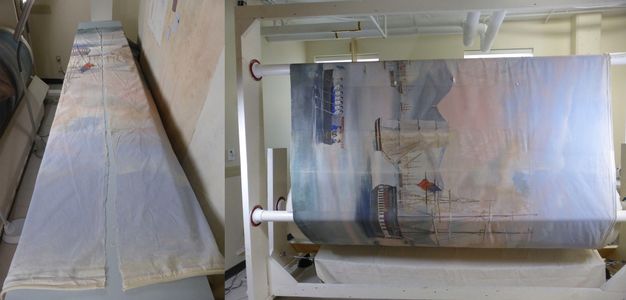
The Grand Panorama of a Whaling Voyage ’Round the World is an 8 1/2 × 1,300 foot painting worked in distemper on cotton muslin that is owned by the New Bedford Whaling Museum. The primary objective of this conservation project was to stabilize the panorama to enable its safe handling and storage and static vertical display. The conservators developed protocols for physically supportive, minimally intrusive, and visually nondisruptive stabilization treatments; a means of documenting the conservation work; and a storage system for the conserved panorama. Treatment included removal of adhered Mylar, retention of select previous repairs, ordering of previously disrupted panels, local stabilization utilizing custom-dyed underlays, and when needed, bobbinet overlays.
23. Conserving the History and Fabric of the New Bedford Whaling Museum’s Grand Panorama of a Whaling Voyage ’Round the World
- Kathryn S. Tarleton, Principal, ConText Inc., Rochester, Massachusetts
- Charlotte Hamlin, Principal, ConText Inc., Rochester, Massachusetts
Introduction
The Grand Panorama of a Whaling Voyage ’Round the World is an 8 1/2 × 1,300 foot painting worked in distemper on cotton muslin (fig. 23.1). Completed in 1848, it was painted by Benjamin Russell and Caleb Pierce Purrington and begins in the busy harbor of New Bedford, Massachusetts, taking the viewer on a world tour highlighting the adventures and terrors of the nineteenth-century world of whaling. Designed to be a moving panorama mounted on upright spools and attached to a structure that allowed it to be scrolled across a stage, it traveled the country and entertained audiences from the 1840s through the latter decades of the nineteenth century. In 1918, it was donated to the New Bedford Whaling Museum (NBWM), in New Bedford, Massachusetts, where various sections of it were temporarily exhibited throughout the twentieth century.
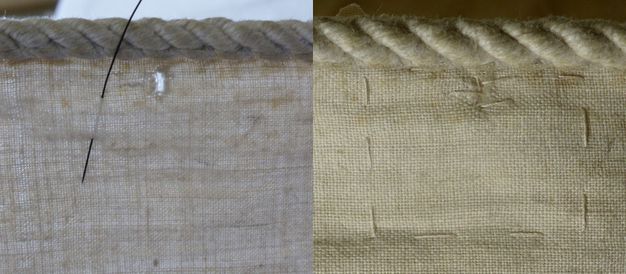
Divided into four separate rolls, it is constructed from two lengths of muslin whipstitched together by hand along their selvages, creating a central horizontal seam that runs the length of the painting. The painting on each roll has an approximately 5-foot-long section of unpainted cotton at its beginning and end. A 3/16-inch-diameter cotton bolt rope is whipstitched along the upper edge.
The primary objective of this conservation project was to stabilize the panorama to enable safe handling and storage and static vertical display of the object. ConText Inc. was responsible for treating all the textile condition issues present on the painting. This paper details the many challenges of treating the massive painting and how the scale and format of the object factored into the treatment decisions made throughout the project. The approach to developing treatment protocols for the range of known condition issues present on the painting is described, as well as how previously unknown condition issues uncovered during the stabilization process were managed. The treatment discussion includes decisions regarding the retention of historical repairs, the reversal of prior stabilization and mounting treatments, and the rejoining of previously separated sections.
Condition Prior to Treatment
In 2001, the NBWM conducted a condition survey of the panorama, the first such survey of the object ever undertaken. Each roll was examined on a flat surface by a group of trained volunteers who filled out condition checklists for each 10-foot section of panorama. In all, twenty-six types of condition issues were recorded; the detailed written documentation and accompanying photographs are housed in four binders at the museum.
The entire painted surface of the panorama was documented as unstable; according to the survey findings, the paint was powdering and flaking. Throughout, the cloth was wrinkled or creased to varying degrees, distorting the painted imagery and promoting the flaking of the painted surface. Although the cotton panorama fabric was reported to be in stable condition overall, numerous examples of textile damage were noted across the four rolls, including stains, holes, tears, seam breaks, full vertical cuts, unpicked seams, and prior mends and patches. Possible mold damage was also noted. At the time of the condition survey, the panorama was in thirteen separate pieces, some of which were out of sequence. Of these thirteen pieces, two 8 1/2 by approximately 50-foot sections were adhered to a heavyweight Mylar backing with an unknown adhesive.
Treatment Protocols
In 2012, the NBWM convened a team of experts to study the best museum and conservation practices in order to develop a protocol for preserving the panorama. The group visited institutions and interviewed professionals who had previous experience with similar objects. The National Endowment for the Humanities–funded project resulted in the 2013 NBWM Panorama Advisory Group Report, “Preserving an American Treasure: A Proposed Treatment Protocol for Purrington & Russell’s Original Panorama Painting of a Whaling Voyage ’Round the World, 1848–1851.”
The report’s treatment protocol for reducing the wrinkles in the panorama’s fabric and consolidating the painted surface was adopted for this project. The recommended treatment encompassed spraying the painted cloth with a gelatin-based consolidant, which was found to simultaneously reduce the extensive wrinkling and stabilize the flaking paint. The treatment also had the advantage of posing fewer ventilation concerns than the use of an acrylic consolidant such as Paraloid B72.
No specific textile stabilization treatment protocols were recommended in the 2013 report. ConText Inc. developed a series of protocols to ensure the use of uniform treatment methods for the many different types of textile condition issues known to be present on the panorama (broken stitching, holes/loss, tears, vertical cuts, etc.). The focus of protocol development was to design physically supportive, minimally intrusive, and visually nondisruptive treatment methods.
A number of “damaged” textile samples were fabricated from medium-weight cotton muslin of similar weight and thread count as the panorama fabric. Each sample represented a different documented condition issue found on the panorama (holes, tears, etc.). These samples were stabilized with both stitched and adhesive treatments, using a variety of fabric and thread types. The stabilized samples were then evaluated based on strength, appearance, and suitability to the project.
The chosen treatment methods included the use of custom-dyed cotton fabric underlays stitched in place using sheer polyester thread in the painted portion of the panorama and cotton-polyester thread in the blank and rope-edge areas of the panorama. Custom-dyed bobbinet was chosen as an overlay fabric for areas of extreme fabric weakness or deterioration. Although tested, no adhesive treatments were chosen for inclusion in the project.
A localized approach to stabilization was taken, treating individual condition issues as needed. Lining the panorama as a means of stabilization and support was not considered necessary, nor was it recommended. Lining the panorama would have essentially doubled the weight of the monumental object, concealing details on the object’s reverse and adding to the complexity of rolled storage. The panorama is not a truly flat textile: the fabric tension varies from the upper rope edge to the middle horizontal seam to the selvage lower edge, so imposing a flat lining on the object could lead to planar distortion of the panorama fabric.
Documentation
A streamlined documentation system was designed to ensure consistent treatment reporting throughout the stabilization project. First, a standard list of condition and treatment terms was compiled; these terms were amended over the course of the project to include all condition issues encountered and treatments utilized. Worksheets were designed for documenting treatment on each 10-foot section of panorama; this system was based on the 2001 condition reporting project worksheet so that data from both projects could be easily compared. These worksheets were organized in four binders, one for each roll of panorama. Additional treatment notes and photos were added to the binders as necessary.
Although each treated area was described, noted, and mapped on the worksheets, not every treated area was photodocumented. By not photographing every single treatment (many of which were repeated numerous times within each 10-foot section), the documentation process was streamlined. Instead, a representative sampling of all condition and treatment types was digitally documented throughout the project. Lastly, a treatment checklist for each 10-foot section of panorama was developed to ensure all treatment practice was standardized throughout the project.
Work Location and Support Apparatus
The panorama was stabilized on-site at the NBWM. This arrangement allowed the conservators access to key museum staff throughout the duration of the project and minimized transport and handling of the rolled panorama sections.
Following recommendations in the 2013 NBWM Panorama Advisory Group Report, a custom-built table was constructed for consolidating the panorama’s painted surface. The smooth, horizontal table surface was equipped with hardware at each side to hold the large storage drums on which the panorama was rolled. A roll of untreated panorama was mounted to one side of the table, unrolled and scrolled across the horizontal surface for consolidation spraying, and then rolled onto an uptake drum at the opposite side of the table.
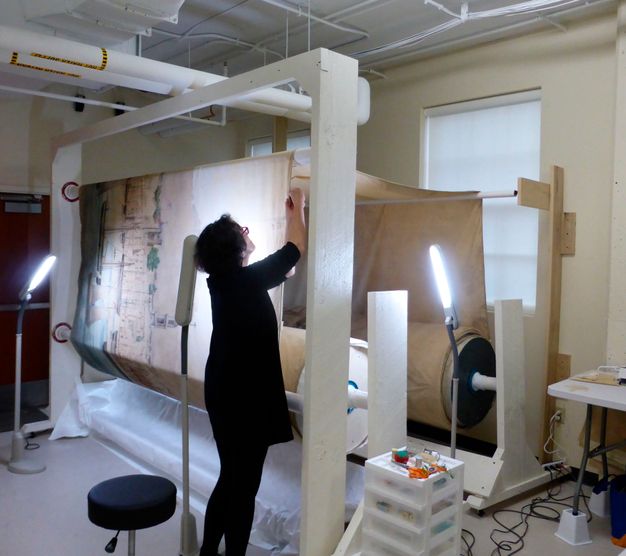
A tension frame was designed in order to implement the textile stabilization treatments on the panorama. The frame was constructed in four separate sections for maximum versatility. This apparatus consisted of four rolling horizontal beams that could be held under tension: a rear beam, which held the untreated panorama roll; two upper beams, which supported and separated the pretreatment and posttreatment sections of the panorama; and a front beam, which was the take-up roll for the treated panorama.
Textile treatment took place in the space between the upper and front beams. The face and reverse of the panorama were fully accessible to the conservators in this space (fig. 23.2). Having access to both sides of the painting not only facilitated stabilization treatment but also revealed condition issues that were not visible during the 2001 condition survey. These were mainly additional areas of weakness and patched repairs. The approximately two hundred areas of the panorama recommended for treatment in the 2001 survey swelled to over 2,050 treated areas by the time the project was completed.
Conservation Procedures
The surface media was consolidated by NBWM staff before the textile stabilization process commenced. The latter work was accomplished in two phases. The first involved separating the two lengths of panorama adhered to Mylar from their backings in order to stabilize and then rejoin them into their proper sequence in the panorama. The second was to stabilize all the textile condition issues present on each panorama roll. This was achieved by systematically treating and documenting each panorama roll in 10-foot sections, following the treatment protocols developed at the start of the project.
Media Consolidation
The method employed for consolidating the panorama’s flaking paint was based on a treatment first developed at the Saint Louis Art Museum by paintings conservator Paul Haner during the conservation of the Monumental Grandeur of the Mississippi Valley panorama. Further testing and refinement of the method was conducted by NBWM staff prior to treatment. The panorama’s painted surface was sprayed with a 0.75% solution of conservation-grade gelatin and distilled water using a Dahlia sprayer. One 10-foot section at a time, the painted surface was sprayed with the solution until saturated and then allowed to air-dry flat on the horizontal spray table before the panorama was rolled ahead and the next section treated.
The treatment successfully consolidated the painted surface and reduced the overall wrinkles and creases in the fabric. Two small areas on roll 1 required additional consolidation treatment during the textile stabilization phase of the project. In these areas, the original surface had been overpainted, and the resulting thick paint layer was not fully consolidated by the initial gelatin treatment. A 1.5% gelatin–distilled water solution was brushed onto these areas and allowed to air-dry.
Mylar Removal
Several methods were tested for removing the heavy Mylar backing adhered to two 50-foot sections of the panorama (roll 3, sections 33–37, and roll 4, sections 11–15). Mechanical means, heat, and solvents were all tested, with varying degrees of success. The most effective method, and the one chosen for the project, was using methanol vapor to soften the adhesive. The panorama was placed facedown on the work surface for this treatment; the front and rear rolling beams of the tension frame were used to advance the panorama as the work progressed. Methanol-dampened blotters (6 × 18 inch) were slipped between the work surface and the panorama face, and the vapor was allowed to penetrate the substrate for several minutes. After the adhesive softened, the plastic backing was mechanically separated from the panorama in small strips. Most of the adhesive residue remained adhered to the Mylar backing during this process. Adhesive residue remaining on the panorama fabric reverse was softened with the application of methanol via cotton swabs and mechanically removed using a small spatula. The adhesive was not uniformly applied throughout the two lengths of panorama. In some sections, the application was light, making removal relatively simple. In areas of dense application, the removal process was much slower.
In addition to the adhesive described above, at least one other adhesive and a variety of double-sided tapes had been used to attach the Mylar backing to the upper edge of the roll 3 panorama length. The backing was removed from this area in the manner noted above, and adhesive residue remaining on the panorama reverse was mechanically removed after softening with acetone applied with a cotton swab.
During removal of the Mylar backing from the roll 3 panorama length, an area of especially strong adhesive was encountered. It was darker than the adhesive removed from the panorama up to that point, and much more resistant to removal attempts. This adhesive swelled in contact with methanol but did not easily roll up or scrape off. Unlike the other adhesive, the residue of this adhesive was embedded in the weave of the panorama fabric. After testing methods of removal (heat and solvents), it was determined that the amount of mechanical action (scraping) necessary for complete removal put too much stress on the panorama fabric. This area of tacky adhesive residue was left in place on the panorama reverse. To prevent the panorama from sticking to itself during rolled storage, a length of scoured cotton muslin was laid on the panorama reverse to cover the area of residue and then rolled with the panorama onto the roll 3 storage drum. This area covered approximately 10 feet of roll 3, sections 35 and 36. The placement of the muslin underlay was marked on the panorama with twill-tape tags stitched to the upper (rope) edge.
In all, approximately 850 square feet of backing were removed from the two lengths of panorama. After removal, the two sections were rolled onto separate storage tubes to await stabilization treatment.
Textile Stabilization
The tension frame was used to implement the textile stabilization phase of the project. After a roll was loaded onto the frame, each 10-foot section of panorama was examined, and all condition issues were measured and noted on the documentation worksheets. A twill-tape label was stitched to the reverse upper (rope) edge to mark the beginning of each section. Each condition issue was stabilized following the treatment protocols set at the start of the project. These protocols were modified and expanded throughout the project to best suit the variety of condition issues that presented themselves.
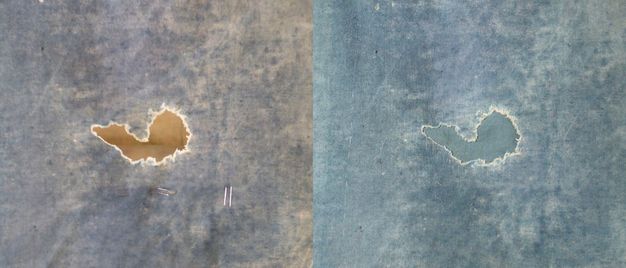
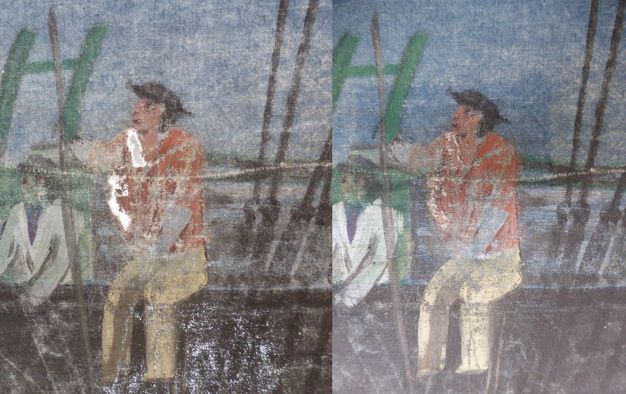
The majority of conditions requiring stabilization were holes, tears, seam breaks, and small areas of weakness in the panorama fabric (figs. 23.3, 23.4, 23.5). These were stabilized with custom-dyed, stitched cotton underlays. All underlay edges were pinked to prevent fraying. Figure eight stitch was used to rejoin most tears and seam breaks; a row of running stitches with intermittent back stitches was worked around the perimeter of all underlays to lend additional stability. Dyed nylon bobbinet stitched overlays were used to stabilize severely abraded and weak areas of the panorama fabric. One particularly large underlay (8 1/2 × 5 feet) was stitched to the blank lead edge of roll 4 due to multiple tears, holes, and areas of fabric loss.
The panorama had patches (both glued and stitched) and previous stitched mends on all four rolls. These repairs were likely made throughout the working life of the panorama as it traveled from venue to venue for exhibition, and they were considered part of the history of the piece. In most cases, these patches and repairs were left intact, with additional stitched stabilization added as necessary.
Two types of glued-on patches were present on the reverse of roll 4. The first was a plain-weave, undyed cotton fabric glued onto the reverse with an unknown adhesive. These were generally stable and relatively flexible and so were left intact. The second type was a “Band-Aid” style patch made of cloth book tape with an added layer of cotton fabric in the center. These were loosely adhered at the edges and quite stiff. They were no longer supporting the panorama fabric, and in some cases were putting stress on it. These were mechanically removed and replaced with dyed cotton underlays. The few patches that required removal were photo-documented, labeled, and stored in the treatment documentation binders.
All four rolls had small areas of weakness scattered throughout, especially at the rope edge, but rolls 2, 3, and 4 exhibited several large areas of significant weakness that were not documented in the original condition survey. These areas, ranging from 10 to 40 inches in height and width, were mainly clustered in the lower half of the panorama fabric. Many of the areas of weakness had small holes and/or tears scattered throughout. These were stabilized with dyed cotton underlays and, in some cases, dyed bobbinet overlays as well (fig. 23.6). The larger underlays were stitched around the perimeter and in vertical rows spaced 4 to 6 inches apart to lend stability to the weak fabric.
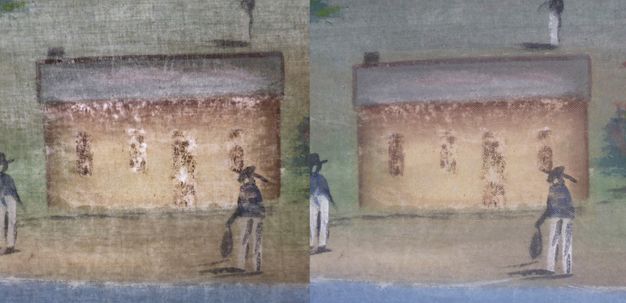
As previously noted, the panorama was in thirteen sections before stabilization began. Several of these pieces required rejoining along vertical cut lines or unpicked vertical seam lines. This was accomplished by butting the adjoining edges together and stitching them to a dyed cotton underlay (fig. 23.7). In all, ten vertical joins were stitched.
On roll 1, sections 9, 10, 12, and 13 each had a large three-sided cut (8 × 48 inches) along the upper edge. These date from the 1964 New York World’s Fair, when a 175-foot section of the panorama was hung for exhibition around the interior walls of a restaurant in the New England States Pavilion. After installation, it was discovered that the panorama’s upper edge was blocking the air-conditioning registers, so the cuts were made to allow the air to flow freely (New Bedford Whaling Museum. 2018. A Spectacle in Motion: The Grand Panorama of a Whaling Voyage ’Round the World. Vol. 1. New Bedford, MA: Old Dartmouth Historical Society and New Bedford Whaling Museum.). The cuts in these areas went through the fabric, but the rope was left intact. To stabilize these large areas, the cut edges were aligned as closely as possible (the panorama fabric had stretched slightly along the cut lines during previous vertical exhibition) and stitched to dyed cotton underlays. These dyed underlays filled the small voids where the cut edges of the panorama cloth did not quite butt together during stabilization treatment.
Roll 2, section 1, received two treatments not applied elsewhere in the project due to its unique condition issues. As found, this approximately 7 × 9 foot section was not attached to any roll; the proper right edge was an unstitched vertical seam and the left was a full vertical cut. The original upper part of this section was missing and had been replaced with a band of white sheeting. It was labeled “miscellaneous section” in the 2001 condition notes, but during the course of this project its proper right edge was found to match the lead edge of roll 2, section 2, revealing its proper placement in the panorama sequence. The sheeting in the upper part of section 1 was replaced with a dyed cotton panel to return the section to its full original height, and section 1 was subsequently reattached to roll 2, section 2. The other treatment this section received was joining it to a new blank lead, to protect its cut leading edge during handling and storage.
Storage Drums
The final step in the treatment process was to place the four stabilized rolls of the panorama onto storage drums. The drums were constructed from four 24-inch-diameter Sonotube concrete forms measuring 9 feet 3 inches in length. The open ends of each tube were fitted with wood plugs that had holes drilled through the center so that the drums could be suspended on metal rods during storage. Each tube was wrapped with a 4-mil barrier layer of Mylar and a layer of Volara foam, secured with double-sided tape.
Each length of stabilized panorama was rolled onto a storage drum with the lead edge outermost, wrapped in polyethylene sheeting, labeled, and stored on a dedicated storage rack at the NBWM. In conjunction with a customized mount, the conservation treatments described here stabilized this enormous textile for its first complete exhibition in over a hundred years (see fig. 23.1).
Appendix: Materials and Suppliers
Stabilization Fabrics
-
Desized, unbleached, scoured, cotton print cloth, style #400
U: Testfabrics, Inc.
- No resin finishes
- Approx. weight: 3.18 oz./sq. yd.
- Approx. width: 44 in.
- Approx. same weight and thread count as panorama fabric
-
20 denier nylon bobbinet, style N800: Dukeries Textiles
& Fancy Goods, Ltd.
- Mesh size approximately 1/16 in. diameter
- Width: 205–213 in.
- 30 warps/in.
- 2 diagonal wefts: 24 wefts/in.
Threads
-
Gütermann Skala 360 sewing thread: Testfabrics, Inc.
- Extra fine tex 8
- 100% polyester sewing thread
-
Coats cotton-covered polyester core sewing thread: locally
purchased
- 35 weight
Dyes
-
Pro MX Fiber Reactive Dye: Pro Chemical and Dye
- Designed to permanently dye cellulose fibers
- Excellent wash and light fastness properties
-
Pro Washfast Acid Dye: Pro Chemical & Dye
- Designed to permanently dye protein and nylon fibers
- Excellent wash and light fastness properties
Rope
- 100% cotton, three-strand rope, 3/16 in. diameter: manufactured by Bohannon Textiles Inc.; purchased from R&W Rope, New Bedford, MA
Gelatin
- Technical grade, 200 Bloom, Type B, 40 mesh gelatin: Polistini Conservation Material
Storage Drum Materials
- 24 in. Sonotube: locally purchased
- Mylar film, 4 mil: Talas, Inc.
- Volara foam, 1/16 in.: Talas, Inc.
- 3M 415 double-sided tape and 3M 850 tape: Talas, Inc.