Chicago
Seymour, Kate, Joanna Strombek, and Jos van Och. “9.
Demystifying Mist-Lining.” In
Conserving Canvas, by
Cynthia Schwarz, Ian McClure, and Jim Coddington. Los Angeles:
Getty Conservation Institute, 2023.
https://www.getty.edu/publications/conserving-canvas/ii-present-practice/9/.
MLA
Seymour, Kate, et al. “9. Demystifying Mist-Lining.”
Conserving Canvas, by
Cynthia Schwarz et al., Getty Conservation Institute, 2023,
https://www.getty.edu/publications/conserving-canvas/ii-present-practice/9/.
Accessed DD Mon. YYYY.
Jos van Och,
Senior Painting Conservator (retired),
Stichting Restauratie Atelier Limburg (SRAL), Maastricht,
the Netherlands
Mist-lining was developed by Jos van Och at the Stichting
Restauratie Atelier Limburg (SRAL) in Maastricht, the
Netherlands, in the 1990s. It has since been used
successfully to line numerous paintings, large and small, of
different ages, conditions, and techniques. Pretreatments
are used to solve distinct problems, leaving the action of
lining solely to providing additional support. The
mist-lining system avoids the use of heat, moisture, and
high pressure and thus respects the integrity of the
original structure and texture. Mist-lining provides an
alternative, low-cost system to traditional or other modern
lining techniques. Careful selection of lining support, the
manner in which the lining adhesive is applied, and the
means to set the bond differentiates this technique. The
acrylic adhesive creates a “bridge” between the two canvases
without impregnation. Choosing the right solvent for
activation allows the acrylic adhesive to bond well to a
wide variety of previously treated canvases, including
wax-resin lined paintings. The bond has good shear
resistance, though its peel force is lower. Delining of
previously mist-lined canvases is therefore facilitated,
allowing mist-lined canvases to be removed successfully,
even over time.
Lining canvas paintings has ever been a contentious action.
Many canvas paintings have been lined and at times relined.
Age and condition have often not been prerequisites for
implementing linings, as for a time it was seen as a
preventative measure. Linings were intended to carry the load
that the original damaged support could no longer bear, as
well as solving a multitude of other structural issues,
including consolidation and improvement of cupping and planar
distortions. This often “one-stop” process was deemed long
lasting, beneficial, and cost efficient. The type of lining
carried out tended to be dependent on the training of the
conservator-restorer, studio practice, and geographic
location. Time has shown that the life span of linings is
determinable, and the lining cycle continues.
The “moratorium” on lining called for after the 1974 Greenwich
Conference on Comparative Lining Techniques (Villers 2003bVillers, Caroline, ed. 2003.
Lining Paintings: Papers from the Greenwich Conference
on Comparative Lining Techniques. London: Archetype.) never materialized, but the idea encouraged conservators to
think of other options for structural repair. Full linings
fell out of fashion, and strip-lining as well as
thread-by-thread tear mending became standard practice.
However, these options cannot be used for severely
structurally compromised canvas paintings—thus, full lining
continues to be necessary. The mist-lining process is still a
relatively new technique and not yet part of many
conservators’ toolkits. Familiarity with this process can
expand the contemporary conservator’s repertoire and provide
one of a few ethical solutions for structural support.
The mist-lining process was invented and developed by Jos van
Och in the 1990s at the Stichting Restauratie Atelier Limburg
(SRAL) (Fife, van Och, and Harrison 2017Fife, G. R., J. van Och, and L. Harrison. 2017. “Miracle
Mystery: Research and Treatment of the Mirakeldoeken, a
16th-Century Tüchlein by Jacob Cornelisz van Oostsanen.”
In
ICOM Committee for Conservation 18th Triennial
Conference Preprints, Copenhagen, 4–8 September 2017, edited by J. Bridgland. Paris: ICOM.;
Seymour and van Och 2005Seymour, Kate, and Jos van Och. 2005. “A Cold-Lining
Technique for Large-Scale Paintings.” In
Big Pictures: Problems and Solutions for Treating
Outsize Paintings, edited by Sally Woodcock, 96–104. London:
Archetype.;
van Och and Hoppenbrouwers 2003van Och, Jos, and René Hoppenbrouwers. 2003. “Mist-Lining
and Low-Pressure Envelopes: An Alternative Lining Method
for the Reinforcement of Canvas Paintings.”
Zeitschrift für Kunsttechnologie und Konservierung
17, no. 1: 116–28.). The term mist-lining was coined by SRAL in the
early 2000s and is now used to denote the technique, system,
and process. The mist-lining system has roots in developments
in structural treatments for lining canvases initially
presented in the 1970s by Gustav Berger and Vishwa R. Mehra
and presented by both at the Greenwich conference in 1974
(Berger 1972aBerger, Gustav. 1972a. “Formulating Adhesive for the
Conservation of Paintings.” In
Conservation of Paintings and the Graphic Arts:
Preprints of Contributions to the Lisbon Congress,
1972, 9–14 October, 613–29. London: International
Institute for Conservation of Historic and Artistic
Works.;
Mehra 1975aMehra, Vishwa R. 1975a. “Further Developments in
Cold-Lining (Nap-Bond System).” In
ICOM Committee for Conservation 4th Triennial Meeting,
Venice, 13–18 October 1975: Preprints, 75/11/5/1-26. Paris: International Council of
Museums.;
Mehra 1975bMehra, Vishwa R. 1975b. “Nap-Bond Cold Lining on a
Low-Pressure Table.”
Maltechnik Restauro: Internationale Zeitschrift Für
Farb- Und Maltechniken, Restaurierung Und Museumsfragen:
Mitteilungen Der IADA
81, no. 2: 87–95.).
Mist-lining is a noninvasive lining technique that involves
spraying minimal amounts of an acrylic dispersion resin onto
an auxiliary canvas before adhering that canvas to the reverse
of the original support, often without tension. This open
adhesive network is regenerated from the dry state,
eliminating moisture. Solvent vapors (or gentle heat) are used
to swell and tackify the adhesive.1
Bonding occurs under light pressure when the adhesive is
activated. The system can be classified as a cold-lining
method and forms a nap bond. The lining adhesive remains
sandwiched between the two canvases with no impregnation of
either textiles or decorative layers, which aids reversibility
and negates any alteration of appearance.
Mist-Lining Methodology
The origins of mist-lining lie in the desire to find an
ethical replacement for more invasive lining techniques.
Conservators commit to following a code of ethics. These
emphasize that cultural heritage should be preserved for
future generations while respecting aesthetic, historic, and
intangible significances, as well as maintaining physical
integrity. Conservators should, thus, limit treatment to
necessary actions and strive to use compatible, non-altering
products, materials, and procedures. Treatments should not
interfere with future actions, examination, or analysis, and
should be reversible.2
The nonimpregnating, easily reversible mist-lining system
complies with this ethos.
The mist-lining process is not a stand-alone procedure and
must be considered in relation to other treatments that will
be carried out on the painting, either before or after lining.
The mist-lining methodology requires each problem to be
handled independently. Simply put, the issues presented by the
painting are analyzed, and solutions to each specific
situation are found and resolved independently of lining. The
lining action is, thus, kept separate from other required
treatments. This enables the process to be highly adaptable
and tailored to the individual case.
Mist-lining is typically carried out after any reduction of
planar distortions, overall treatment of the support,
consolidation of paint layers, individual mending and/or
strengthening of tears and holes, and removal of undesired
superficial layers. Deformations are first flattened by
prestretching the support and applying gentle and gradual
lateral tension, often combined with humidification.
Conversely, the mist-lining system will conform to any
preexisting out-of-plane deformations and thus can be used to
support (modern) canvas paintings devised with a more
three-dimensional nature.
Consolidation of paint layers occurs as a separate step using
an appropriate adhesive. Removal of varnish layers and
overpaints is carried out prior to lining, though linings can
be effectuated with any nonoriginal coatings left intact.
Subsequent treatments often involve filling of paint losses,
retouching, and revarnishing. After mist-lining, it is
imperative to consider fully the implications of the choice of
solvent for varnish application, or the use of heat to impress
texture in fills, as both solvent exposure and heat will
affect the lining adhesive. Some examples of pretreatments
implemented prior to mist-lining are reported in the
Mist-Lining Handbook (Seymour and Strombek 2022Seymour, Kate, and Joanna Strombek. 2022.
The Mist-Lining Handbook. E-book. Maastricht:
Stichting Restauratie Atelier Limburg.). Mist-lining has been a successful choice for paintings
that have a past structural treatment legacy, whether lined
with glue-paste or wax-resin adhesives or both. Research has
been carried out showing that the sprayed acrylic adhesive
adheres well to canvases impregnated with wax resin (Contreras 2015Contreras, Luis B. 2015. “Mist-Lining como metodo de
reentelado en obra antigua enterada con cera-resina.”
Master’s thesis, Universitat Politècnica de València,
Facultad de Bellas Artes de San Carlos.;
Fischer 2002Fischer, Ulrike. 2002. “Die Konservierung und
Restaurierung des Leinwandgemäldes Friedrich Wilhelm I,
Kopie nach Antoine Pesne, Entstehungszeit vermummt. 1.
Hälfte 18. Jahrhundert (Praktisches Thema, Band I) and
Doublierung von Wasch-Harz-behandelten Gemälde mit
Acrylharz - eine Versuchsreihe (Theoretisches Thema, Band
II).” Unpublished thesis, Stichting Restauratie Atelier
Limburg (SRAL), Maastricht.). This property enables the use of heat to be avoided on
these thermo-sensitive structures.
The mist-lining process allows conservators to make the best
choice for the needs of the individual canvas painting, rather
than using a standardized technique to solve all issues. The
choice to use the mist-lining system, thus, comes at the
initial stage of the decision-making process—when considering
the treatment plan—although the commitment to using the system
can be altered, if necessary, as treatment progresses. The
order of treatments, therefore, needs to be fully considered
before the plan is confirmed. Our philosophy is to leave
options open as much as possible. Each step of the treatment
process is thought through, taking into account the
consequences for subsequent procedures and future behavior of
materials inherent in the system. For this reason, the
pretreatments prescribed have great importance.
The decision to use this system comes with a caveat.
Expectations for results need to be tempered to accept
surfaces that are not as “flat as a board” or linings that are
not as “rigid as a plank.” This system does not produce the
same degree of surface finish and stiffness provided by
traditional linings. The natural drape of the canvas and
texture of paint layers will not be significantly altered
during lining. Any out-of-plane texture or impasto (including
cupping) that exists before lining will be maintained.
Consolidation problems are not resolved. The key, as
mentioned, is to treat these defects, as necessary, prior to
lining and to accept a certain natural “aged” look. (This may
mean taking a different approach to dealing with clients or
owners of paintings.) Nor does the system provide a stiff
lining support. Mist-lining moves away from the idea that the
lining should carry all the stress within the laminate
structure. Instead, a mist-lining provides “gentle” support to
the original materials, helping to mitigate dimensional
changes induced by climatic variations, but not preventing
them.
These aspects of the system remain open to debate. No complete
scientific study comparing mist-lining results to those of
other lining systems has been carried out. This “new” approach
thus remains unprovable. However, numerous paintings, large
and small in scale and presenting a wide variety of past
treatments and conditions, have been lined with this system.
These have performed well over the last thirty years, so
perhaps the “proof is in the pudding.” Ongoing research aims
to provide further insight and answers to these issues (Poulis, Seymour, and Mosleh 2020Poulis, J. A., Kate Seymour, and Yasmine Mosleh. 2020.
“The Influence of Loading, Temperature and Relative
Humidity on Adhesives for Canvas Lining.”
IOP Conference Series: Materials Science and
Engineering
949, no. 1 (International Conference Florence Heri-Tech:
The Future of Heritage Science and Technologies, 14–16
October 2020): 949 012086.
https://iopscience.iop.org/article/10.1088/1757-899X/949/1/012086/meta.).
The Mist-Lining Process
As mentioned, the mist-lining technique uses an acrylic
dispersion resin sprayed onto a prepared auxiliary textile
support. The result is an open network, rather than a
continuous layer of adhesive, which is allowed to dry on
application. After the lining canvas is placed in position,
the adhesive can be regenerated in situ with solvent vapors.
Bonding occurs under low pressure without the use of heat or
moisture. The system effects a nap-bond with no impregnation
of the original textile or migration into the decorative
layers. This aids reversibility and avoids any change in
appearance. Delining can be effected by applying peel forces
(sometimes after solvent exposure) with little or no adhesive
remaining attached to the original textile.
The technique requires little equipment and is easy to set up
in the studio or on site. The low-pressure envelope can easily
be adapted to accommodate paintings of different sizes or
orientations (horizontal or vertical). Linings have been
effectively implemented on all sizes of paintings, including
large, oversize formats.3
Low-pressure tables can also be used, if a flatter lining
surface is needed. Furthermore, the adhesive mixture and
application process can be applied to effect strip-linings if
a full lining is not desirable.
Canvas Selection and Preparation
Factors influencing the choice of lining canvas are the
ability to develop a nap, flexibility versus rigidity (drape),
responsiveness to humidity fluctuations, type of weave, and
thickness of the canvas. The response rate of warp and weft
threads to external conditions should be similar. Open-weave
fabrics are preferred, as less tension is required to decrimp
the fabric and to remount the painting. More importantly,
solvent vapors can diffuse more readily through open-weave
textiles so less solvent volume is required during activation.
A wide range of textiles has been used by the SRAL team over
the years. Research into the mechanical properties of linen,
polyester, and mixed-fiber textiles has been considered (Young and Jardine 2012Young, Christina, and Suzanne Jardine. 2012. “Fabrics for
the Twenty-First Century: As Artist Canvas and for the
Structural Reinforcement of Easel Paintings on Canvas.”
Studies in Conservation 57, no. 4: 237–53.). Choices are made on a case-by-case basis. The canvas
requires a spun-yarn textile fabric, rather than a
monofilament. Typically, open-weave lightweight natural linen
fabrics or a fire-resistant lightweight spun-yarn polyester
textile (Trevera CS) are used. Many other fabric types have
also been experimented with and employed (Seymour and Strombek 2022Seymour, Kate, and Joanna Strombek. 2022.
The Mist-Lining Handbook. E-book. Maastricht:
Stichting Restauratie Atelier Limburg.).
The lining canvas may be tensioned prior to the application of
the sprayed adhesive. Natural linen textiles are decrimped
only if the weave is dense, as the necessity is less for
open-weave textiles. The desired tension of the lining textile
is dependent on numerous factors. The conservator should
determine if the lining process will take place under tension
or with either or both canvases in a free state. This decision
may depend on logistics (size), the condition of the painting
(first lining or relining), and future display (environmental
factors). Tension is thus considered a variable in the process
and cannot be quantified with a constant number; however, the
tension applied when preparing the lining canvas should not be
more than what will be required when remounting the painting.
The aim is not to overstretch the adhesive when the lining is
complete and to effect in an undisturbed point-to-point bond
between the two canvases.
The size of the original support (including tacking margins)
is masked out on the lining canvas to ensure that the edges of
the lining fabric are not coated with adhesive. The surface of
the stretched lining canvas is prepared by enhancing the nap.
The yarn is disrupted to encourage fibers to protrude from the
surface. Nap fibers are fluffed up using sandpaper worked
gently in the same directions as the weave. The yarn should
not be broken. Care is taken not to disturb the napped surface
before spraying on the adhesive.
Interleaf textiles can be inserted as required to provide
enhanced local (to support tears or holes) or overall
stiffness. Nonwoven polyester or woven glass-fiber interleafs
(adhered prior to lining with either Plextol mixtures or Beva
371 film) are typically used at SRAL. These will mitigate the
return of viscoelastic, out-of-plane deformations.
The Adhesive
Currently, two methacrylic ester-acrylic ester copolymer
dispersions are mixed to obtain desired performance stiffness
and solubility characteristics. Plextol D 540 and Dispersion
K 360 (adjusted to pH 7) were used in a 30:70 ratio, but other
formulations are being further investigated due to the
discontinuation of Plextol D 540. The manufacturer of Plextol
(Synthomer) has recommended as a substitute Plextol D 512.4
This and other alternatives (Plextol D 498 and Plextol B 500)
are being tested to compare results at Delft University of
Technology (TU Delft) (Poulis, Seymour, and Mosleh 2020Poulis, J. A., Kate Seymour, and Yasmine Mosleh. 2020.
“The Influence of Loading, Temperature and Relative
Humidity on Adhesives for Canvas Lining.”
IOP Conference Series: Materials Science and
Engineering
949, no. 1 (International Conference Florence Heri-Tech:
The Future of Heritage Science and Technologies, 14–16
October 2020): 949 012086.
https://iopscience.iop.org/article/10.1088/1757-899X/949/1/012086/meta.).5
A high-volume, low-pressure (HVLP) compressed-air spray gun is
used to spray the adhesive onto the canvas in a fine mist. The
spray mist only encapsulates the raised nap and does not
impregnate the lining fabric or create a continuous coating.
As only the nap is coated, the mechanical-physical properties
of the canvas are unchanged; it remains flexible and able to
conform to the drape and morphology dictated by the original
canvas.
The optimum result is achieved when the adhesive is sprayed
from different angles in more than one layer. The aim is to
use as little adhesive as possible, something that is
currently judged through experience. The coating should remain
open and “fluffy” so as to allow the solvent vapors easy
access. A thinner layer of adhesive will react more quickly to
the solvent vapors and will need less pressure to create a
bond, but the bond achieved will be more resistant if the
adhesive layer is more substantial. It is, however, never the
aim to have a thick layer of adhesive! The ultimate thickness
of the sprayed adhesive layer is considered one of the key
variables of the system. We suggest those new to the system
practice these decision-making processes on mock-ups to gain
insight into such variables.
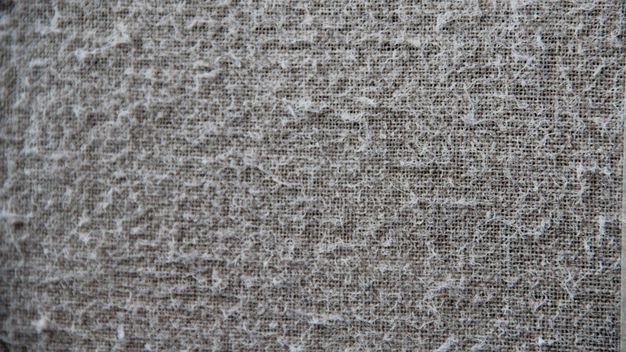
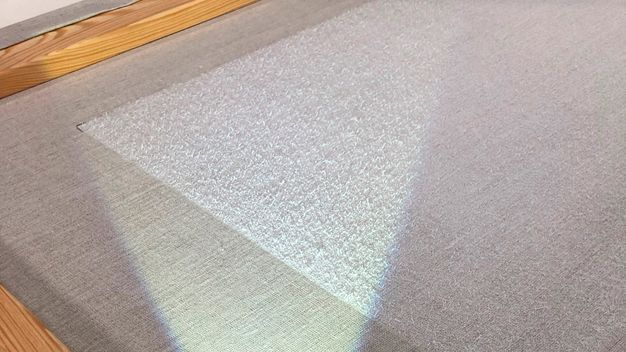
Figures 9.1 and
9.2 show an example of the dried
adhesive layer applied to an open-woven linen canvas.
ExpandFigure 9.1Close-up of the open-network sprayed lining
adhesive.Image: SRALExpandFigure 9.2An open-weave linen canvas sprayed with an acrylic
dispersion adhesive. Note the masked-out area, which is
the exact dimensions of the painting that will be
lined.Image: SRAL
The sprayed acqueous adhesive is allowed to dry before lining
occurs. The two canvases are brought together before a
subsequent bond is effected within a low-pressure envelope.
The original canvas is carefully positioned on the lining
canvas in contact with the sprayed area. Smaller paintings can
be lined faceup with the lining canvas either loomed or
untensioned, while larger paintings are typically lined
without being tensioned and facedown. In the latter case, the
lining canvas is often rolled into position over the exposed
reverse of the original. It is imperative that placement is
carried out carefully and precisely, so as not to flatten the
fluffed, open network of the adhesive and to ensure that the
weave of the lining canvas aligns with that of the original.
Dragging the original over the sprayed adhesive surface will
deform the adhesive surface and compress it into a continuous
coating.
The Low-Pressure Envelope
The low-pressure envelope consists of two differing
thicknesses of high-density polyethylene (HDPE) plastic
sheeting and a ring of perforated pipes connected to a
centrifugal fan (or vacuum cleaner) (fig. 9.3). Both plastic sheets should be solvent (and heat)
resistant. The plastic sheeting is typically sourced at local
building merchants. The thicker plastic sheet can be stretched
to a working frame that is larger than the lining canvas or
taped to a flat surface such as a table or floor. The thinner,
unstretched plastic sheet should be flexible enough to
accommodate surface topography (e.g., impasto, cupping). In
some cases, the setup can be reversed.
ExpandFigure 9.3Schematic view of the setup for the low-pressure
envelope.Image: Kate Seymour
The design of the low-pressure envelope is another key
variable of this adaptive system. Varying the thickness and
tension of the plastic sheeting will modify the pressure
exerted. The flexibility of the plastic sheeting allows an
even pressure to be applied over the whole surface area as the
plastic conforms to the topography of the structure within the
low-pressure envelope. Slight deformations in the canvas can,
however, be manipulated, but the system does not exert
sufficient pressure to push severe deformations into plane. A
stiffer sheet of plastic (such as Melinex) would exert
pressure on high points and the force exerted would be imposed
on a smaller area. Using a too-stiff membrane could
potentially cause moating or even flatten impastos; it could
also push out-of-plane structures, such as seams, forward.
Air is extracted from the low-pressure envelope using a ring
of perforated pipes (diameter about 2 cm). Typically PVC
pipes, intended to house electrical wires in walls, are used.
These are sourced from local building merchants. Other
improvised versions could be utilized, such as garden
hosepipes or washing machine hose. The tubes should not deform
when air is extracted. Lengths of up to 3 meters can be bought
and modified to the desired size. Connection pieces make it
possible to extend beyond this dimension and connect at the
corners. The ring should be a good 20–30 centimeters wider
than the (loomed) lining canvas. Both plastic sheets used for
the envelope should be larger than the ring. Holes are drilled
into one side of the pipes at regular intervals. When
assembled, all corners and joints are taped together to ensure
the ring maintains its shape and does not disconnect during
lining. A T-connector is used to attach the ring to the
centrifugal fan. When placed in the envelope, the pipes are
covered with a textile “sock” to ensure that the plastic
sheeting is not drawn into the holes.
Air is extracted from the center of the envelope by including
a piece of cloth slightly larger than the ring system. This is
called a “breather.” It is typically placed on top of the
stiffer membrane. Note that there should also be soft material
placed under the envelope, outside the system, to ensure the
envelope is floating and that, if punctured, it will not be
sucked down to the flat surface, which would induce excess
pressure during lining.
When the centrifugal fan is turned on, air is extracted from
between the two plastic membranes evenly. Sharp edges (e.g.,
working loom members) should be padded with cloth coverings.
These also aid in the extraction of air from the center of the
envelope to the ring system. Thin nonwoven fabrics can also be
placed over the paint surface if desired; however, these stop
the upper plastic membrane from following the morphology of
the surface and may diminish the bond achieved. The exact
conformation to the surfaces (upper paint and lower textile)
by the plastic sheets permits a point-to-point bonding at a
low, even pressure.
Although the low-pressure envelope is used in the lining
process, it can also be used for a variety of other
conservation treatments. Further information on the materials
used is provided in the Mist-Lining Handbook (Seymour and Strombek 2022Seymour, Kate, and Joanna Strombek. 2022.
The Mist-Lining Handbook. E-book. Maastricht:
Stichting Restauratie Atelier Limburg.). We advise some experimentation prior to determining the
setup for the low-pressure envelope.
Bond Formation
As opposed to a continuous coating, when dried the open
adhesive network can effect a light bond with a relatively
small amount of adhesive. A dried, thick, continuous (stiff)
coating of an adhesive will need to deform or soften in order
to uniformly connect the two undulating surfaces. In this
case, heat and high pressure can expedite and ensure a good
bond, but often at the expense of paint modification and
impregnation of nonoriginal materials into the original
textile and decorative layers. In the mist-lining system, the
“fluffy” adhesive layer has a volume that accommodates the
distance between the two woven textiles. During lining, gentle
pressure is sufficient to ensure that the two canvases remain
connected while the bond is being formed.
The adhesive is reactivated in situ using solvent vapors.
Solvent exposure induces swelling, allowing the adhesive to
regenerate and become tacky. The volume of solvent vapors,
inserted into the envelope, required to regenerate the
adhesive is carefully calculated to ensure that the adhesive
swells and becomes sticky but does not dissolve, ensuring that
the adhesive remains between the lining and the original
canvas. Solvent selection is dependent upon a number of
factors, including the sensitivity of paint and varnish
layers, the condition of the reverse of the original support,
any remnants of previous lining adhesives, and, of course, the
solubility parameters of the adhesive. Acrylic dispersions are
sensitive to a range of solvents, including alcohols and
aromatic hydrocarbons.6
Mixtures of these can also be considered. The choice of
solvent(s), duration of exposure to solvent vapors, and the
pressure exerted within the low-pressure envelope will affect
the bond strength achieved and are considered variables in
this system.
Testing ensures that the best solvent is selected. We
recommend using smaller sections, or swatches, of a
representative lining canvas sprayed with a similar amount of
adhesive to test for an effective representative bond.
Swatches are placed on the reverse of the original and exposed
to different preselected solvent vapors for the same amount of
time. The sections are left under weight until the solvent has
evaporated, and then each is peeled away to evaluate the
effectiveness of the bond. Experience builds an expectation of
results, but tests ensure a better understanding of the
individual variables that can be implemented for particular
cases.
Effecting a Mist-Lining
The lining is carried out within the low-pressure envelope (fig. 9.4). First, the solvent vapors are introduced into the envelope
using a “solvent-delivery cloth”—typically, an open-weave
cotton cheesecloth. The ability of the solvent-delivery cloth
to absorb the solvents used will dictate the volume of solvent
that is needed; the volume used at SRAL is 60 ml of solvent
per square meter of cheesecloth. The cheesecloth should be
slightly larger than the area of sprayed adhesive, as it will
shrink slightly as the fluid solvent is absorbed.
ExpandFigure 9.4Video showing the mist-lining process.Video: SRAL
The solvent-delivery cloth is rolled up and encapsulated in
plastic (clingfilm/Saran wrap) before the solvent is
introduced. The solvent is injected into the package using a
needle and syringe. Sufficient time must be allowed before
placing the solvent-delivery cloth in the envelope for the
solvent to spread evenly throughout the cloth. When the
solvent has evenly dampened the solvent-delivery cloth and the
lining setup is established, the cloth is rolled out inside
the envelope, placed at the reverse of the lining canvas, as
can be seen in figure 9.5. Placing the
cloth in the envelope and rolling it out inside the envelope
should be practiced, prior to the addition of the solvents,
until it can be done quickly enough that solvent is not lost
through evaporation (during the application process).
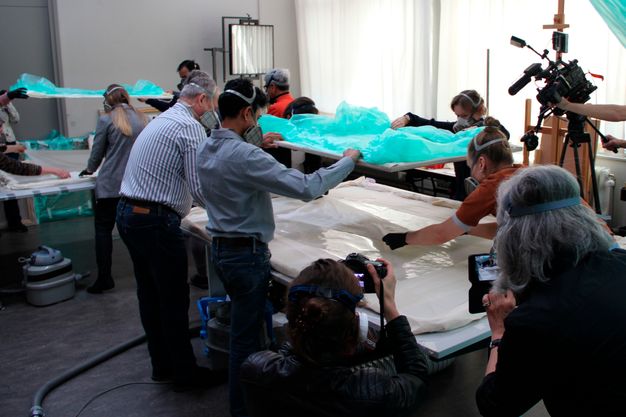
ExpandFigure 9.5Mist-Lining Workshop trainees practicing placing the
solvent-delivery cloth to reactivate the lining
adhesive.Image: Joanna Strombek
The solvent vapors, thus delivered, defuse through the lining
fabric to the open adhesive network. Once the adhesive is
tacky (but not dissolved), the solvent-delivery cloth is
removed; typically, this takes between ten and twenty minutes.
Air is extracted from the envelope to expedite the activation
time, but continual pressure is not necessary at this stage.
The solvent-delivery cloth should be replaced with a dry cloth
to facilitate solvent evaporation during bond formation.
Once the solvent-delivery cloth has been removed, the air is
extracted from the low-pressure envelope. This causes the two
canvases to be drawn together and the reactivated (thin)
adhesive spray coating can bridge the distance between the
two. Pressure is maintained until the majority of solvent
vapors have evaporated and the adhesive is reset. The amount
of pressure in the envelope is determined by the degree of air
extracted by the centrifugal fan and the thickness/stiffness
of the plastic sheeting. Typically, values of 90 mbar are
reached and maintained for about sixty to ninety minutes. For
safety reasons, as solvent vapors are being passed through an
electrical motor, an attendant should be present at all times
during the lining. The risk of sparks igniting dust particles
within the motor should be prevented by using the motor
exclusively for air extraction. Air exchange values can be
used to reduce risk.
We recommend that conservators experiment and become
comfortable with the system variables before undertaking a
mist-lining. Results are impressive (figs. 9.6, 9.7). Aspects to consider are
pretreatments, thickness of the adhesive layer, the type of
solvents and lining canvas selected, and the setup of the
envelope.
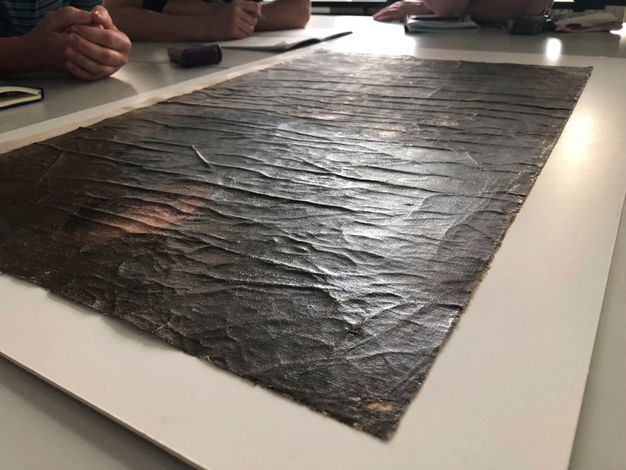
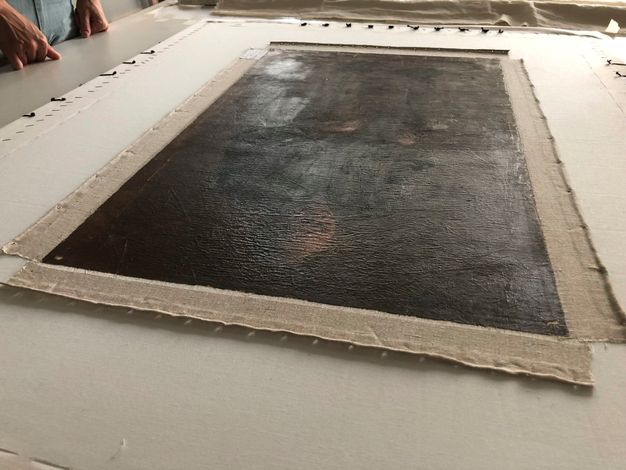
ExpandFigure 9.6Deaccessioned painting prior to lining. Note that the
out-of-plane deformations are mitigated prior to lining
using gentle tension and controlled humidification.Image: SRALExpandFigure 9.7The deaccessioned painting shown in figure 9.6 after
lining. The strip-linings added to apply tension prior to
lining were kept in situ. The lined painting is still
mounted on the temporary working loom. Note that the
raised horizontal deformations are reduced, but the
craquelure pattern is still evident.Image: SRAL
Mist-Lining Dissemination
The SRAL team has imparted their knowledge and experiences of
the mist-lining system to the wider conservation field over
the years (see the appendix for a chronology of workshops and
conferences disseminating the mist-lining system). Students
studying conservation in the Netherlands have been instructed
in the system since the early 1990s. International interns,
fellows, and junior conservators working at SRAL over the past
thirty years have all used the system. Papers have been
written describing it, and presentations have been given at
conferences (see
Barbosa et al.
and
Brandt and Volbracht
in this publication;
Costantini 2013Costantini, Daniele. 2013. “Cold Lining and Mist Lining:
Insights and Possibilities of Adaptation to the
Mediterranean Climate.” CeROArt Online EGG 3.
https://doi.org/10.4000/ceroart.3090.;
Iaccarino Idelson and Garofalo 2019Iaccarino Idelson, Antonio, and Valerio Garofalo. 2019.
“Aiming at Reproducibility in Lining Canvas Paintings.”
CeROArt Online, Flux 11.
https://doi.org/10.4000/ceroart.6488.;
Ruuben and Robbins 2011Ruuben, Tannar, and Nina Robbins. 2011.“Two Painted Works
of Art on Diverse Supports—Adopting Paintings Conservation
Methods and Materials in Specific Cases.”
ICOM Committee for Conservation 16th Triennial
Conference Preprints, Lisbon, 19–23 September 2011, edited by J.
Bridgland, 1323–926. Paris: ICOM.). Dissemination has had successes and failures and has led
to further modifications in the system. The expertise of the
system still remains largely in-house at SRAL, however, and
the use of this relatively new system is not widespread.
Because the system is adaptive and tailored to the needs of
the painting, it is full of variables that may be difficult to
grasp if not encountered in practice. Thus, confidence in
considering this noninvasive and gentle approach to the
structural repair of canvases may be lacking in many
conservators less familiar with the system.
In 2019, with the generous support of the Getty Foundation’s
Conserving Canvas initiative, SRAL organized a Mist-Lining
Workshop to further disseminate this technique and share our
experiences.7
The aim was to provide midcareer conservators from different
world regions with hands-on experience in this alternative
option for the structural repair of canvas paintings. At the
same time, this global group also brought new thoughts and
inspired further adaptations and developments of the
mist-lining system (Nadeau et al. 2020Nadeau, Marie-Helene, Teresa Schreibweis Torrents, Lucie
Kourilova, Josefina López, Lynne Harrison, Joanna
Strombek, Luigi Orata, Rita Costabile, Lisette Vos, Suvi
Kervinen, Danica Stojkovicova, Cynthia Schwarz, and Kate
Seymour. 2020. “Review: Mist-Lining Workshop: A Two-Phase
Programme with Support from The Getty Foundation’s
Conserving Canvas Initiative, 25th–29th March and Summer
2019.” The Picture Restorer 57 (Autumn 2020):
58–64.). The workshop was documented in film and print. The video,
produced by Bigeye Productions, can be viewed on YouTube for
further insight.8
The resulting Mist-Lining Handbook (Seymour and Strombek 2022Seymour, Kate, and Joanna Strombek. 2022.
The Mist-Lining Handbook. E-book. Maastricht:
Stichting Restauratie Atelier Limburg.) provides a valuable resource to the field. It is full of
information on case studies, material information, and
sources. Once practiced, the mist-lining system’s variables
become something that the conservator can use to tailor
treatment to the particular needs of each case. The materials
and equipment needed are low cost and relatively easy to
source locally. It is hoped that these resources will give
this viable system new traction as a treatment option.
Conclusion
The mist-lining system remains frequently used at SRAL. A
numerical quantification of paintings treated with this system
has not been carried out. However, it is safe to say that over
the past thirty years, some hundreds of paintings belonging to
local, national, and international collections have been
treated by the SRAL team using this process. To date, none of
those so treated have been returned due to failure of the
lining. This body of work provides empirical confirmation of
the success of the system. Of course, failures—or rather,
disappointments—have occurred. These setbacks are typically
evident immediately after lining, before the artwork is
returned to its collection, and thus can be resolved
immediately. Reflecting on these complications provides
learning lessons for the SRAL team and encourages further
developments or adaptations of the system.
Conservation ethics have shifted over the past decades toward
a minimalist approach and avoidance of invasive treatments.
The change in ethos to the structural repair of canvases
allows the conservator to identify and find solutions to
separate problems presented by the painting. Lining has
become, with the mist-lining system, a custom action. There
are, of course, drawbacks to lining with this system, such as
covering the original canvas from view and using solvent
vapors to regenerate the lining adhesive, because those vapors
permeate throughout the painting structure. However, the
choice of adhesive and its relatively long-term chemical
stability mean that the adhesive bond can be reversed in the
future. The original reverse of the canvas can thus be
regained, if necessary, as the adhesive remains primarily on
the lining canvas when delining.
The idea that the original canvas will never be the same again
after a lining is carried out can now be left behind. The
mist-lining system is noninvasive and can provide additional
support for canvases without changing the stiffness of the
original canvas and without influencing the appearance or
saturation of the paint layers. While this process may not be
the only modern solution to resolve this new way of thinking,
it is an effective and versatile technique that has been used
successfully for the last thirty years at SRAL and elsewhere
to line a vast number of damaged paintings—and to reline
paintings previously lined with glue-paste or wax-resin
adhesives.
Appendix: Chronology of Workshops and Conferences
Disseminating the Mist-Lining System
1995–2006: Annual workshops for SRAL post-master’s students
2006–20: Biannual workshops for postgraduate University of
Amsterdam students
2007–8: Workshop and treatment of Hubert Vos’s
Empress Cixi at the Summer Palace, Beijing
2008: Workshop at Academy of Fine Arts, Dresden
2010: International symposium and workshop on lining
techniques at SRAL
2010: “Current Practice and Recent Developments in the
Structural Conservation of Paintings on Canvas Supports,”
ICOM-CC Paintings Working Group workshop at Metropolia
University of Applied Sciences, Helsinki
2011: Ripping Yarns: Traditions and Advances in the Structural
Repair of Canvas Paintings, British Association of Paintings
Conservator-Restorers conference at the Courtauld Institute of
Art, London
2011–14: Workshops at SRAL for students from the Courtauld
Institute, London (2011); Hamilton Kerr Institute, Cambridge
(2012); École Supérieure des Arts, Saint-Luc, Liege (2013);
and New University (NOVA), Lisbon (2014)
2012: Glue-Paste Linings: Tradition, Performance and
Stability, conference at Thyssen-Bornemisza Museum, Madrid
2015–18: Workshops for professions at M. A. Vrubel Museum,
Omsk (2015); Indira Gandhi National Centre for the Arts, New
Delhi (2016); Indian National Trust for Art and Cultural
Heritage, Kolkata (2016); the State Tretyakov Gallery, Moscow
(2018); and Brera Academy of Fiine Art, Arcore, Milan (2022)
2019–23: Getty Foundation, Conserving Canvas initiative,
Mist-Lining Workshop (2019); Pilot Virtual Online Mist-Lining
Workshop (2021); and Regional Mist-Lining Workshop (2023)
Notes
Acrylic adhesives are thermoplastic. Thus, dependant on
the Tg, gentle heat (about 50°C) is also sufficient to
tackify the dry adhesive and create a bond.
↩︎
Panorama Mesdag project (1986–96). The
Panorama was painted by Hendrik Willem Mesdag
and workshop in 1881; it is 14.70 m high × 114.70 m in
circumference (van der Donk, de Herder, and van Lier 1996van der Donk, Herbert, Hans de Herder, and André
van Lier. 1996. “Restauratie Panorama Mesdag.” In
Magisch Panorama. Panorama Mesdag, een belevenis
in ruimte en tijd, edited by Yvonne van Eekelen, Mattie Boom, Jan E.
Schierbeek, and Gerrit Willems, 151–63. Zwolle:
Waanders.). See also Panorama Mesdag Geschiedenis en restauratie
van een schilderij zonder grenzen:
https://www.npo.nl/close-up/11-07-2015/AT_2037854. While not technically a mist-lining, the Beva 371
lining adhesive was flocked and the heat-activated bond
was set using a low-pressure envelope developed by Jos
van Och, and is therefore one of the projects considered
evolutionary in developing the mist-lining system. This
remains the largest known painting lined (vertically) in
situ. ↩︎
Email correspondence between Kate Seymour and Thomas
Bernhofer, technical service manager, Coatings, SBU
Functional Solutions, Synthomer, March 28, 2018. See
also
http://www.synthomer.com. ↩︎
Until recently, tests at SRAL have been empirical in
nature, conducted on mock-ups or historical material
(such as old, removed lining canvases or deaccessioned
paintings). The lining process and specifications have
been adjusted and tested for specific cases. Samples
were analyzed between 2014 and 2017 by Dr. J. A. (Hans)
Poulis (director of the Adhesion Institute, TU Delft)
and a team of interns at TU Delft, Aerospace Division as
well as students from the University of Amsterdam as
part of master’s thesis research. See
Poulis, Seymour, and Mosleh 2020Poulis, J. A., Kate Seymour, and Yasmine Mosleh.
2020. “The Influence of Loading, Temperature and
Relative Humidity on Adhesives for Canvas Lining.”
IOP Conference Series: Materials Science and
Engineering
949, no. 1 (International Conference Florence
Heri-Tech: The Future of Heritage Science and
Technologies, 14–16 October 2020): 949 012086.
https://iopscience.iop.org/article/10.1088/1757-899X/949/1/012086/meta.. ↩︎
The toxicity of the solvents can also be considered.
Personal protective equipment (PPE) can be used to
safely work with toxic solvents. Environmental factors
and sustainability issues may also influence solvent
selection.
↩︎
To date, two more workshops have been organized under
the auspices of the Getty Foundation’s Conserving Canvas
initiative since the first workshop.
↩︎
Figure 9.1Close-up of the open-network sprayed lining adhesive. Image:
SRAL
Figure 9.2An open-weave linen canvas sprayed with an acrylic dispersion
adhesive. Note the masked-out area, which is the exact
dimensions of the painting that will be lined. Image:
SRAL
Figure 9.3Schematic view of the setup for the low-pressure envelope.
Image: Kate Seymour
Figure 9.4Video showing the mist-lining process. Video: SRAL
Figure 9.5Mist-Lining Workshop trainees practicing placing the
solvent-delivery cloth to reactivate the lining adhesive.
Image: Joanna Strombek
Figure 9.6Deaccessioned painting prior to lining. Note that the
out-of-plane deformations are mitigated prior to lining using
gentle tension and controlled humidification. Image:
SRAL
Figure 9.7The deaccessioned painting shown in figure 9.6 after lining.
The strip-linings added to apply tension prior to lining were
kept in situ. The lined painting is still mounted on the
temporary working loom. Note that the raised horizontal
deformations are reduced, but the craquelure pattern is still
evident. Image: SRAL