In preparation for an upcoming exhibition featuring preparatory works by Edwin Austin Abbey (1852–1911) for major mural commissions, conservators at the Yale University Art Gallery treated a 12-foot-diameter study for Abbey’s ceiling mural Passage of the Hours (1904–11). The unvarnished, matte surface of The Hours is well preserved, but improper storage in the early twentieth century caused structural damages to the canvas, including undulating deformations and sharp creases. This case study describes a series of innovative solutions to challenges presented by the structural treatment of this painting, which will travel internationally. A 14-foot-round aluminum working strainer was fabricated to help conservators resolve canvas deformations under tension. The painting was loomed temporarily onto this strainer using Velcro attachments. Once on the working strainer, structural damages and deformations were addressed vertically, providing access to both the recto and verso with minimal handling. The painting has been reunited with its original stretcher, itself a collapsible design that disassembles into two loose-lined hemispheres for travel. A segmented edge-lining, again using Velcro attachments, was designed to enable the painting to be efficiently and gently stretched at each venue, while adding little additional bulk to the fold-over edges.
24. Working around The Hours: The Structural Treatment of a Twelve-Foot-Round Ceiling Painting by Edwin Austin Abbey
- Cynthia Schwarz, Senior Associate Conservator of Paintings, Yale University Art Gallery
- Kelsey Wingel, Assistant Conservator of Paintings, Yale University Art Gallery
- Julianna Ly, Assistant Conservator of Paintings, Cleveland Museum of Art
- Ian McClure, Chief Conservator (retired), Yale University Art Gallery
Introduction
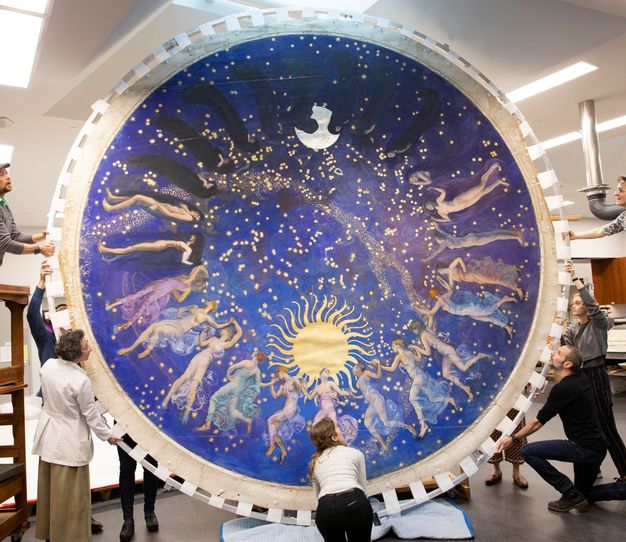
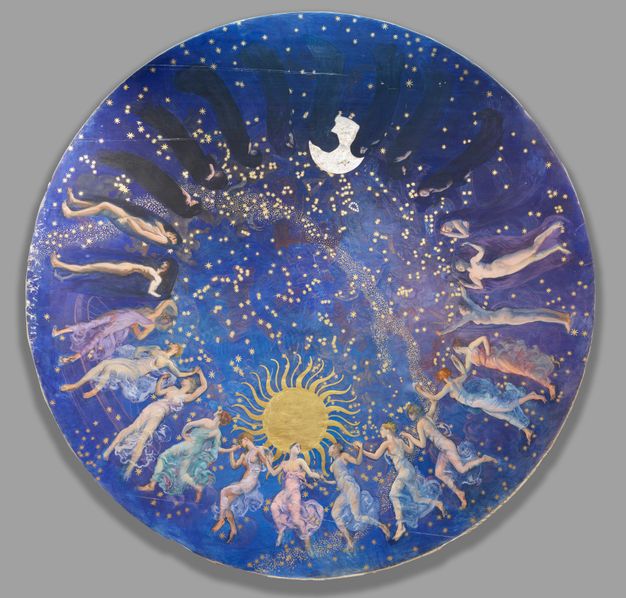
Painted between 1904 and 1911 by the American artist Edwin Austin Abbey (1852–1911), Cartoon for the Passage of the Hours (henceforth referred to as The Hours) is a 12-foot 6-inch-diameter painting in the collection of the Yale University Art Gallery (YUAG) (fig. 24.1). Created as a half-scale study for a 24-foot ceiling painting in the Pennsylvania State Capitol building, this work will feature prominently in an upcoming exhibition of Abbey’s preparatory studies for murals in American public buildings during the Gilded Age, a period referred to by artists of the time as the American Renaissance. Opening at YUAG in the fall of 2024 and traveling to the National Gallery, London, the following spring, this exhibition led conservators to devise unique solutions for the structural treatment, transport, and display of The Hours. These solutions included the fabrication of a custom aluminum working strainer, the use of Velcro hook and loop systems for stretching the painting to a temporary loom and its final strainer, the use of a silicone heating mat for attaching temporary looming strips, and the design of a segmented edge-lining template using computer-aided design (CAD) and computerized numerical control (CNC) cutting technology.
Although largely unknown today, Edwin Austin Abbey was one of the most prominent American painters working in British and American artistic circles at the turn of the twentieth century. Having begun his career as an illustrator in the publishing firm of Harper and Brothers in New York City, Abbey adopted oil painting in 1889 after moving permanently to England (Lucas, Edward Verral. 1921. Edwin Austin Abbey, Royal Academician: The Record of His Life and Work. 2 vols. London: Methuen.). Over the next twenty years, he exhibited several acclaimed paintings of Shakespearean subjects at the Royal Academy, eventually becoming an academician in 1898 (Lucas, Edward Verral. 1921. Edwin Austin Abbey, Royal Academician: The Record of His Life and Work. 2 vols. London: Methuen.). Like many painters of the time, Abbey also possessed a keen interest in mural painting and completed several commissions for British and American public buildings, his most famous being The Quest and Achievement of the Holy Grail, held in the Boston Public Library.
An essential component of Abbey’s artistic process was the creation of hundreds of preparatory studies for each mural or easel composition, many of which are now part of the Edwin Austin Abbey Memorial Collection at YUAG.1 Certainly one of Abbey’s largest studies, The Hours may also be one of his most ambitious and visually striking preparatory works. The painting was created as a half-scale study for a 24-foot ceiling painting currently in situ in the House of Representatives Chamber of the Pennsylvania State Capitol building in Harrisburg. In a composition that Abbey described as “one of the most successful designs I have ever made,” the painting depicts twenty-four women, personifications of the hours, moving around the perimeter of a celestial sphere filled with forty-eight constellations of the Northern Hemisphere (Lucas, Edward Verral. 1921. Edwin Austin Abbey, Royal Academician: The Record of His Life and Work. 2 vols. London: Methuen.). Heavily influenced by one of the star maps Peter Apian (1495–1552) published in his Astronomicum Caesareum, the constellations are indicated with carefully placed mordant-gilded stars (Ricci, Patricia Likos. 2015. “Edwin Austin Abbey’s ‘The Passage of the Hours’: Astronomy as History.” In Inspiration of Astronomical Phenomena VIII: City of Stars, edited by Brian Patrick Abbott, 43–55. San Francisco: Astronomical Society of the Pacific Conference Series.). With the sun passing from Virgo to Libra, the carefully balanced composition may reference the position of astronomical bodies around the fall equinox, when day and night are equal.
Painting Technique and Condition
The Hours was painted on a fairly open and evenly woven linen canvas (26 × 22 threads per inch) prepared with a commercially primed lead white ground. Abbey used the full width of the cloth, measuring 160 inches from selvage to selvage. As with many of his preparatory works, Abbey applied leanly bound paints in transparent, overlapping washes to create a matte, velvety surface. Dry media are present underneath, between, and on top of the paint layers, as Abbey used charcoal and white chalk to place and later modify the figures and constellations. Gold and silver leaf were applied over impastoed white paint and mordant to create the shimmering effects of the moon, sun, stars, and Milky Way.2
Early inventories of the Abbey collection indicate that The Hours remained stretched from the beginning of its creation in Abbey’s London studio until his possessions were packed for shipment to New Haven in 1937, when the work was rolled for transport across the Atlantic and subsequently placed into storage for eighty years. The Hours has never been exhibited or treated since its arrival, although it was surveyed and sympathetically rehoused twenty years ago by paintings conservator Anne O’Connor during a rehousing project funded by the Institute of Museum and Library Services.
The canvas remains supple and strong, but it displayed severe undulations from decades of tightly rolled storage, creating a corrugated pattern of planar deformations most visible in raking light (fig. 24.2). Several strong creases from past folding of the canvas extended the width of the painting and were made more visible by associated ground and paint loss. The tacking and fold-over edges display the most abrasion and loss to the canvas, ground, and paint layers, much of it corresponding to the particular fold patterns of a circular painting. Some of the abrasion and losses along the tacking edges may also have been caused by Abbey rolling the painting back and forth as he worked.
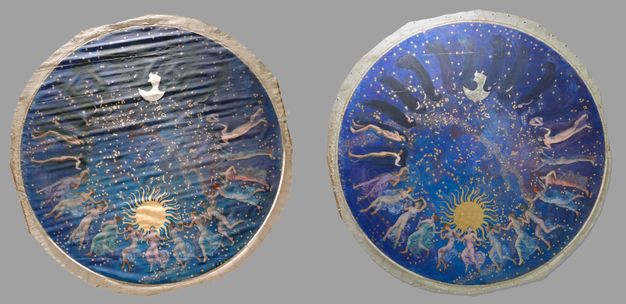
The paint and ground layers are inherently stable, with flaking occurring primarily along canvas creases in the painted surface and fold-over edges. The painting retains its unvarnished, matte surface. Minor burnishing of the surface is visible as small, glossy high points scattered throughout, where the paint film likely rubbed against the roll interleaf. The burnishing is most noticeable in the night half of the painting, where a thin layer of hazy white efflorescence is also present on the robes of the figures.3
Treatment
Initial Considerations
The large size, unusual shape, and unique condition concerns of The Hours, along with the particular travel and display requirements of an internationally traveling exhibition, presented several treatment challenges for the conservation team. The matte, underbound paint layers required a minimally saturating, adequately strong, flexible consolidant. Humidity and tension were required to resolve canvas deformations before fitting the painting to its stretcher, necessitating the temporary looming of the painting onto a working strainer. The large size of the painting and its anticipated international travel dictated that The Hours would need to be either rolled during transport and restretched at each venue or stretched onto a folding stretcher. Having located the original stretcher, a design that comes apart in two halves for travel, we decided to use the original and thus transport the painting rolled. The weakened tacking edges and the act of restretching the painting several times during the course of travel required conservators to devise an edge-lining system that would facilitate the safe and efficient stretching and unstretching of the painting while adding minimal extra bulk.
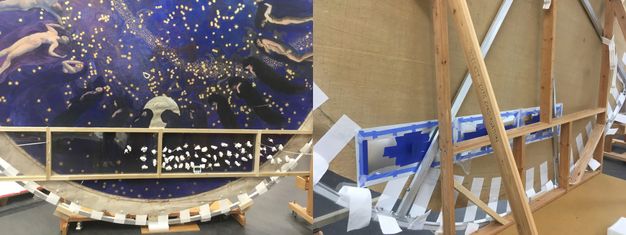
To prepare for treatment, a 16 × 16 foot platform of particle board pallets and Masonite was constructed to provide a clean, elevated workspace on the studio floor. The surface was prepared with blotter, Pellon, and tissue to provide a firmly padded surface for structural work. A rolling wooden bridge was also fabricated to span the length of the work, facilitating access to the center of the painting. The painting was unrolled on the platform for examination and documentation, including detailed digital condition maps.
Consolidation
Solvent testing indicated that the paint surface was highly soluble in aromatics and blanched with aqueous solutions. The matte surface was visibly saturated and darkened with many consolidants. A solution of 10% Aquazol 200 in isopropanol and water (1:1), mixed 3:1 with 0.25% funori, achieved adequately strong adhesion for the flaking ground and paint layers. The incorporation of funori reduced the gloss of the consolidant, achieving an appropriately matte surface with no visible difference.4 After initial introduction of isopropanol to the losses to aid flow, the consolidant was delivered with a small brush.
Looming
Once the ground and paint layers were stabilized, a temporary strainer, or loom, was devised to enable safer handling and the treatment of the planar deformations. Looming the painting allowed it to be humidified upright and under tension and enabled conservators to continuously adjust canvas tension as planar deformations were resolved. To account for the wide (up to 1 foot across) flattened fold-over edges, a 14-foot aluminum strainer was designed and fabricated from 1 1/2 inch hollow square stock by a local metalworking shop.5 The strainer was designed with an internal bisecting stabilizing structure that could be removed for uninterrupted access to the verso. Flanges around the outer edges allowed it to be bolted to the floor for additional stabilization, if necessary, when the cross members were removed. The use of aluminum instead of wood provided rigidity and a lighter structure. To enable the efficient and gentle stretching and unstretching of the painting during travel, a Velcro system was selected in lieu of tacks or staples, thereby minimizing damage that would be caused by repeated piercing of the tacking edges. Velcro also provides a much faster method of stretching a large painting, enabling conservators to attach a 12-foot painting to a stretcher in a matter of minutes.6
The intermediate looming step presented a valuable opportunity for conservators to test the capabilities of the Velcro attachment system before incorporating it into the final edge-lining and stretching design. The strength of the nylon Velcro attachment as applied was calculated (with the help of mechanical engineer Dr. Lukasz Bratasz) and shown to be well over twice the shear strength that would be needed should the painting ever be displayed as a ceiling, taking into account both the weight of the canvas and an average stretching tension of 270 N/m.7
Fifty-six looming strips, each 4 1/16 inches wide, were fabricated to be placed 4 inches apart around the circumference of the painting. The strips were cut from polyester sailcloth. At one end, where the strip was to be attached to the painting, two layers of Beva 371 film were adhered and the edge pinked. Four-inch-wide “loop side” Velcro (Loop 1000) was sewn to the opposite end of the strips to attach the painting to the strainer. Nylon Velcro was selected over polyester Velcro because of its demonstrated use in conservation and longer cycle life.8
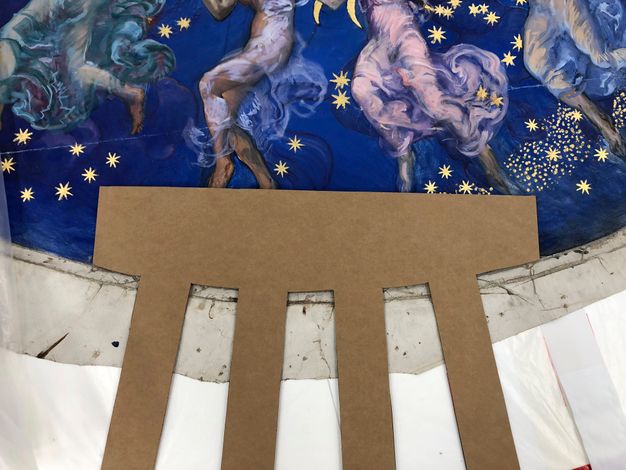
The looming strips were attached while the painting was faceup. Strip placement was guided by the use of a cardboard template to ensure that the attached strips established a radial line of tension from the center of the painting outward (fig. 24.3). To minimize flexing of the canvas support and to avoid applying heat to the easily burnished paint film, a flexible silicone heating mat was assembled using a commercially available product and basic wiring. Wired to a standard plug and connected to a rheostat for regulating the temperature, the mat could be slipped underneath the painting and looming strip to activate the Beva adhesive. The temperature of the mat and the surface of the painting were monitored with an infrared noncontact thermometer, and the rheostat could be adjusted accordingly. During Beva activation from the back of the painting, a metal plate cushioned with Volara and wrapped with Marvelseal was used to apply gentle pressure from the front and reflect heat back toward the painting. After the Beva was activated, the strips were cooled under a cushioned metal plate and weights.
The looming strips were attached 2 inches in from the tacking edge, over the tacking edge, and 2 inches past the tacking edge. The strips were not attached to the full length of the wide fold-over edges, as this was deemed unnecessary and some areas of canvas shrinkage prevented it. Rare earth magnets, cushioned with blotter and wrapped in Tyvek for easier removal, were used to prevent flexing of the unattached tacking margins when the painting was placed upright.
The aluminum strainer was prepared by attaching the hook side of the Velcro (Hook 88) to both the side edges and verso with West Systems marine epoxy, providing two points of contact for the looming strips. Temporary cardboard supports were fabricated to level the front of the strainer so that the painting would not slump during stretching. These pizza slice–shape cardboard inserts were removable from the back. The painting was gently slid onto the strainer and stretched faceup with the Velcro looming strips—a process that, remarkably, took only a matter of minutes. This attachment system allows for minor adjustments to tension around the circle. Once stretched, the 14-foot loomed painting was placed upright on a large in-house fabricated easel, repurposed from another project (see fig. 24.1).
Humidification
Following looming, planar deformations and creases were resolved through humidification and drying under pressure. This step was completed with the painting upright, enabling access to the front and back of the work and allowing conservators to monitor the painting’s surface. Upright humidification also allowed the painting to be periodically retensioned with the looming strips as the canvas deformations relaxed.
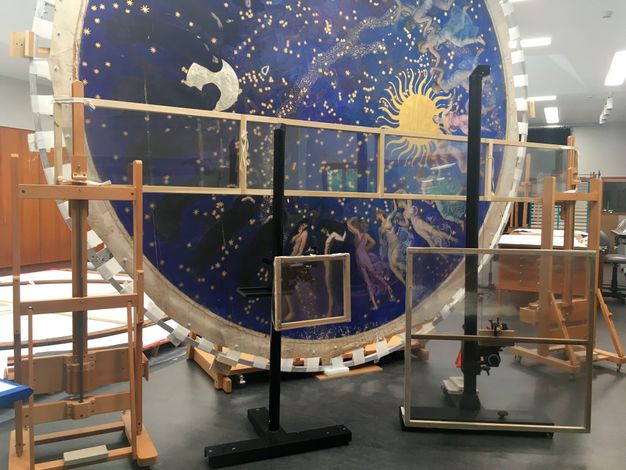
Three clear vertical panels composed of polycarbonate sheet stabilized with wooden frames were fabricated to provide a surface for the front of the painting during upright humidification (fig. 24.4). These panels were easily adjusted and movable using photographic light stands and adapted easels. The panels were covered in silicone-release Mylar and positioned against the face of the painting to provide a stable working surface during treatment. Damp blotters were positioned on the verso of the canvas and layered with Mylar and a metal plate. As one conservator held the blotter and metal plate in place, a colleague applied rare earth magnets to the panel on the front. The strength and number of magnets could be adjusted to apply variable amounts of pressure to the canvas and blotter.9 The clear panels allowed conservators to monitor the front of the painting (fig. 24.5).
The canvas responded well to this system of controlled humidification. Conservators found that ten-minute exposures to a damp blotter, followed by controlled drying under dry blotters—forty-minute cycles of dry blotters switched three times—resolved many planar deformations. In areas where canvas creases and folds caused tented paint, a suction platen was used concurrently to coax the deformed paint layers into plane.
Modifications to the Original Strainer and Edge-Lining
Due to its large size, The Hours needed to be either rolled for travel and stretched at each venue or stretched onto a custom-built folding stretcher that allowed it to be shipped in its folded orientation. Fortuitously, the original wooden strainer, long dissociated from the painting, was discovered in YUAG’s architectural fragments collection months before the treatment began. Conservators decided to reunite the painting with its original strainer for the exhibition of this work.
Although Abbey sometimes used folding stretchers for other paintings, such as Columbus in the New World (1906) in the YUAG collection, the strainer for The Hours disassembles into two half circles for transport. It is composed of six curved outer members joined together with bridle joints. The strainer was constructed to fit together in two halves along two long crossbars. The two halves were likely originally secured together with metal hardware, but the hardware and crossbars did not survive and had to be reconstructed in house.10 The newly constructed middle crossbars join together lengthwise with a series of heavy-gauge bed bolts and threaded crescent washers, as well as biscuits for positioning. Additional heavy mending plates are used to reinforce all joins. Before stretching the painting, the original strainer was cleaned with cosmetic sponges, and minor splits were repaired with hide glue. Several damages to the perimeter of the strainer were filled with Araldite epoxy putty to ensure a smooth fold-over edge.11
The decision to use the original strainer requires that the painting travel on a roller and be restretched at both exhibition venues. To restretch the painting as noninvasively as possible at each venue, and encouraged by the success of the looming strips, conservators decided to use a nylon Velcro attachment for the final stretching. The softer, loop side of the Velcro is attached to an edge-lining, with the hook side attached to a Dibond panel screwed into the back face of the strainer. The two halves of the strainer were loose-lined with Trevira CS fabric to lend additional support to the canvas and provide a surface on which to unroll and stretch the painting during installation.12
Edge-lining was pursued to provide additional support to the tacking edges during stretching and unstretching and to serve as a means by which the painting could be attached with Velcro to the strainer. Mock-ups indicated that the circular shape of the painting, its wide fold-over edges, and the extra bulk from the Velcro would present several challenges during stretching. Conservators aimed to design an edge-lining system that would not add significant bulk to the edges of the painting, as it might become a hindrance during rolling.
To minimize excess material, the edge-lining was designed to take the form of segments, or strips, rather than one continuous piece of canvas. Edge-lining strips were designed to fit around the circumference of the circle and have tabs that fold over the back of the strainer. Twenty-four strips were constructed from Trevira CS fabric, Beva 371 film, and 6-inch-wide loop-side Velcro (Loop 1100) (fig. 24.6). The strips were designed to attach to the entire diameter of the tacking edge and 3 inches behind the face of the painting, providing continuous support around the edge of the work. To avoid creating excess bulk at the fold-over edges, the strips were designed with three tapered Velcro tabs calculated to fit together with no overlap when folded around and attached to the back of the strainer.
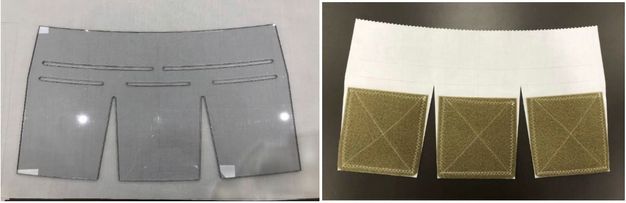
Using the ideal geometric measurements of the painting, a CAD design for the edge-lining was developed and, with the help of a CNC unit, a template was cut from acrylic sheet.13 The template was traced onto the fabric, ensuring that the Trevira warp direction was always oriented radially from the center of the painting to the center of the middle tab. Two layers of Beva 371 film were applied to one side of the edge-lining strips, and the interior edge was pinked. Three strips of 6-inch-wide loop-side Velcro were sewn with heavy-duty polyester thread to the tabs on the opposite end of the edge-lining strip. To assist with the sewing process, the Velcro was first tacked in place with one layer of Beva 371 film.
The loomed painting was placed facedown onto a fresh bed of blotter and tissue for the edge-lining attachment. The looming strips were removed incrementally with a tacking iron, and the edge-lining strips were attached side by side, also with a warm tacking iron. Conservators used tacking irons of several different sizes and shapes to ensure that the edge-lining strips were well adhered to existing canvas folds and creases along the tacking edges. The Trevira conformed well to these small deformations. After attachment, the strips were cooled under metal plates and weight. Additional strips of Velcro were used to attach the edge-lining tabs to the aluminum loom, allowing the painting to remain under tension during most of the edge-lining process.
The 6-inch-wide hook-side Velcro (Hook 89) was attached to the back of the strainer by epoxying the Velcro to four curved pieces of Dibond aluminum composite panel. Attaching the Velcro to the panel rather than directly to the strainer presented several advantages: One, the aluminum panel, cut to match the shape of the strainer and to bridge the bridle joints, served to further stabilize the strainer. In addition, adhering the Velcro to the panel rather than directly to the strainer protected original chalk markings, inscriptions, and labels. The panel pieces were secured to the strainer with several strategically placed screws.
Stretching
In a carefully planned series of steps to prepare for stretching, the edge-lined painting was unloomed and the aluminum strainer removed (fig. 24.7) The two halves of the original wooden strainer were then placed on the verso of the painting to ensure a close fit. After it was ensured the painting would fit onto its strainer, the two halves of the strainer were loose-lined with Trevira CS fabric, and the painting was successfully stretched onto its strainer using the Velcro edge-lining.
Continuing Work and Conclusion
During the COVID-19 pandemic, treatment was halted on this painting for most of 2020, and it progressed slowly to accommodate social distancing guidelines. With the structural treatment nearly complete, the next steps include surface cleaning, filling losses with a flexible material, retouching, fabricating a travel roller, working with fabricators to construct a modular frame, navigating the logistics of international travel, and, finally, ensuring the painting is housed appropriately in long-term storage.
This treatment has been and continues to be a product of a team of conservators, fellows, interns, engineers, curators, fabricators, and consultants from across the museum and Yale University community. The complex treatments associated with this exhibition have led to technical innovation, as conservators have striven for minimally interventive approaches that enable the international travel and display of Abbey’s delicate, untouched works for the first time. Treatments have also facilitated the in-depth study of Abbey’s unique painting technique and materials, contributing to an increased understanding of the working practice of American and British mural painters at the turn of the twentieth century.
Acknowledgments
The authors would like to thank Olav Bjornerud, Dr. Lukasz Bratasz, Jason DeBlock, Anthony Florio, Andrés Garcés, Theresa Fairbanks-Harris, Elizabeth Godcher, Jacquelyn Peterson Grace, Alexander Harding, Burrus Harlow, Lisa Hodermarsky, Richard House, Anaiah Johnson, Dr. Pablo Londero, Janet Miller, Dr. Mark Mitchell, Sydney Nikolaus, Anne O’Connor, Vicki Onofrio, Paul Panamarenko, Elizabeth Paolini, Irma Passeri, Katherine Peters, Thomas Philips, Laura Rivers, Sarah Schlick, Charlene Senical, Jessica Smolinski, Caitlin Sofield, and Dr. Marcie Wiggins.
Appendix: Supplies
Beva 371 film, Pellon, blotter
TALAS
https://www.talasonline.com
Velcro
Looming Velcro: 4 in. Loop 1000 and 1 in. Hook 88
HookandLoop.com
https://www.hookandloop.com
Edge-Lining Velcro: 6 in. Loop 1100 and 6 in. Hook 89
Industrial Webbing Co.
https://www.industrialwebbing.com
Rare earth magnets
For tacking edges: #NSN0683
For humidification: #NSN0582, #NSN0635, #NSN0642, #CUP0303
MAGCRAFT
https://www.magcraft.com
Trevira woven polyester fabric
Crea (previously Theatex)
https://www.creatheatertextiel.nl
West Systems epoxy
Epoxy resin #104 and Epoxy Hardener #206 and #209
West Marine
https://www.westmarine.com
Dibond 3 mm aluminum composite panel
3A Composites
https://3acompositesusa.com/products/dibond/
Silicone heating mat
Omega Engineering Inc.
No longer available from manufacturer; purchased on eBay
Notes
-
The Hours is one of over three thousand studies on paper and canvas that came directly from Abbey’s studio to Yale University in 1937. For more information on the history of the Abbey collection, see Hamilton, George Heard. 1939. “The Edwin Austin Abbey Collection.” Bulletin of the Associates in Fine Arts at Yale University 9, no. 1: 10–13.. ↩︎
-
The metal leaf was characterized with X-ray fluorescence spectroscopy (XRF) by Dr. Pablo Londero and Dr. Marcie Wiggins using the facilities and equipment of the Yale Institute for the Preservation of Cultural Heritage. For more information on Abbey’s materials and techniques, see Wingel, Kelsey, Richard Hark, Katherine Schilling, Marcie Wiggins, Pablo Londero, Anikó Bezur, and Cynthia Schwarz. 2019. “Hazy Conditions: Revealing the Materials and Techniques of Edwin Austin Abbey’s Efflorescing Oil Paintings and Exploring New Approaches to Treatment.” In AIC Paintings Specialty Group Postprints 32, edited by Wendy Partridge, 131–56. Washington, DC: AIC.. ↩︎
-
Surface efflorescence is noticeably present on about half of Abbey’s preparatory studies in the YUAG collection. The efflorescence on this painting was not analyzed, but it has been characterized on other Abbey paintings as free fatty acids and metal soaps of zinc or lead. For more information, see Wingel, Kelsey, Richard Hark, Katherine Schilling, Marcie Wiggins, Pablo Londero, Anikó Bezur, and Cynthia Schwarz. 2019. “Hazy Conditions: Revealing the Materials and Techniques of Edwin Austin Abbey’s Efflorescing Oil Paintings and Exploring New Approaches to Treatment.” In AIC Paintings Specialty Group Postprints 32, edited by Wendy Partridge, 131–56. Washington, DC: AIC.. ↩︎
-
The funori was prepared by an adapted purification process similar to the rinse, soak, heat, filter, and purify methods described in Swider, Joseph R., and Martha Smith. 2005. “Funori: Overview of a 300-Year-Old Consolidant.” Journal of the American Institute for Conservation 44, no. 2: 117–26. http://www.jstor.org/stable/40025138.. ↩︎
-
The aluminum strainer was fabricated by Promoco Manufacturing Co., 300 Morgan Lane, West Haven, CT 06516. ↩︎
-
Many of the advantages of using Velcro for stretching large, traveling paintings are also discussed in McMillan, Gillian. 2005. “Touring Robert Rauschenberg’s 32-ft-long Painting Barge.” In Big Pictures: Problems and Solutions for Treating Outsize Paintings, edited by Sally Woodcock, 45–51. London: Archetype.. ↩︎
-
This value was chosen as a high estimate of tensions on a stretched painting from relevant literature, such as Iaccarino Idelson, Antonio. 2009. “About the Choice of Tension for Canvas Paintings.” CeROArt: Les dilemmes de la restauration, no. 4. https://doi.org/10.4000/ceroart.1269.. The shear strength of Velcro, 8 pounds per square inch, was provided by the manufacturer. ↩︎
-
According to Velcro manufacturer specifications, nylon Velcro is rated “high” for cycle life, whereas polyester is rated “medium” (Velcro Brand Woven Fasteners Product Guide, https://www.hookandloop.com/media/wysiwyg/pdf_content/Woven-Fasteners.pdf). Gardiner and Weber reported that a “high” cycle life is able to withstand 10,000 closures (Gardiner, Joy, and Joseph Weber. 2010. “Failure to Bind: A Re-examination of the Ageing of Hook and Loop Fasteners.” Textile Specialty Group Postprints 20, 116.). ↩︎
-
Although rare earth magnet vendors supply pull-force specifications, the force exerted on the canvas varies by the number and thickness of layers involved in a conservation treatment. For the purposes of this treatment, the magnets had to be strong enough to suspend the metal plate and blotters against the painting surface. ↩︎
-
New pine crossbars and the center joining mechanism were fabricated by museum technician Paul Panamarenko. ↩︎
-
This portion of the treatment was completed by conservator Sydney Nikolaus. ↩︎
-
Trevira CS fabric is a woven polyester selected for its nice hand, low stretch on the bias, and inert qualities. Manufactured for the theater industry, it is available in 3 and 5 meter widths, making it ideal for loose-lining and lining large paintings. One of the authors was introduced to this fabric at the SRAL Mist-Lining Workshop in 2019. ↩︎
-
The authors would like to thank Olav Bjornerud and Jason DeBlock for calculating and fabricating the edge-lining template. The template was cut with a custom ShopBot CNC unit in the YUAG fabrication shop. ↩︎