Chicago
Lavorini, Barbara, and Luigi Orata. “11. Customized
Methodologies Developed to Solve Conservation Issues with Large
Paintings on Canvas.” In
Conserving Canvas, by
Cynthia Schwarz, Ian McClure, and Jim Coddington. Los Angeles:
Getty Conservation Institute, 2023.
https://www.getty.edu/publications/conserving-canvas/ii-present-practice/11/.
MLA
Lavorini, Barbara, and Luigi Orata. “11. Customized
Methodologies Developed to Solve Conservation Issues with Large
Paintings on Canvas.”
Conserving Canvas, by
Cynthia Schwarz et al., Getty Conservation Institute, 2023,
https://www.getty.edu/publications/conserving-canvas/ii-present-practice/11/.
Accessed DD Mon. YYYY.
11.
Customized Methodologies Developed to Solve Conservation Issues
with Large Paintings on Canvas
11. Customized Methodologies
Barbara Lavorini,
Paintings Conservator,
Istituto Centrale per il Restauro, Ministry of Culture,
Rome
Luigi Orata,
Paintings Conservator,
private studio, Florence
This paper describes some customized methodologies developed
to solve certain complex problems on a large-size painting
on canvas by Alessandro Allori, which was restored at
Laboratorio degli Angeli in Bologna for the exhibition
Ferdinando I de’ Medici: Maiestate tantum at the
Medici Chapels in Florence. These methods are used to
illustrate the authors’ own approach to complex structural
problems.
KEYWORDS: large-size
paintings, lining canvas, Plextol, vacuum, tub system
Introduction
“We are firmly convinced that there cannot be a single method
valid for every painting—not only for obvious reasons related
to the nature of the work, but above all because of the
individual ‘character’ of the painting, with its ‘own’ fabric,
its ‘own’ ground preparation, its ‘own’ pigment and its ‘own’
reaction to the passage of time. It follows that if there is
no single method and no single material appropriate to every
picture, it must and will be for the painting itself to impose
a careful choice between the various methods and materials”
(Baldini and Taiti 2003, 115Baldini, Umberto, and Sergio Taiti. 2003. “Italian Lining
Techniques: Lining with Pasta Adhesive (and Other Methods)
at the Fortezza da Basso, Florence.” In
Lining Paintings: Papers from the Greenwich Conference
on Comparative Lining Techniques, edited by Caroline Villers, 115–20. London:
Archetype.).
The quotation above is an excerpt from Sergio Taiti and
Umberto Baldini’s address at the Greenwich lining conference
in 1974. Sergio Taiti had been chief conservator for
structural treatments on canvas at Opificio delle Pietre Dure
of Florence for about twenty years, and during his tenure he
distinguished himself for having a deep sensitivity toward the
specific characteristics of paintings. We didn’t have the
opportunity to meet him in person, but we had our training in
canvas conservation with Luciano Sostegni, who had worked
closely with Taiti and became his successor at the Fortezza da
Basso’s Laboratories. Although our profession led us to test
and use new and different materials and methods, his teachings
remain the basis for our approach to work and we are still
firmly convinced of their validity.
We believe that preliminary study of a painting, in order to
deeply understand its materials and technique as well as its
present condition, is essential to define customized
treatments for conservation. From this point of view, we try
not to focus on only a single material or methodology;
instead, during the preliminary decision-making phase, we
usually take into account a wide range of possibilities. By
doing so, we allow ourselves the opportunity to employ
different materials in different ways.
Moreover, we consider the minimal intervention approach as our
guide, but we believe that some clarification about this
matter is needed. We think that the minimum should
definitely be calibrated to the specific needs of the artwork
in order to solve its conservation problems, slow its
degradation process, and try to avoid further treatments in
the near future. If keeping the treatment to a minimum means
minimizing the impact of conservation on the artwork, we
should consider only treatments that actually solve the
identified problems. For example, neglecting to guarantee the
color or the priming layers’ adhesion to the original support
effectively might lead the painting to undergo another
conservation treatment within a short time, and this will
probably result in a more stressful and invasive practice in
the end. At this point, can we say that we have kept our
treatment to the minimum needed, or should we admit that what
we have done is not enough appropriate to the conservation
needs of that individual artwork?
For a decade we have adopted and promoted a diagnostic
protocol1
aimed at defining a more accurate and objective situation to
provide additional information to help the conservator (with
his own experience) in choosing a more appropriate
methodology, specifically suited to the artwork’s structural
conservation conditions.
Issues with the Painting
The painting by Alesandro Allori is
Allegory with the Triumph of Florence and measures
about 30 square meters. It was created in 1588–89 to celebrate
the marriage of Ferdinando I, grand duke of Tuscany, to
Christine of Lorraine, and was located outdoors, above the
arch of the Florentine Porta al Prato. The scene was painted
with a leanly bound oil applied in thin and even layers. The
fine linen canvas was made of four pieces, whose selvages were
positioned horizontally and sewn together. The support was
prepared with a thin, light gray ground, probably using animal
glue and a little linseed oil as a binder.
When we first examined the painting, it was in storage at the
Pitti Palace. The canvas was mounted on a three-part folding
wooden stretcher (fig. 11.1), probably
provided after the canvas was lined with a glue-paste adhesive
in the early part of the twentieth century. The painting
suffered new damage during the flood of Florence in 1966: it
was partially impregnated with water, mud, and naphtha (which
had leaked from buildings’ heating systems and was carried by
the flood water), and diffused biological growth developed.
Repeated handling of the folded painting over time had led to
the permanent deformation of the original canvas along the
perimeter, resulting in a 15-cm extension at the edges
compared to the middle area of the support width. The old
lining adhesion was compromised, with evident and diffused
blistering. Over two hundred new tears, cuts, and holes
weakened the canvas, and some patches had been glued to the
back of the lining using animal glue or wax resin.
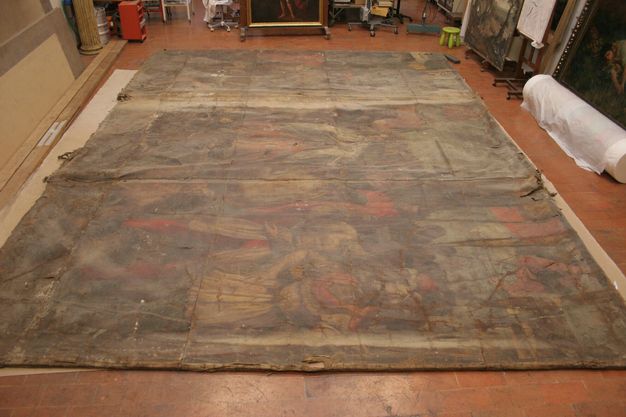
ExpandFigure 11.1Alessandro Allori (Italian, 1535–1607),
Allegoria con il trionfo di Firenze, 1589. Oil on
canvas, 484 × 630 cm (190 1/2 × 248 in.). Florence, Medici
Chapels. The painting before restoration, mounted on a
three-part folding wooden stretcher.Image: Laboratorio degli Angeli S.r.l., su concessione
del Ministero per i beni e la attività culturali e per il
turismo – Museo Nazionale del Bargello (prot.
MIBACT_MN-BAR n.1446-P del 01/07/2020). No modification or
further reproduction of the image is allowed.
Thick mud residue, molds, and patches were also visible on the
front. The original seams appeared partially ripped and
deformed, and extensive fillings and retouching on the paint
layers were mostly applied on these areas.2
The painting had been folded with the painted side face in,
and this led to the detachment and loss of thousands of paint
fragments. After the flood, an attempt to fix unstable paint
layers was carried out using wax. This led to the complete
waterproofing of some localized areas, especially around the
seams joining the pieces of the original canvas.
The main problems to solve were reducing the huge deformations
of the canvas, restoring the compromised structural integrity
of the support, providing a good adhesion between the paint
layers and the original canvas and, finally, evaluating the
ability of the support to undergo a new tensioning on the
stretcher, considering its large size and significant weight.
Conservation Treatment
To define the methodological choices and the materials to use,
compatibility with the original materials, use of minimum
amounts of new materials, and future reversibility were all
considered. Since full reversibility of binding agents for
consolidation or adhesives that impregnate the paint layers is
often impossible, it was important to us to leave open the
possibility to use a wide range of materials in the future.
Three main operating activities to reflect on were identified:
the facing, the re‑adhesion of the paint layers to the
support, and the lining.3
These three phases are clearly separate, even if strongly
interconnected, especially with regard to facing and
consolidation. This is due not only to the need for
compatibility with the painting materials, but above all to
the intimate connection taking place during the intervention.
Treating the canvas from the back with an adhesive to fix
flaking paint layers will probably lead to the impregnation of
the faced surface. It is then crucial to consider products
with similar properties and solubility—or at least to evaluate
the possible interactions of materials. This is important to
ensure correct and easy removal of the facing. For that
reason, theoretical considerations were reviewed and tests
were run to select the best material to solve the specific
problems mentioned above.
In order to facilitate the flattening of the canvas and to be
sure of safeguarding the appearance of the lean oil technique,
an aqueous method was preferred and adhesives like extra-fine
rabbit-skin glue and Aquazol were tested.4
Before facing the surface, dust and mud residue were carefully
removed using soft brushes and swabs with deionized water.
Some local preventive fixing was needed to avoid color losses.
Old fills and retouching were eliminated, mold was removed,
and the areas affected were disinfected.
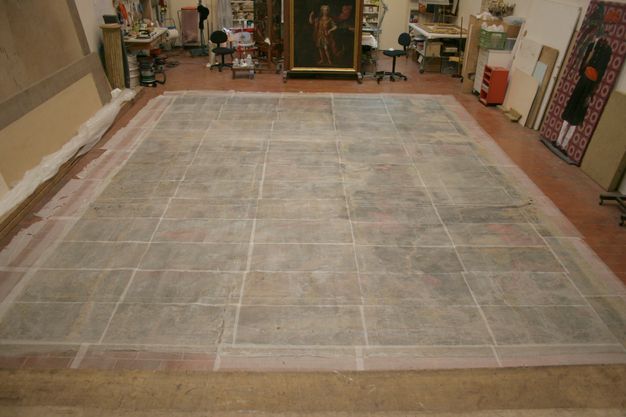
During the surface facing, a first flattening of the canvas’s
deformation was possible, thanks to the moisture added by the
aqueous adhesive and to some light tensioning provided by the
contraction of Japanese paper while drying (fig. 11.2).5
ExpandFigure 11.2Allegoria during the restoration process. The
painting is faced with Japanese paper; sheets fixed around
the perimeter were glued to the worktop to prevent
shrinkage as the glue dried.Image: Laboratorio degli Angeli S.r.l., su concessione
del Ministero per i beni e la attività culturali e per il
turismo – Museo Nazionale del Bargello (prot.
MIBACT_MN-BAR n.1446-P del 01/07/2020). No modification or
further reproduction of the image is allowed.
Using a polystyrene roller, the painting was then turned
facedown to work on the back and remove the old lining adhered
with glue paste.6
The residue of the old glue paste was carefully removed with a
scalpel. In some problematic areas where the adhesive was
particularly tough, an agar gel7
was used to swell and soften it, making removal easier.
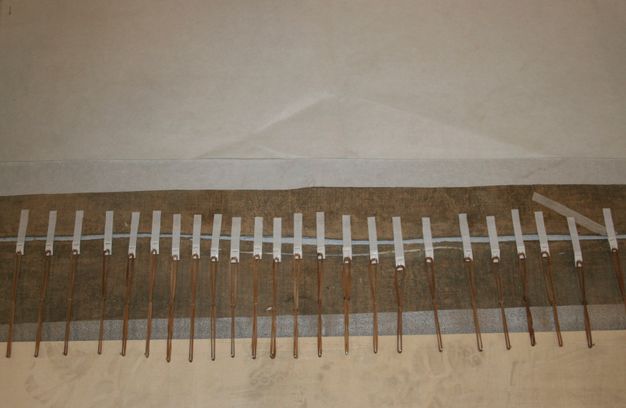
All cuts were brought back to the correct position with the
aid of tension applied using tie-beams adjusted by rubber
bands (fig. 11.3), and moisture
released through a Gore-Tex fabric. Polyester fabric tie-beams
were adhered to the back of the canvas with original formula
Beva 371 film. The humidification, tension, and time needed
were related to the extent of deformation being treated. A
polyester thread was used to resew the selvages where
necessary, passing through the holes of the original seam when
possible.
ExpandFigure 11.3Detail of a seam brought back to the correct position
with the aid of tension (tie-beams) and moisture.Image: Laboratorio degli Angeli S.r.l., su concessione
del Ministero per i beni e la attività culturali e per il
turismo – Museo Nazionale del Bargello (prot.
MIBACT_MN-BAR n.1446-P del 01/07/2020). No modification or
further reproduction of the image is allowed.
Many cycles of humidification and tension were needed to
flatten the canvas. Due to the very large size of the
painting, stretching it on a temporary loom was deemed
expensive and impractical, so it was decided to tension it on
a thin worktop placed directly on the floor. To do this,
strips of polyester canvas8
were fixed to the perimeter with Beva 371 film, reactivated at
two different times: the first on the polyester canvas, at
80°C, and the second on the back of the original canvas, at
65°C. This particular procedure is intended to create a
stronger bond between the adhesive and the polyester canvas
than between the adhesive and the original canvas, ensuring
better reversibility in the future. Ideally, no adhesive will
be left on the original canvas when the strips are removed; at
worst, only a few traces will remain.
A complex problem we needed to solve was recovering the
adhesion of paint layers that had been treated with wax or
impregnated with nonpolar substances in the past, using an
aqueous adhesive. This was preferred to help the flattening of
the original canvas and to guarantee the easy removal of the
facing. Tests were performed to evaluate the strength of the
bond produced by extra-fine rabbit-skin glue, sturgeon glue,
and Aquazol 500 and 200 dissolved in water, ethanol, and
acetone. Aquazol 500 in acetone showed good adhesion
properties on wax samples.9
To adhere the paint layers to the original canvas, two coats
of Aquazol 500 were applied at two distinct times. First,
Aquazol 500 in acetone at 10%10
was applied to guarantee good adhesion of the areas that
presented wax and nonpolar substances. Later, a second
application of the same resin dissolved at 5% in a solution of
acetone and water (1:1) was used to effectively increase the
flattening of the canvas.
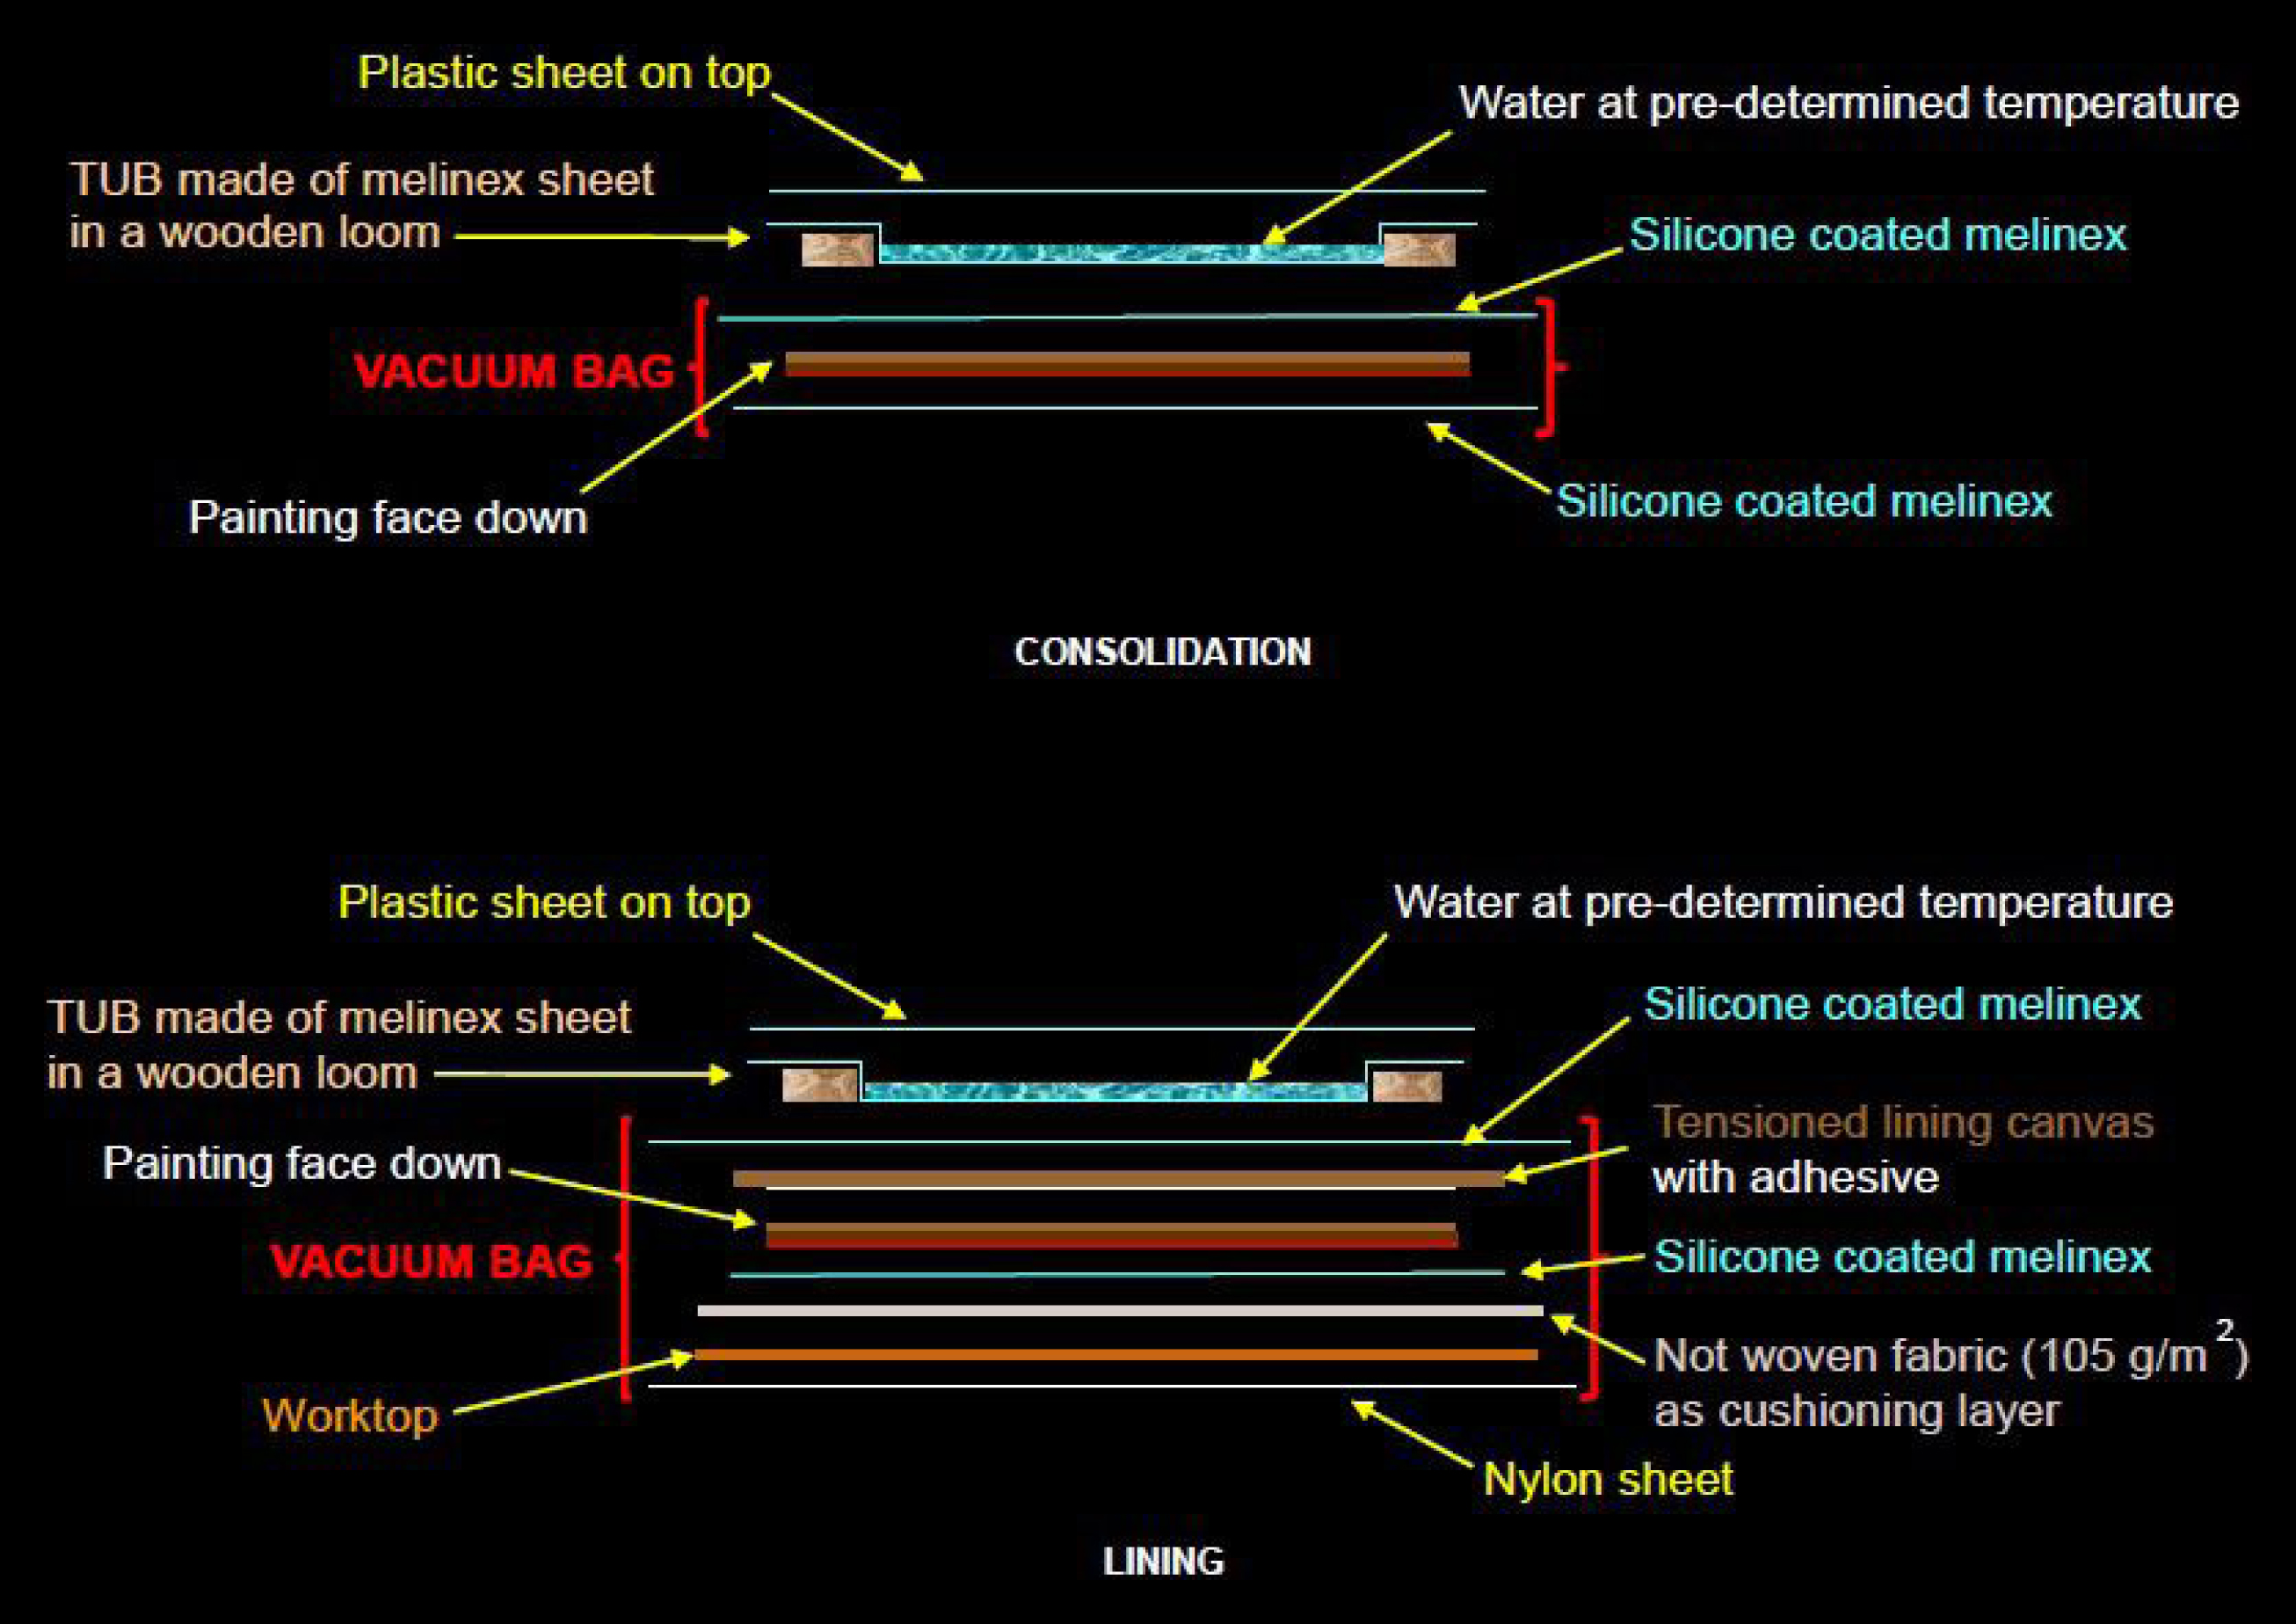
After the complete evaporation of solvents, always keeping the
painting tensioned,11
the thermoplastic adhesive was reactivated by heat in a vacuum
bag (envelope). Heat was transferred to the adhesive using
water at a predetermined temperature, provided by a movable
temporary “tub” figure 11.5. The
materials needed to carry out this intervention are shown in
figure 11.4. The painting was placed
facedown in a vacuum bag made of silicone-coated polyester
film (Melinex). On the top of this bag, a tub made of a
Melinex sheet placed in a wooden loom12
was prepared. A certain volume of water, preheated to a
predetermined temperature, was poured into the tub . After ten
minutes,13
the water was removed and the tub was shifted to treat another
area. This operation was repeated to treat the whole surface,
always keeping the painting under pressure in the vacuum
bag.14
ExpandFigure 11.4The tub system used to reactivate a thermoplastic resin
in a vacuum bag.Image: Barbara Lavorini and Luigi Orata
ExpandFigure 11.5Video of the tub system.Video: Barbara Lavorini and Luigi Orata
It’s important to note that this method is not an alternative
to the use of a hot table, but it permits heat transfer from
the back when it is necessary to work with the painting
facedown.15
Using a vacuum system and applying heat through a tub
containing preheated water guarantees that the whole surface
is treated with the same pressure and temperature,
substantially reducing the risk of nonhomogeneous performance
of the thermoplastic adhesive.
In preparation for mending structural damages, some adhesives
were tested (table 11.1). To avoid
damage to the original canvas in the future, the breaking
point of the adhesive should be equal to or slightly less than
the toughness value of the original yarn (Orata 2009Orata, Luigi, 2009.
Tagli e strappi nei dipinti su tela, metodologie di
intervento
[Cuts and tears on canvas paintings: Treatment methods].
Florence: Nardini.), measured by tension test with a dynamometer. The adhesive
with a breaking point that is similar to that of the original
yarn is highlighted in red in the table.
Table 11.1 Tensile test performed on different adhesives used to
join strips of canvas 1 inch wide
Resin
Breaking point (kg)
Sample 1
Sample 2
Sample 3
Average value
Polyamide
3.320
1.330
1.970
2.206
Akeogard AT35
0.320
0.430
0.496
0.415
Akeogard AT35 + water (1:1)
2.300
1.400
1.400
1.900
Ethylene vinyl acetate (EVA)
1.080
0.850
1.020
0.938
Source: Orata 2009. Used with permission.
Table: Barbara Lavorini and Luigi Orata
All the cuts, tears, and holes (more than two hundred) were
mended thread by thread using Akeogard AT3516
applied with a tiny brush, using an optical visor. All the
structural damages and the four seams were further reinforced
by applying monofilament fabric patches adhered with a mixture
made of 80% Plextol B500 and 20% Dispersion K360, reactivated
by butyl acetate.
With the first steps of consolidation, tear mending, and
humidification complete, we evaluated if lining was necessary.
A series of elements, such as the dimension of the canvas in
relation to its ability to support itself, the presence of
more than two hundred structural damages, the advanced
degradation of the cellulose, and the presence of four
horizontal seams, led us to the decision to apply an auxiliary
support. As mentioned, every case is unique, and sometimes it
is appropriate to assess the use of different methods and
materials for lining.
Glue-paste lining did not seem suitable, not only because it
would increase the weight of the whole structure, but also
(mostly) due to the difficulty in maintaining the appearance
of the painted surface, preventing the seams’ stitches from
impressing on the front, and preserving the original seams
(Lavorini 2007Lavorini, Barbara. 2007. “La foderatura a pasta secondo
il metodo fiorentino: Varianti di applicazioni della pasta
fiorentina” [Glue-paste lining with the Florentine method:
Variants of applications]. In
Dipinti su tela: Problemi e prospettive per la
conservazione, giornata di studio, Ferrara, 1 aprile
2006, edited by Marco Ciatti and Erminio Signorini, 29–48.
Padua: Il Prato.). Lining with Beva 371 was also disregarded due to the
evaporation of a large amount of solvent (such as toluene)
during the operation. Cold-lining, using the Mehra system
(Mehra 1981aMehra, Viswha R. 1981a. “The Cold Lining of Paintings.”
The Conservator 5, no. 1: 12–14.), was just as risky for the large amount of butyl acetate
(or similar solvent) needed to reactivate Plextol.17
Using a thermoplastic adhesive in aqueous dispersion appeared
to be a good solution to avoid the use of a fair amount of
solvent, with its attendant risks of toxicity and fire.
A study focused on testing different adhesives obtained by
mixing Plextol B500 and Dispersion K360,18
in different proportions, was carried out to obtain a final
mixture to be reactivated by heating. Empirical tests were
performed to define the approximate reactivation temperature
and the reversibility of each mixture (Orata and Capellaro 2013Orata, Luigi (ed.), and Filippo Capellaro. 2013. “Un
adesivo termoplastico modulabile secondo le
caratteristiche dell’opera, La foderatura di un grande
formato particolare” [A thermoplastic adhesive modulated
according to the characteristics of the work. The lining
of a particular large format]. Edited by Luigi Orata.
Kermes: La rivista del restauro 26, no. 90:
57–66., 57–66) in order to identify the one that would better fit
the features and conservative conditions of the painting (table 11.2). The possibility of matching specific needs makes this
acrylic-based class of adhesives very advantageous in devising
innovative solutions.
Table 11.2 Test results for different resin mixtures performed
to determine reactivation temperature and evaluate
bond and reversibility
Sample
Resin mixture
Temperature
40°C
50°C
60°C
70°C
80°C
1
100% Plextol B500
W
W
W
W
W
2
100% Dispersion K360
S
S
G
G
G
3
80% B500 + 20% K360
W
W
W
S
S
4
70% B500 + 30% K360
W
W
S
G
G
5
60% B500 + 40% K360
W
S
G
G
G
6
50% B500 + 50% K360
S
S
G
G
G
7
40% B500 + 60% K360
S
S
G
G
E
Notes:
Adhesion by vacuum bag (700 mbar) and constant heat for
10 min at different temperatures.
W = Weak, S = Sufficient, G = Good, E = Excellent
Source: Orata and Capellaro 2013. Used with permission.
Table: Barbara Lavorini and Luigi Orata
Samples 1 and 2 are tests on the two pure resins (see
table 11.2). Each mixture was
sprayed on a polyester canvas mock-up. After solvent
evaporation, each was joined to a linen canvas mock-up in
order to simulate the real conditions of use. The mock-ups
were then placed in a vacuum bag and lined by increasing the
temperature incrementally starting at 40°C and going up to
80°C, applying a constant vacuum of 700 mbar. After each
10-degree increase, the bag was opened, each mock-up was
tested, and the degree of adhesion was evaluated. Sample 4,
composed of 30% Dispersion K360 and 70% Plextol B500,
reactivated between 60°C and 70°C (shown in red in
table 11.2), showed a good
combination of adhesion and reversibility.
This adhesive was sprayed on the stretched polyester
canvas.19
Particular attention was paid to maintaining the correct
tension of the lining canvas during the entire process. In
fact, during the reactivation of the thermoplastic adhesive,
the lining canvas was stretched again on the worktop to
maintain the orthogonal orientation of the warp and weft
threads and to avoid the transfer of undesirable tensions to
the painting during the final stretching phase. If the lining
canvas is not tensioned when applying the adhesive and when
the lining is adhered to the original canvas, its threads will
remain more extensible. When the lined painting is finally
stretched on the definitive stretcher, more tension would be
required to first stretch those loose threads before
transferring tension to the whole lined support. This
excessive tension could result in damage to the original
canvas, which is usually less elastic than the new lining
canvas.20
Before lining the painting facedown in the vacuum system, it
was necessary to fill the biggest losses with stucco to avoid
the original canvas being pushed toward the paint surface,
where paint layers were missing.
The adhesion of new canvas was carried out in a vacuum bag
(envelope), with the painting placed facedown on a worktop.
Nonwoven fabric21
was used as a cushioning layer to preserve the thin
brushstrokes, keeping the seams on the back at the same time.
The adhesive was reactivated by placing 70°C water inside a
loom and treating circumscribed areas of about 1 square meter
using the tub system described above and outlined in
figures 11.4 and
11.5. To stretch the canvas on the
final expandable stretcher, the painting was positioned
facedown to reduce the forces applied at the edges.
Not all the losses were filled and retouched because the art
historian who directed the conservation treatment chose to
leave a historical memory of the flood of Florence. When the
treatment was finished, the painting was exhibited at the
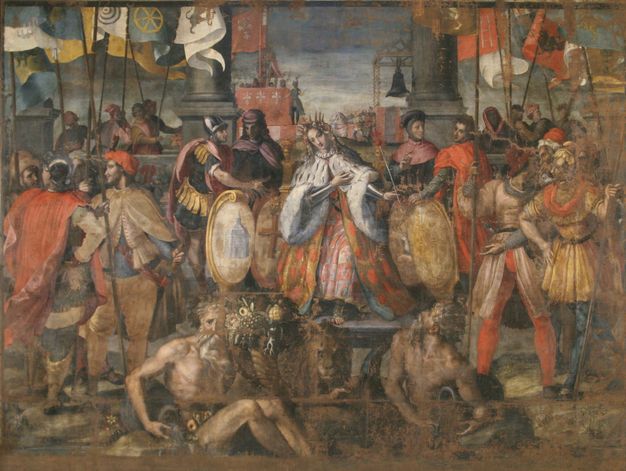
Medici Chapels in Florence (fig. 11.6).
ExpandFigure 11.6Allegoria con il trionfo di Firenze after
restoration.Image: Laboratorio degli Angeli S.r.l., courtesy
Ministero della Cultura – Museo Nazionale del Bargello
(prot. MIBACT_MN-BAR n.1446-P del 01/07/2020). No
modification or further reproduction of the image is
allowed.
Conclusion
The methodologies described above are only some examples of
solutions outlined to solve specific conservation issues on
large-size paintings, but they represent the way we approach
the work, focusing on the artwork, which always has its own
requirements as a result of the properties of its original
materials and subsequent history.
We believe that no best or worst methodology exists, but a
specific and suitable intervention should be applied based on
a deep understanding of both the painting technique and the
conservation history of the artwork. A protocol of scientific
analysis helps to identify and quantify structural damages and
then decide, based on the experience gained with practice,
which conservation strategy is more appropriate to solve the
specific problem, regardless of tradition, inclination, or
current trends.
Acknowledgments
Thanks to Jennifer Ginevra (TEFL/Cambridge educator) and Dan
Butcovich Pieroni (CELTA/Cambridge educator) for providing
edits and revisions.
Notes
Measuring the canvas pH, the degree of polymerization
(DP), traction testing of the yarn (tensile strength)
with a dynamometer, and eventual examination with
scanning electron microscopy (SEM) and energy dispersive
X-ray spectroscopy (EDS). See
Orata 2009, 25–31Orata, Luigi, 2009.
Tagli e strappi nei dipinti su tela, metodologie
di intervento
[Cuts and tears on canvas paintings: Treatment
methods]. Florence: Nardini.. ↩︎
The original support is made up of five pieces stitched
together along the selvages.
↩︎
Like every conservation treatment, these phases are
optional and the restorer evaluates whether it is
necessary to perform each one of them from time to time.
↩︎
Both Aquazol 200 and 500 were tested. See
Arslanoglu and Tallent 2003Arslanoglu, Julie, and Carolyn Tallent. 2003.
“Evaluation of the Use of Aquazol as an Adhesive in
Painting Conservation.”
Western Association for Art Conservation
Newsletter
25, no. 2: 12–18.
https://cool.culturalheritage.org/waac/wn/wn25/wn25-2/wn25-205.pdf.,
Arslanoglu 2004Arslanoglu, Julie. 2004. “Aquazol as Used in
Conservation Practice.”
Western Association for Art Conservation
Newsletter
26, no. 1: 10–15.
https://cool.culturalheritage.org/waac/wn/wn26/wn26-1/wn26-105.pdf.. ↩︎
Extra-fine rabbit skin glue produced by
Le Franc & Bourgeois was used to face the
painting layers with Japanese paper sheets (Tengujo
kashmir 9 g/m2). The sheets fixed around the
perimeter were glued to the worktop to prevent shrinkage
while the glue dried. The high refining degree of this
glue guarantees good elasticity and very light color,
reducing the risk of color changes in a painting made
with such a lean oil.
↩︎
Florentine glue-paste adhesive is usually composed of
wheat and rye flours, animal glue, water, Venetian
turpentine, molasses, and linseed mucilage.
↩︎
Maintaining the canvas in tension is considered very
important to fix the threads in a correct position, to
reduce movement, and to give more stability to the whole
painting in the future.
↩︎
The tub usually measures about 1 square meter, which is
an affordable dimension to easily handle a certain
amount of water; 3 cm of water are needed to maintain
temperature during the treatment.
↩︎
Ten minutes was the minimum estimated time needed to
guarantee that the adhesive reached the desired
temperature.
↩︎
This system was first performed by Sergio Taiti in the
early 1980s. A video showing the tub system process is
available at
https://vimeo.com/801439551/7d9863ee77. ↩︎
Working with the painting facedown—during both the
adhesion of the paint layers and the lining—prevented
the original seams from being pushed onto the paint
layers, showing on the front and thus compromising the
artwork.
↩︎
A polyurethane-based resin in water dispersion,
manufactured by Syremont.
↩︎
Mist-lining technique might have been a choice, but at
the time we were not overly confident with it, and the
particular environmental conditions (very hot during the
summer and without any climate control) would have
required some adjustment. Moreover, the large size of
the painting would have needed a considerable amount of
solvent even using this method.
↩︎
Plextol B500 is an aqueous dispersion of thermoplastic
acrylic polymer based on methyl methacrylate and ethyl
acrylate. Dispersion K360 is an aqueous dispersion of
thermoplastic acrylic polymer based on
2-ethyl-hexyl-acrylate. According to technical data
sheets, Plextol B500 and Dispersion K360 are miscible.
↩︎
Trevira CS (Lipari), 100% polyester, 260
g/m2. The amount of dry resin left on the
lining canvas was calculated at about 36
g/m2.
↩︎
Elastic modulus is a measure of stiffness, defining the
relationship between stress and strain in a material.
The elastic modulus of the original canvas is usually
quite different than the modulus of the new lining
canvas. In our experience of tensioning new lining
canvases, we have found that new canvas (whether made of
natural or synthetic fibers) is usually more elastic
than the original.
↩︎
Figure 11.1Alessandro Allori (Italian, 1535–1607),
Allegoria con il trionfo di Firenze, 1589. Oil on
canvas, 484 × 630 cm (190 1/2 × 248 in.). Florence, Medici
Chapels. The painting before restoration, mounted on a
three-part folding wooden stretcher. Image: Laboratorio degli
Angeli S.r.l., su concessione del Ministero per i beni e la
attività culturali e per il turismo – Museo Nazionale del
Bargello (prot. MIBACT_MN-BAR n.1446-P del 01/07/2020). No
modification or further reproduction of the image is
allowed.
Figure 11.2Allegoria during the restoration process. The
painting is faced with Japanese paper; sheets fixed around the
perimeter were glued to the worktop to prevent shrinkage as
the glue dried. Image: Laboratorio degli Angeli S.r.l., su
concessione del Ministero per i beni e la attività culturali e
per il turismo – Museo Nazionale del Bargello (prot.
MIBACT_MN-BAR n.1446-P del 01/07/2020). No modification or
further reproduction of the image is allowed.
Figure 11.3Detail of a seam brought back to the correct position with
the aid of tension (tie-beams) and moisture. Image:
Laboratorio degli Angeli S.r.l., su concessione del Ministero
per i beni e la attività culturali e per il turismo – Museo
Nazionale del Bargello (prot. MIBACT_MN-BAR n.1446-P del
01/07/2020). No modification or further reproduction of the
image is allowed.
Figure 11.4The tub system used to reactivate a thermoplastic resin in a
vacuum bag. Image: Barbara Lavorini and Luigi Orata
Figure 11.5Video of the tub system. Video: Barbara Lavorini and Luigi
Orata
Table 11.1 Tensile test performed on different adhesives used to
join strips of canvas 1 inch wide
Resin
Breaking point (kg)
Sample 1
Sample 2
Sample 3
Average value
Polyamide
3.320
1.330
1.970
2.206
Akeogard AT35
0.320
0.430
0.496
0.415
Akeogard AT35 + water (1:1)
2.300
1.400
1.400
1.900
Ethylene vinyl acetate (EVA)
1.080
0.850
1.020
0.938
Source: Orata 2009. Used with permission.
Table: Barbara Lavorini and Luigi Orata
Table 11.2 Test results for different resin mixtures performed to
determine reactivation temperature and evaluate bond and
reversibility
Sample
Resin mixture
Temperature
40°C
50°C
60°C
70°C
80°C
1
100% Plextol B500
W
W
W
W
W
2
100% Dispersion K360
S
S
G
G
G
3
80% B500 + 20% K360
W
W
W
S
S
4
70% B500 + 30% K360
W
W
S
G
G
5
60% B500 + 40% K360
W
S
G
G
G
6
50% B500 + 50% K360
S
S
G
G
G
7
40% B500 + 60% K360
S
S
G
G
E
Notes:
Adhesion by vacuum bag (700 mbar) and constant heat for 10
min at different temperatures.
W = Weak, S = Sufficient, G = Good, E = Excellent
Source: Orata and Capellaro 2013. Used with permission.
Table: Barbara Lavorini and Luigi Orata
Figure 11.6Allegoria con il trionfo di Firenze after
restoration. Image: Laboratorio degli Angeli S.r.l., courtesy
Ministero della Cultura – Museo Nazionale del Bargello (prot.
MIBACT_MN-BAR n.1446-P del 01/07/2020). No modification or
further reproduction of the image is allowed.