Chicago
Rossi-Doria, Matteo. “10. Linking Past and Future: Forty Years a
Liner in Italy.” In
Conserving Canvas, by
Cynthia Schwarz, Ian McClure, and Jim Coddington. Los Angeles:
Getty Conservation Institute, 2023.
https://www.getty.edu/publications/conserving-canvas/ii-present-practice/10/.
MLA
Rossi-Doria, Matteo. “10. Linking Past and Future: Forty Years a
Liner in Italy.”
Conserving Canvas, by
Cynthia Schwarz et al., Getty Conservation Institute, 2023,
https://www.getty.edu/publications/conserving-canvas/ii-present-practice/10/.
Accessed DD Mon. YYYY.
The author, a liner with extensive experience in structural
conservation of paintings, describes the huge changes he has
seen over the past forty years, specifically in the Italian
context. Along a path that has passed from tradition to
alternative synthetic materials and minimalism, the author
learned to adopt an attitude of respecting each painting and
adapting treatment to its individual needs while maintaining
safety. The essay focuses on a reconsideration and
reevaluation of traditional methods—whether they can be
still used and if their characteristics can be better
described from a chemical and mechanical perspective.
Forty years have passed since I first stepped into a
conservation studio. I have spent all those years in Italy,
but I have also had the opportunity to travel and build strong
friendships with colleagues around the world. Working with
them, I realized that each of us comes from a specific
background with its own economic issues, culture, and
conservation management, all of which has influenced our
training, knowledge, approaches, methodologies, and working
practice.
Italy is a small and challenging country with a huge heritage
to preserve and a very long conservation history that has
influenced generations of conservators in Europe. Because of
this richness, in 1939 Italy established precise rules and
roles to defend and protect its heritage based on central
control by the Ministry of Cultural Heritage (Coccolo 2017Coccolo, F. 2017.
The Origin and Consequences of Italian Legislation on
the Protection of the National Cultural Heritage in the
Twentieth Century.
Venice: Cà Foscari University.). The ministry fixes the scale of priorities, the way
projects have to be designed, and how cost estimates must be
calculated (often by the square meter). It is a low-value
economy, with private companies covering 90% of active
conservation, competing to reduce prices and trying to work
within tight schedules. It’s not necessary to describe in
detail how this public administration manages conservation
needs, but certainly one of the first concerns is how to be
sustainable without sacrificing quality of treatments. Our
community in Italy has suffered under this condition, and only
occasionally has it been possible to share our methods,
approaches, problems, and concerns with an international
community. For this reason, I am deeply grateful to the Getty
Foundation for the great opportunity offered by the Conserving
Canvas initiative.
Consolidation
At the Yale conference in 2019, we all focused on linings,
showing different approaches and methods, but only a few
presentations mentioned the need for some sort of
consolidation of the paint layers. In my practice, I deal with
many different cases that show severe deterioration. What I
see, most of the time, apart from structural damage (tears,
accidents, deformation, etc.) is the loss of strength of all
original materials, due mostly to inappropriate environmental
conditions. I can’t list here all the different forms that the
degradation takes, but what worries me most is the increase in
porosity of many painting structures, the weakness of the
supports, the risk of losses, and in general the fragility of
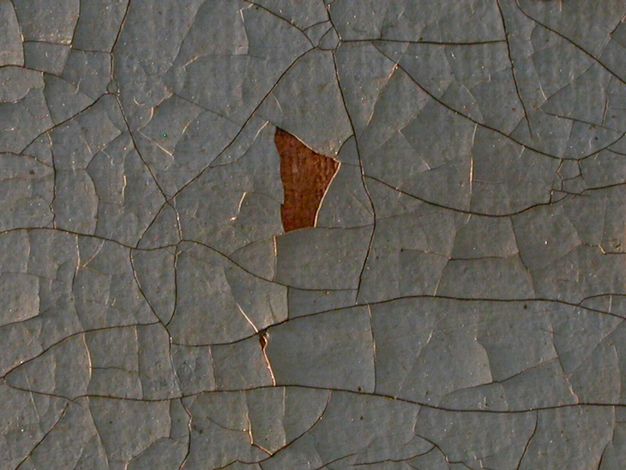
these incredible artifacts (fig. 10.1).
ExpandFigure 10.1Close-up illustrating an overall loss of adhesion and the
need for consolidation.Image: Matteo Rossi-Doria
Consolidation is an irreversible process, and for this reason
it is viewed as an embarrassment, something that is preferably
not discussed. The Center for the Study of Restoration
Materials (CESMAR7), an Italian association devoted to
research on polychrome surfaces, organized two international
meetings on this specific issue in 2006 and 2008 (CESMAR7 2008CESMAR7 (Center for the Study of Restoration Materials).
2008.
Colour and Conservation: 3rd International Conference:
Materials and Methods for Consolidation, and Scientific
Methods for Evaluating Their Effectiveness: Proceedings
of the Conference in Milan, 10–11 November 2006. Saonara, Italy: Il Prato.,
2010CESMAR7. 2010.
Colour and Conservation: 4th International Conference:
Materials and Methods for Consolidation, and Scientific
Methods for Evaluating Their Effectiveness: Proceedings
of the Conference in Milan, 21–22 November 2008. Saonara, Italy: Il Prato.). We realized at that time only a few publications covered
the subject and little research was being done; it seemed to
us that everybody was trying to avoid this field full of
uncertainties.
Of course, early lining methods were designed to provide some
sort of strength to the grounds and paint film by infusing
waxes, resins, and animal glues with the aid of huge pressures
and high temperatures. But to definitively step out of this
old story, we have to design specific consolidation strategies
that are informed by a full understanding of the mechanical
stresses and damages and of the degree and speed of
deterioration of each component.1
To do honest work, we should openly discuss many of our totems
and try to establish a path toward an adequate decision-making
process (Ciatti and Signorini 2007Ciatti, Marco, and Erminio Signorini, eds. 2007.
Dipinti su tela: Problemi e prospettive per la
conservazione, giornata di studio, Ferrara, 1 aprile
2006
[Canvas paintings: Problems and perspectives in
conservation, one-day meeting, Ferrara, April 1, 2006].
Saonara, Italy: Il Prato.;
Michalski and Rossi-Doria 2011Michalski, Stefan, and Matteo Rossi-Doria. 2011. “Using
Decision Diagrams to Explore, Document, and Teach
Treatment Decisions, with an Example of Their Application
to a Difficult Painting Consolidation Treatment.” In
ICOM-CC Lisbon 2011: Preprints: 16th Triennial
Conference, Lisbon, September 19–23, 2011. Lisbon: Critério.;
Rossi-Doria 2010Rossi-Doria, Matteo. 2010. “Diversity of Methodologies
and Decision-Making Processes in the Structural
Conservation of Oversize Paintings.” In
Actas Del Congreso Internacional de Restauración de
pinturas sobre lienzo de gran formato
[International Congress on outsize paintings
conservation], Valencia, Spain, 2010, edited by
Susana Martín Rey, Vicente Guerola Blay, and María Castell
Agust. Valencia: Universitat Politècnica de
València.).2
Consolidation involves a vast amount of knowledge and
difficult ethical issues. Each of us has developed a personal
framework to understand what the needs are in terms of
consolidation, considering future deterioration and designing
specific strategies that can guarantee efficacy and respect
for the features of original materials—a difficult but
necessary task. First we must understand the best way to
achieve a reliable result: from the front or from the back?
It’s a never-ending story, and each of us has our own ideas.
I’m a witness to the changes in Italy on this issue. In the
past, we infused animal glues from the reverse, controlling
shrinkage dynamics, but then many liners started to consider
the increase in sensitivity to moisture and mechanical
stresses. After the disasters of the Florentine flood in 1966,
our community made a drastic change: the adoption of a total
infusion from the reverse of synthetic consolidants, such as
Paraloid B‑72, Plexisol, Beva, and others. These were able to
strengthen the canvas fibers, treat the excessive porosity,
and consolidate degraded paint layers. My generation dedicated
a lot of effort to establishing how to manage this difficult
task—testing and selecting materials, looking for appropriate
concentrations and applications, and finding solvents of lower
toxicity. This helped to separate the structural treatment
into different steps, where consolidation was one part and
lining another. The impact of minimalism pushed us to always
look for a compromise between respect for original materials
and the need for remedial conservation, dependent on the next
steps of treatment as well as the quality of the future
environment (rarely stable, rarely monitored).
Synthetic consolidants, in general, produced lower mechanical
stresses and had lower reactivity to moisture than traditional
consolidants; this in turn stimulated the search for
glue-paste linings with reduced shrinkage risk.
Tradition
In my presentation at the Yale conference, I showed how lining
history developed in Italy through the centuries by focusing
on a specific family who worked for 295 years on Roman
heritage. Other contributions in this publication describe in
more detail the cultural and methodological environment in
which Italian liners designed different methods and
approaches, mostly in Rome, Florence, Venice, Turin, Naples,
Bergamo, and Bologna. It is an extraordinary history of
skills, human capacity, and courage, one that produced some
mistakes but also wonderful results, considering the
difficulties liners had in those times.
During my career, I have had to remove some of these old
linings and many times I could assess how respectful they
were, still showing adequate adhesion after three hundred
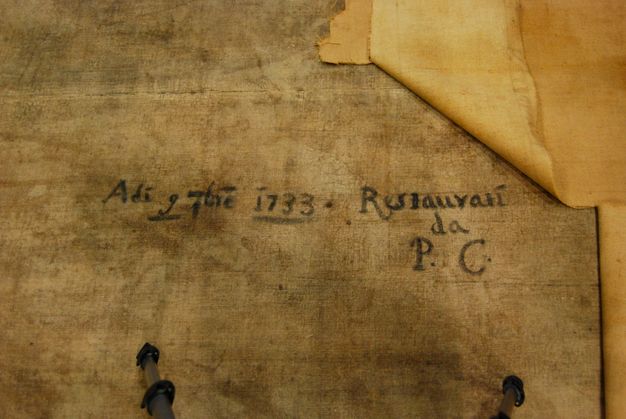
years but also easy to remove (fig. 10.2). The most interesting observation is the stability they
often show when mounted on strainers with no means of
expansion. These skilled artisans changed and modified their
methods over time, and this history still belongs to our
cultural environment, despite huge changes in the last fifty
years.
ExpandFigure 10.2Removal of a 280-year-old lining. Adhesion was adequate
after 300 years, but the lining was also easy to
remove.Image: Matteo Rossi-Doria
My practice was influenced by the “Roman method” designed by
the Istituto Centrale per il Restauro (ICR). This method was
brought to the ICR by assistants to Mauro Pelliccioli, a
famous Italian restorer from Bergamo who was called to provide
linings for war-damaged paintings. In 1963, facing the
restoration of the three large paintings by Caravaggio,
Giovanni Urbani, the head of paintings labs, refined the
method by introducing the use of temporary expandable metal
lining stretchers, instead of the heavy wooden looms that were
unable to control tension during the lining process. The
original Bergamo recipe went through some modifications, as
did the ironing process.
Over the next forty years, Italians continued to line
paintings using traditional methods, with some modifications.
The big campaigns of restoration after the war, after the
Florence flood, in Venice, and in Rome from 1980 to 2000,
confirmed the differences between regional traditions. One
example of this dynamic is the existence of two official
Italian methods—the Florentine and the Roman—designed,
respectively, by the Opificio delle Pietre Dure and the ICR,
both part of the same institution, the Ministry of Cultural
Heritage (Phenix 1995Phenix, Alan. 1995. “The Lining of Paintings: Traditions,
Principles, and Developments.” In
Lining and Backing: The Support of Paintings, Paper and
Textiles: Papers Delivered at the UKIC Conference, 7–8
November 1995, UKIC, Hampshire, edited by Andrew Durham, 21–33. London: United Kingdom
Institute for Conservation of Historic and Artistic
Works.;
Stoner and Rushfield 2012Stoner, Joyce Hill, and Rebecca Rushfield. 2012.
Conservation of Easel Paintings: Principles and
Practice. Oxford: Butterworth-Heinemann.).
Reevaluation of Water-Based Adhesives
Working with glue-paste adhesives has been a necessity in my
work. It’s not that I thought these methods could be applied
to all kinds of paintings—many would show problems, so it was
necessary to be confident in the use of other methods and
materials. It has always been obvious to me that no one
treatment can be the magical one that solves all problems
without causing any changes. For this reason, I always tried
to widen my list of options and to adapt myself to many
working conditions, from minimalism and the decision to avoid
lining altogether up to (respectful) ways to use synthetic
adhesives.
As mentioned above, sustainability is a crucial issue. The
traditional glue-paste methods are low cost, easily used
on-site, and don’t require special equipment. Apart from being
the only method that is completely nontoxic, it can be
extremely effective, respectful, and totally reversible, and
can provide stability and the desired stiffness. This is
possible because it is adaptable and open to many
modifications, as we will see in this paper.
For these reasons, in 1995 I started to reconsider all aspects
of traditional methods. It has been a long process and remains
a work in progress. In the last ten years, I intensified my
studies, assessed test results, worked with international
researchers, and monitored long-term results.
A big concern is mold growth and attack by
Stegobium paniceum (the only insect we find on
linings). All natural materials are hygroscopic and have that
element of risk, but our observations in Italy indicate that
problems occur only in specific microclimates with long
exposure to high RH and poor ventilation. Recent tests (Fuster-López et al. 2017Fuster-López, Laura, Cecil Krarup Andersen, Nicolas
Bouillon, Fabien Frohrer, Matteo Rossi-Doria, Mikkel
Scharff, Kate Seymour, Ángel Vicente-Escuder, Sofia
Vicente-Palomino, and Dolores J. Yusà-Marco. 2017.
“Glue-Paste Linings: An Evaluation of Some Biological,
Chemical and Mechanical Aspects of a Traditional
Technique.” In
ICOM Committee for Conservation, 18th Triennial
Conference, Copenhagen, Denmark, 4–8 September 2017:
Linking Past and Future; Preprints, edited by Janet Bridgland. Paris: ICOM.; see also
Fuster-López et al. in this volume) demonstrate that the use of close-weave fabrics and some
traditional ingredients—such as rye flour and molasses—can
increase the risk. A good backing board, some space between
the painting and the wall, and some basic control of damp will
reduce this risk in a very effective way.
What worries me most about traditional linings is the amount
of adhesive applied to the reverse of the painting. Excessive
amounts (we might say abusive amounts) of adhesive, of very
strong glues, increase sensitivity to humidity variations,
resulting in mechanical stresses being transmitted to the
paint layers.
The results of the ICOM-CC International Working Group,
available in this publication (Fuster-López et al. in this volume), represent the first attempt at a scientific assessment of
glue-paste linings. Some conservators have previously
published results of experiments with modified recipes (Ackroyd 1995Ackroyd, Paul. 1995. “Glue-Paste Lining of Paintings: An
Evaluation of the Bond Performance and Relative Stiffness
of Some Glue-Paste Linings.” In
Lining and Backing: The Support of Paintings, Paper and
Textiles: Papers Delivered at the UKIC Conference, 7–8
November 1995, edited by Andrew Durham, 83–91. London: United Kingdom
Institute for Conservation of Historic and Artistic
Works.), but a full understanding was missing. Now, for the first
time, it has become possible to study the influence of
different materials and different application methods from a
mechanical, physical, chemical, and biological point of view,
and to establish precise parameters for further investigation.
Materials Selection
Geographically, the list of materials used in traditional
linings is more or less similar, with local variations in the
natural fabrics and adhesive mixtures. This section is based
on my research and experience.
Fabrics
Over the centuries, liners have never stopped discussing the
selection of the best lining canvas to use, and the search
continues to this day—although we now use a more quantitative
approach (Young 1999Young, Christina. 1999. “Towards a Better Understanding
of the Physical Properties of Lining Materials for
Paintings: Interim Results.” The Conservator 23,
no. 1: 83–91.). The selection of the fabric affects the method, the
adhesive application, and many other factors.
Close-Weave Canvases
Liners have used close-weave canvases across many local
traditions, including those of Florence, France, the United
Kingdom, the Netherlands, Belgium, and Denmark. The shared
concept is uniform glue application between the two canvases:
the original and the lining. The canvas behaves as a semirigid
support stiffened by animal glue, and adhesion is optimized by
ironing, which dries the adhesive while applying pressure on
the painting surface to flatten deformation or cupping. The
glue layer, applied in an even adhesive film (in some
traditions quite thickly), carries most of the load of the
painting because close-weave fabrics provide poor grip and
have high elastic modulus, but develop more mechanical
stresses.
Observations from monitoring insect infestations shows an
increase of deterioration in close-weave linings due to the
fact that insects living in the glue layer are protected from
ventilation, light, and predators.
Open-Weave Canvases
Open-weave fabrics are part of the Italian and Spanish
traditions. In Italy, all methods apart from the Florentine
apply open-weave canvases. Often, on large, heavy, damaged
paintings, two similar fabrics were stretched on the same loom
to obtain a stiffer support.
In my experience, open-weave fabrics don’t need to be washed
(unless thread count exceeds twelve to fourteen threads per
square centimeter), so one can keep the stable materials
introduced during production that are used to protect the
fibers, such as starches, methyl cellulose, and butyl
acrylates. They provide a better grip than close-weave
fabrics, and the glue film is not continuous, similar to a nap
bond. These fabrics are lighter, transmit lower mechanical
stress, and are less reactive to RH variation. Mold can
develop more easily than on close-weave fabrics, but insects,
on the other hand, have a more difficult life.
These results confirmed my decision to use them as lining
canvases. Open-weave fabrics can have various fiber densities
(from 8 × 8 to 14 × 12), as well as various thread dimensions
and torsions, thereby providing a range of performance in
terms of support, stiffness, and capacity to stabilize
deformations.
Adhesives
The revalidation of traditional materials and methods led me
to study and then compare recipes used in glue-paste linings.
First, I asked myself if the term glue paste properly
describes these mixtures. I looked for a more precise name,
settling on water-based adhesive gel. The name
identifies the principal features of the two main
ingredients—flour and animal gelatin—and their unique capacity
to trap water for a long time. As they were the only adhesive
materials available for centuries, it is interesting to assess
how restorers varied the way they used them.
Then I started to study what these ingredients are from a
chemical, physical-mechanical, and biological point of view. I
had to admit that many of the concepts I had learned during
training were totally insufficient or, in many cases, simply
wrong. It took time to realize that conservation science
rarely looked at other fields that research these natural
materials, such as the food, cosmetics, pharmaceuticals, and
biomedical industries. Multinational companies invest heavily
in ongoing studies to optimize their products and their
ability to manipulate these natural materials.
Apart from the Russian tradition, where only sturgeon glue and
some honey were used, all other methods built their recipes
using three main groups of ingredients: fillers (wheat and rye
flours), materials with adhesive properties (animal gelatins),
and additives that modify some of the mechanical properties
(honey, molasses, Venetian turpentine, linseed mucilage,
vinegar, oxgall, glycerin, oils). I will not focus on this
last class of materials because, in reality, they have a
marginal role in mechanical behavior in glue-paste linings.
Instead, I think it is useful to focus on the two main
ingredients: animal gels and flours.
Animal Gels
These amazing materials are used in many steps of treatment—as
an adhesive for facings, a consolidant for paint film
decohesion, an ingredient in glue-paste compositions, and as a
binder for fillings. In tests over the years, animal glues
were chosen for their high strength compared to all synthetic
materials. I think it is useful, therefore, to establish some
essential information that will guide how and why they can be
used (Pearson 2003Pearson, C. 2003. “Animal Glues and Adhesives,” In
Handbook of Adhesive Technology, 2nd ed., edited
by K. L. Mittal and A. Pizzi, 479–94. Boca Raton, FL: CRC
Press.;
Schellmann 2007Schellmann, Nanke C. 2007. “Animal Glues: A Review of
Their Key Properties Relevant to Conservation.”
Studies in Conservation 52, no. S1: 55–66.;
Bigi, Panzavolta, and Rubini 2004Bigi, Adriana, Silvia Panzavolta, and Katia Rubini. 2004.
“Relation between Triple-Helix Content and Mechanical
Properties of Gelatine Films.” Biomaterials 25,
no. 25: 5675–80.).
Animal gels are produced in two different ways: Type 1 with
acid, and Type 2 with alkaline treatments. Most conservators
work with Type 1 for their higher adhesive properties and gel
strength. Manufacturers and mostly wholesale sellers and
traders established in Europe, the United States, Asia (China,
Vietnam, Cambodia, India), and to a lesser extent in North
America, produce a wide variety of blends for food, cosmetics,
and pharmaceuticals.
Gel strength (GS) is measured in terms of the Bloom grade.3
Manufacturers produce gelatins with different Bloom values for
different intended uses by varying the fundamental steps in
biochemical treatments and number of extractions. Of course,
the quality of collagen and basic materials plays a
significant role, as do other additives.
Depending on Bloom value, gelatins vary their behavior with
moisture and their rate of sorption and desorption. Mechanical
tests in the conservation literature show curves measured at
different RH values but, until now, none of them have
specified the gel strength, only the general type of gelatin:
rabbit, sturgeon, hide, or bone. Because it’s difficult to
find precise technical data on gelatin suppliers’ labeling,
it’s probably necessary to develop our manual and sensory
skills to (at least) establish a method to estimate gel
strength. Specific features can be interpreted and evaluated
to correlate with the Bloom scale: speed and quantity of water
absorption/release, speed of gel degradation, color, smell,
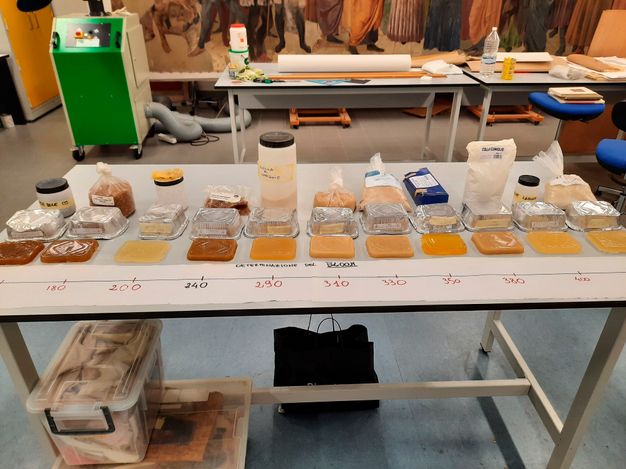
viscosity, time of tack, and gel stiffness. Sturgeon-bladder
glue Bloom values have only recently been investigated. All
the samples I tried had different Bloom values, as did other
gelatins, and any considerations related to flexibility or the
higher stability of bladder collagen are not correct if not
related to measured Bloom and RH values (fig. 10.3) (Bridarolli et al. 2022Bridarolli, A., A. Freeman, N. Fujisawa, and M. Lukomski.
2022. “Mechanical Properties of Mammalian and Fish Glues
over Range of Temperature and Humidity.”
Journal of Cultural Heritage 53: 226–35.).
ExpandFigure 10.3Bloom determination of different animal glues in a gel
formulation, 1:3 in water.Image: Matteo Rossi-Doria
The range of Bloom values for an animal glue suitable for
paintings conservation starts at approximately 150 to 400.
Bloom 250 is an average that can be used for most of the
purposes mentioned, but it is also possible to define more
precise values for each use. Lower Bloom solutions have lower
viscosity and longer setting/gelling times (but less
strength), so these are useful when better penetration is
needed.
Higher Bloom values provide the opposite: higher viscosity at
a given concentration, higher adhesive capacities and tack,
faster setting times, less response to short-term RH
fluctuations, and more resistance to biological deterioration.
They also require higher water temperature for dissolution.
Bloom 250 can be used for effective facings and for fillings.
Higher values, up to 350, can be used in glue-paste mixtures.
Working concentrations vary depending on the gel strength.
Working temperatures of 50°C–65°C play a crucial role in
reducing viscosity so as to facilitate penetration, whereas
room temperatures facilitate the gelling process and reduce
penetration.
Animal glues lose their properties if exposed to high
temperature or if reheated too many times.
Flours
Liners have used flours from various grains since the
beginning. The reason is simple: they were easy to find and
prepare, they were (and remain) very cheap, and they provide
good adhesion, tack, and a nice stiffness. Their unbelievable
mechanical properties (Delcour and Hoseney 2010Delcour, J. A., and R. C. Hoseney. 2010.
Principles of Cereal Science and Technology.
Saint Paul, MN: AACC International.) have been exploited by humans in thousands of different
ways, depending on the materials’ availability and local
culture.
Flour plus water plus heat produces a gel with amazing
capacities to trap water and keep it suspended for a long
time. Properties can vary depending on the type of grain and
the complex biochemical reactions of their preparation. In
conservation, only wheat and rye flours were used since they
had better mechanical properties than other grains.
Each flour has a different ratio of the two main components:
starches and proteins. Wheat flour contains 70%–75% starch,
8%–14% protein, and other substances in small amounts (lipids,
polysaccharides, fibers). Cereal and food science produces
thousands of research articles about the manipulation of flour
properties by the variety of grain and variation in the
enzymes of starch and protein.
The capacity to easily manipulate any single component gives
the possibility of designing specific blends depending on
needs. In 2018, while looking at these possibilities, I
thought it would be valuable to follow some of this research
to understand if, going outside the limits of edibility, it
was possible to design a blend that could be used as an
adhesive generally—specifically as a lining adhesive.
Starches contain two different polysaccharides—amylopectin and
amylase—in an 80:20 ratio, both insoluble in water without
heat (>65°C). By slightly changing this ratio we can change
the stiffness: greater flexibility by increasing amylopectin
or greater stiffness by increasing amylose. This ratio is
reflected in the protein content of a specific flour.
Proteins in wheat starch are mostly composed of glutenin and
gliadin, which, when hydrated, form gluten. By changing the
ratio of these two proteins or modifying the total amount, the
food industry produces different blends that differ in their
“strength.” Strength is measured by the W index, which tells
us how resistant a dough is in the rising process and how long
it retains water and fermentation gas (carbon dioxide). For
conservation purposes, a low W (120–170) provides a stiffer
film when dry; conversely, increasing the protein content and
W to 350–400 makes the film softer and more flexible. Results
from the ICOM-CC glue-paste project (see
Fuster-López et al. in this volume) suggest that a higher gluten content reduces water
absorption, provides lower wetting capacities, and reduces
reactivity to RH variations.
All additional substances, such as raising agents, baking
powders, flavorings, sugars, and the like must be avoided.
Manipulating Natural Materials
As we grow more confident with these methods and manipulate
them better, we will be able to vary them according to our
needs.
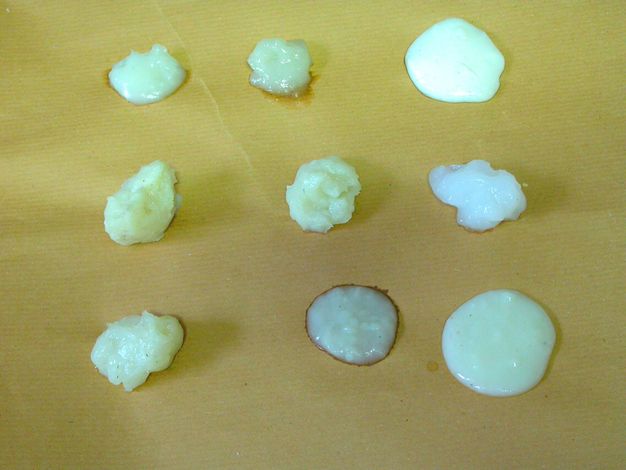
Variation of density and viscosity could be achieved by
adding or reducing the amount of water or by adding
natural and synthetic materials, such as alum salts, chia
or carob seed powder, high-gluten flours, Klucel G and
carboxymethyl cellulose (CMC), Carbopol, and other
thickeners (fig. 10.4).
Variation of adhesive properties could be achieved by
increasing or reducing the amount of natural and synthetic
adhesives in the mixtures and, potentially, using specific
flour blends.
Variation of elasticity/stiffness and wetting properties
could be achieved by using flours with different strengths
(W), greater or less animal-glue gel strength (Bloom),
adding synthetic materials such as acrylic emulsions, or
pretreating the lining support.
ExpandFigure 10.4Experimental samples of different water-based adhesive
gels prepared for tests and workshops demonstrating the
varied physical properties that can be tailored to the
project with simple ingredients. They contain, in
different concentrations, materials widely used in
conservation that can be dissolved in water, including
different flours (low and high W), starches (wheat and
rice), CMC (Tylose 300), HPC (Klucel G),
thickeners (Klucel G, carob seeds, Carbopol), as well
as adhesives (Plextol B 500 acrylic dispersion) and
animal gelatins (low/medium/high Bloom).Image: Matteo Rossi-Doria
Although I avoid standardizing recipes, the mixture described
below is more or less in the middle of all the considerations
described above.
The filler part is a mixture of two different wheat flours
with different gluten content and strength, in a ratio of
70:30. The first is W 180–250 and the second W 350. The flour
blend is dissolved in water in a ratio of 1:3, then heated at
65°C–70°C until a gel develops.
Animal-glue gel (Bloom 250–350) that has been previously
prepared in water in a ratio of 1:3 at 55°C is then dissolved
into the warm flour mixture. A small amount of alum salts is
also added at this stage as a biocide and thickener. The
amount of animal glue in the recipe can vary but it is always
much less than in most traditional methods. This drastic
reduction in glue is necessary to decrease reactivity and
mechanical stresses. All additional substances are, in my
opinion, useless and should be avoided.
Once the mixture has cooled to room temperature, it is
possible to add variable amounts of Plextol B 500 acrylic
dispersion: 2% to 10%, depending on needs. This product, low
cost and easy to find, can improve the adhesive bonding that
was lost due to the reduction of animal glue, as well as
increase flexibility. At the same time, it drastically
decreases water capacity, thereby speeding the drying process,
while providing good initial tack. Further research will
probably confirm the amount of risk reduction in terms of
reactivity and biodeterioration reduction. This adhesive
mixture will always be easily reversible, being soluble in
water. Any residue can be gently rubbed off.
Application Method
My reevaluation not only addressed the materials but also
focused on the way they were used by the traditional liner. My
question has always been whether these kinds of procedures are
needed in order to guarantee a good result. Following this
track as I worked on my experiments, I realized it was
possible to change many steps of traditional treatments that I
thought were wrong, excessive, drastic, useless, or even
damaging.
As noted earlier, liners over time have designed specific
strategies to control forces during glue paste
application—using pressure, tension, or heat—and further
reduced lining canvas reactivity by infusing hydrophobic
substances such as wax and synthetic polymers.
Many conservators treat support and surface deformations using
a combination of tension, pressure, humidity, and such
procedures as low-pressure, vacuum, and others. I do that too,
and results can be extremely successful, but without any
stabilization, the “memory” of deformations will cause them to
reappear sooner or later. It’s an old story, but we still need
to discuss it.
The Lining Process
Facing
This crucial step of structural treatment may be necessary if
one has fragile paint that is at high risk of loss during
subsequent steps of treatment, especially when removing
previous lining materials. Any glue or adhesive applied on the
front will try to flow through the porosity and fill the gaps
caused by cleavage, delamination, and losses. The selection of
a respectful facing adhesive depends on the nature of the
paint layers, and wrong decisions can cause damage.
As a facing material, I selected a pure-cellulose tissue with
13 grams wet strength that has been calendared to be water
resistant. The adhesive is applied through the tissue, as with
Japanese paper facings. It sets quickly and adapts well to a
variety of surface morphologies. Wrinkles are easy to remove.
The glue can be applied in different ways depending on the
needs of the treatment plan—by brush or sprayed gently on the
surface. It is easy to manipulate the concentration, Bloom
values (200–250), and viscosities to achieve the desired
result in terms of adhesion, preconsolidation, or treatment of
deformations by exploiting a mix of traditional Japanese paper
conservation techniques with similar Italian traditions.
When dry, the wet strength tissue provides good protection
from mechanical stresses applied from the back to remove old
canvases and glues. It also provides a barrier to infused
consolidants, avoiding solvent migration to the front, and
also helps in stabilizing surface deformations such as bad
crack patterns. In addition, these facings are easy to remove
and do not leave fibers on the paint surface.
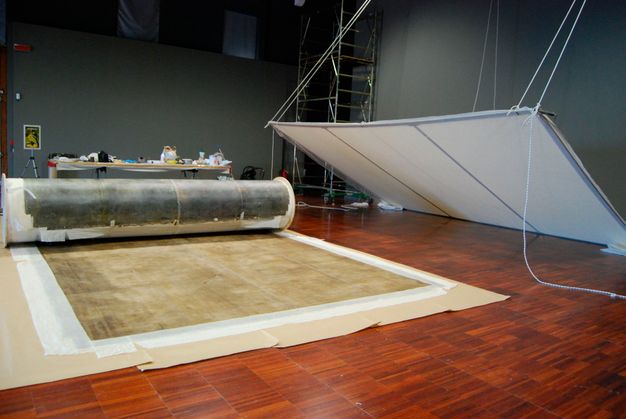
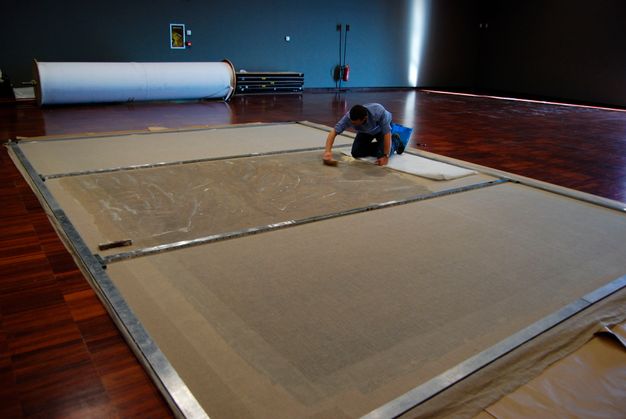
Lining
The lining process is extremely simplified. The selected
open-weave canvas is stretched on a provisional expandable
lining stretcher that can accommodate a wide range of
dimensions and consistently control canvas tension (fig. 10.5).
ExpandFigure 10.5Lining preparation using a metal provisional expandable
lining stretcher.Image: Matteo Rossi-Doria
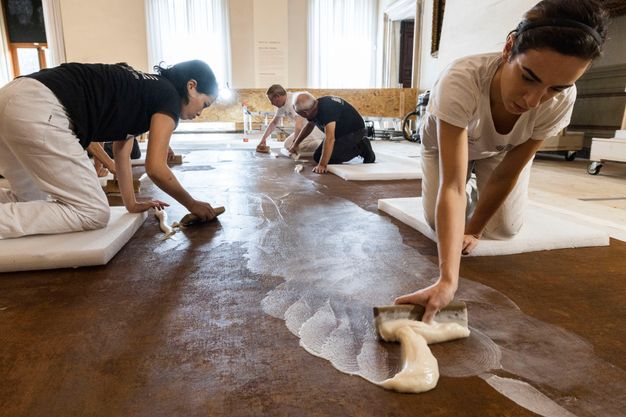
The adhesive mixture is then applied on the reverse of the
painting in an even coat, and the working stretcher is
correctly positioned on top of it. More adhesive is applied to
wet the new canvas and provide a first bonding (figs. 10.6, 10.7).
ExpandFigure 10.6Application of the selected adhesive mixture on the
reverse of the painting.Image: Matteo Rossi-DoriaExpandFigure 10.7Application of adhesive through the selected lining
canvas.Image: Matteo Rossi-Doria
The glue application behaves as a very slow humidifier that
relaxes deformation and distortions. It is possible to set the
time for an even humidification process, depending on the
degree of deformation. In cases where deformations have been
pretreated and the painting is flat, one can immediately apply
gentle tension to the lining canvas and remove excess adhesive
by manually pressing with wooden spatulas and other tools for
an even application.
Drying time can vary depending on the need for additional
humidification to soften hard cracks and surface deformation.
In cases where we don’t have such needs, the painting can dry
without any additional operation, and ironing can be avoided.
Manual ironing is an option to treat surface deformation once
it has been humidified by the glue during the lining process.
It is possible to achieve great results without using huge
pressure or high temperatures. Bad crack patterns can be
flattened by locally applying additional moisture.
At the end of the drying process, the facing can be removed
easily.
Conclusion
Looking ahead, it is possible that these methods will
disappear from the accepted list of lining options and be
mentioned only in lectures on the history of conservation—or
will remain in use only by traditional liners in the private
sector. However, I think that omitting this information risks
the next generation of conservators losing a full
understanding of how to properly preserve many thousands of
glue-paste lined paintings all over the world. I hope this
paper can contribute to a better understanding of the
potentialities, features, and behavior of water-based
adhesives, as well as stimulate curiosity to finally assess
them in a rational, open-minded way (Rossi-Doria 2013Rossi-Doria, Matteo. 2013. “Requiem o recupero critico
dei metodi di foderatura tradizionali [Requiem for, or
critical recovery of, traditional lining methods].” In
XI Congresso nazionale IGIIC Lo stato dell’arte 11:
Accademia delle belle arti: Bologna, 10–12 ottobre
2013, 77–87. Florence: Nardini.
https://cbccoop.it/app/uploads/2017/05/testo-IGIIC-2013-1.pdf.).
As mentioned, I do work with other materials—Beva and
acrylics—as other options. These alternative methods have
their advantages and disadvantages, the latter mostly due to
the use of high temperatures or solvents for reactivation;
these linings have low elastic modulus and are quite difficult
to remove without additional heat or solvents. The recent
habit of using Beva film extensively concerns me, just as
Vishwa Mehra in 1970 was scared by wax and its abuse. I hope
we can soon reconsider this habit.
Even when using these modern procedures, I try to apply the
same approach I use for traditional materials: looking for
more respectful applications and avoiding flow of the adhesive
inside the painting structure. I hope it will soon be possible
to dedicate another paper to this topic.
Notes
Of the various texts on the mechanics of paintings,
adhesives, and consolidants from a conservation
perspective, I particularly value
CCI (Canadian Conservation Institute) 2011CCI (Canadian Conservation Institute). 2011.
Adhesives and Consolidants for Conservation:
Research and Applications: Proceedings of
Symposium, 2011. Ottawa: Canadian Conservation Institute.,
Clarricoates et al. 2012Clarricoates, Rhiannon, Alexandra Gent, Angelina
Barros D’Sa, and Lizzie Bone, eds. 2012.
Adhesives and Consolidants in Painting
Conservation. London: Archetype.,
Mecklenburg and Tumosa 1991bMecklenburg, Marion F., and Charles S. Tumosa.
1991b. “Mechanical Behavior of Paintings Subjected
to Changes in Temperature and Relative Humidity.” In
Art in Transit: Studies in the Transport of
Paintings, edited by Marion F. Mecklenburg, 137–72.
Washington, DC: National Gallery of Art., and
Michalski 1991Michalski, Stefan. 1991. “Paintings: Their Response
to Temperature, Relative Humidity, Shock, and
Vibration.” In
Art in Transit: Studies in the Transport of
Paintings, edited by Marion Mecklenburg, 223–48. Washington,
DC: National Gallery of Art.. ↩︎
Ciatti and Signorini 2007Ciatti, Marco, and Erminio Signorini, eds. 2007.
Dipinti su tela: Problemi e prospettive per la
conservazione, giornata di studio, Ferrara, 1
aprile 2006
[Canvas paintings: Problems and perspectives in
conservation, one-day meeting, Ferrara, April 1,
2006]. Saonara, Italy: Il Prato.
is the postprint of a one-day meeting dedicated to
traditional Italian lining methods and is the only
resource that contains a good comparison of Florentine
and Roman methods.
↩︎
Figure 10.1Close-up illustrating an overall loss of adhesion and the
need for consolidation. Image: Matteo Rossi-Doria
Figure 10.2Removal of a 280-year-old lining. Adhesion was adequate after
300 years, but the lining was also easy to remove. Image:
Matteo Rossi-Doria
Figure 10.3Bloom determination of different animal glues in a gel
formulation, 1:3 in water. Image: Matteo Rossi-Doria
Figure 10.4Experimental samples of different water-based adhesive gels
prepared for tests and workshops demonstrating the varied
physical properties that can be tailored to the project with
simple ingredients. They contain, in different concentrations,
materials widely used in conservation that can be dissolved in
water, including different flours (low and high W), starches
(wheat and rice), CMC (Tylose 300), HPC (Klucel G), thickeners
(Klucel G, carob seeds, Carbopol), as well as adhesives
(Plextol B 500 acrylic dispersion) and animal gelatins
(low/medium/high Bloom). Image: Matteo Rossi-Doria
Figure 10.5Lining preparation using a metal provisional expandable
lining stretcher. Image: Matteo Rossi-Doria
Figure 10.6Application of the selected adhesive mixture on the reverse
of the painting. Image: Matteo Rossi-Doria
Figure 10.7Application of adhesive through the selected lining canvas.
Image: Matteo Rossi-Doria