Chicago
Harrison, Lynne. “22.
Self-Portrait as Saint Catherine of Alexandria by Artemisia
Gentileschi: A Recent Glue-Paste Relining Treatment at the
National Gallery, London.” In
Conserving Canvas, by
Cynthia Schwarz, Ian McClure, and Jim Coddington. Los Angeles:
Getty Conservation Institute, 2023.
https://www.getty.edu/publications/conserving-canvas/iv-case-studies/22/.
MLA
Harrison, Lynne. “22.
Self-Portrait as Saint Catherine of Alexandria by Artemisia
Gentileschi: A Recent Glue-Paste Relining Treatment at the
National Gallery, London.”
Conserving Canvas, by
Cynthia Schwarz et al., Getty Conservation Institute, 2023,
https://www.getty.edu/publications/conserving-canvas/iv-case-studies/22/.
Accessed DD Mon. YYYY.
22. Self-Portrait as Saint Catherine of Alexandria by
Artemisia Gentileschi: A Recent Glue-Paste Relining Treatment at
the National Gallery, London
22.
Self-Portrait as Saint Catherine of Alexandria
Lynne Harrison,
Conservator,
National Gallery, London
An important recent acquisition to the collection of the
National Gallery, London, is the oil-on-canvas painting
Self-Portrait as Saint Catherine of Alexandria (ca.
1615–17) by Artemisia Gentileschi (1593–1654), one of only a
handful of works by female painters in the collection and
the first painting by this artist to be represented at the
gallery. Upon its acquisition in 2018, the painting
underwent full conservation treatment in the gallery’s
conservation studios and was presented to the public later
that year. The treatment was filmed for the gallery’s
website and made available on YouTube as part of the
museum’s public engagement program. The National Gallery has
long undertaken structural treatments of its paintings
collection, and traditional aqueous glue-paste hand-lining
(among other techniques) remains part of its arsenal of
lining methods. Research undertaken at the gallery in the
late 1990s led to adaptations in the recipe and lining
methodology, and glue-paste hand-lining continues to be used
when considered appropriate for a painting’s requirements.
This paper presents the structural treatment of
Gentileschi’s Self-Portrait to remove the existing
aged and failing glue-paste lining, repair the torn damage
to the original canvas support, reinforce the original
canvas join, and reline with glue-paste adhesive. Also
addressed is the issue surrounding the painting’s original
format, thought to have been reduced in size at some point,
and resolved to some extent in collaboration with the
curatorial department. The preparatory steps for lining,
including tear repair and moisture-flattening treatment, and
the various stages of the hand-relining process are
described in detail. Techniques unique to the National
Gallery’s glue-paste hand-lining processes are discussed,
such as the use of wax-resin facings and beeswax moisture
barriers, and details of the materials and equipment
employed (e.g., the low-pressure vacuum table) are included.
KEYWORDS: Artemisia
Gentileschi, Saint Catherine
Introduction
In July 2018, the National Gallery, London, acquired a
self-portrait by the Italian Baroque artist Artemisia
Gentileschi, one of only a handful of works by female painters
in the collection and the first painting by this artist to be
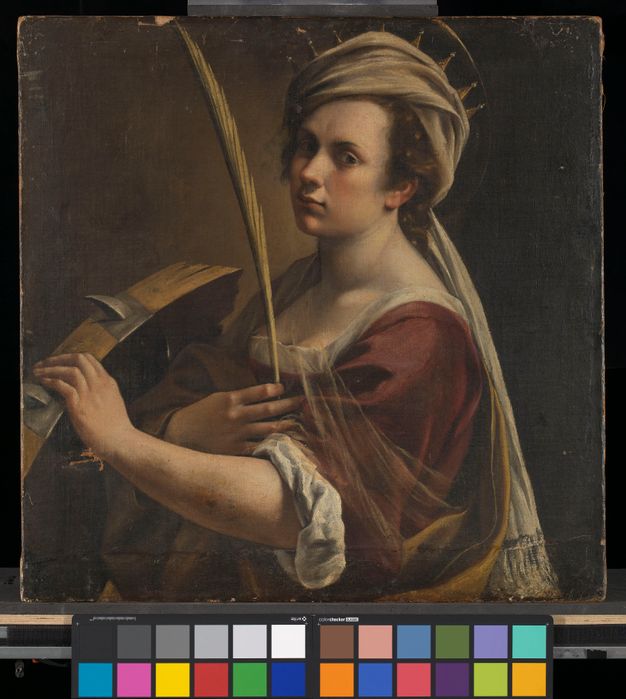
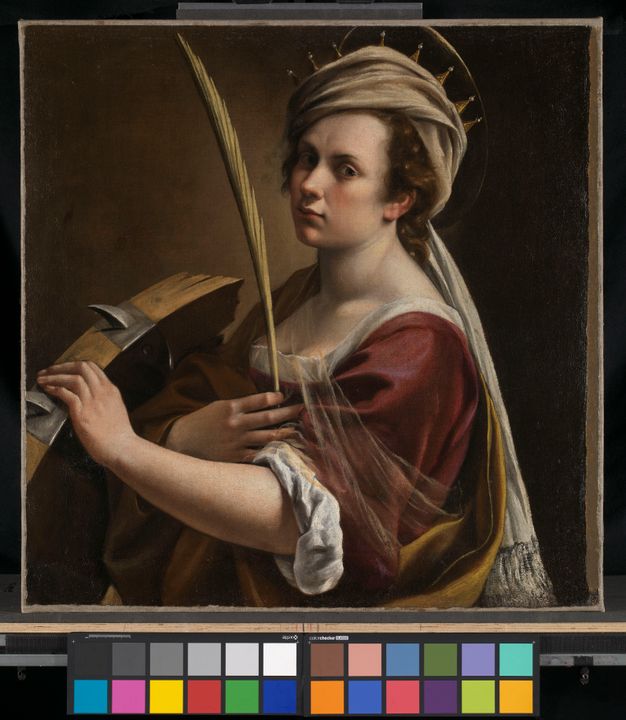
represented at the gallery. The painting,
Self-Portrait as Saint Catherine of Alexandria (ca.
1615–17), depicts the artist herself as Saint Catherine of
Alexandria, the Christian saint martyred in the early fourth
century (fig. 22.1). Her right hand
holds the martyr’s palm close to her chest, while she rests
her left hand on a broken wheel with iron spikes, the
instrument of Catherine’s torture and the saint’s standard
attribute. The painting dates from Gentileschi’s period of
activity in Florence, where she lived and worked from 1613 to
1620, establishing herself as an independent artist and
becoming the first woman to gain membership to the Accademia
della Arti del Disegno, in 1616 (Bissell 1968, 154Bissell, R. Ward. 1968. “Artemisia Gentileschi—A New
Documented Chronology.” The Art Bulletin 50, no.
2, 153–168.;
Bissell 1999, 141Bissell, R. Ward. 1999.
Artemisia Gentileschi and the Authority of Art:
Critical Reading and Catalogue Raisonné.
University Park: Pennsylvania State University Press;
London: Eurospan.;
Whitlum-Cooper et al. 2019Whitlum-Cooper, Francesca, Letizia Treves, and Susannah
Avery-Quash. 2019. “[In]Visible: Paintings by Women
Artists in the National Gallery, London: An Interview with
Letizia Treves and Francesca Whitlum-Cooper.”
19: Interdisciplinary Studies in the Long Nineteenth
Century
28.
https://doi.org/10.16995/ntn.850.).
ExpandFigure 22.1Artemisia Gentileschi (Italian, 1593–1654),
Self-Portrait as Saint Catherine of Alexandria,
ca. 1615–17. Oil on canvas, 71.5 × 71 cm (28 1/8 × 28
in.). The National Gallery, London, NG6672. Before
treatment.Image: The National Gallery, London
Upon acquisition, the canvas painting was treated in the
National Gallery conservation department, where the decision
was made to reline the painting and to clean and restore the
image. The entire treatment was filmed for the National
Gallery’s website and made available on YouTube as part of the
gallery’s public engagement program.1
Conservation was led by Larry Keith (chief restorer and
keeper), and the structural treatment was undertaken by Paul
Ackroyd (senior restorer) and the author.2
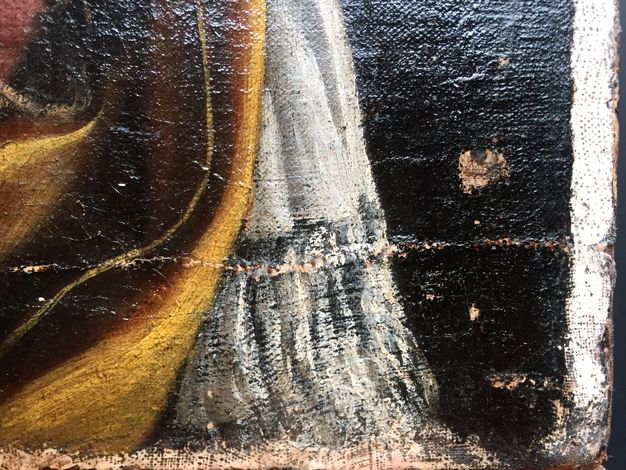
The painting was originally executed on a medium-weight,
plain-weave canvas, with a horizontal seam approximately 7 cm
up from the bottom edge. The seam is uneven and rather wavy in
appearance (fig. 22.2) and is likely
to have been sewn by the artist: it is known that at this time
Gentileschi was poor—“she was beleaguered with financial
problems,” and probably therefore was preparing and reusing
her own canvases for painting (Barker 2017, 59Barker, Sheila. 2017. “Artemisia’s Money: The
Entrepreneurship of a Woman Artist in Seventeenth-Century
Florence.” In
Artemisia Gentileschi in a Changing Light, edited
by Sheila Barker, 59–88. Turnhout, Belgium: Harvey
Miller.;
Keith et al. 2019, 8n23, 16n24Keith, Larry, Letizia Trevez, Marta Melchiorre de
Crescenzo, and Joanna Russell. 2019. “Artemisia
Gentileschi’s Self-Portrait as St. Catherine of
Alexandria.”
National Gallery Technical Bulletin 40:
4–17.).
ExpandFigure 22.2Gentileschi, Self-Portrait, before treatment.
Detail of the seam, likely sewn by the artist.Image: The National Gallery, London
Around the late nineteenth or early twentieth century, the
painting was glue-paste lined onto another linen canvas and
attached to its existing mortise-and-tenon joint stretcher. At
the time of acquisition by the National Gallery, the painting
had old, discolored restorations and was coated with a
significantly yellowed and poorly saturating varnish (see
fig. 22.1). Impact damage in the lower
left of the painting had resulted in an irregular 3.8 cm long
tear to both the original and lining canvas. The original seam
was pronounced and potentially weak, as the seam flap at the
back would have been cut away for the previous lining
treatment. The remains of the sewing stitches were now visible
on the front, partially hidden by restoration (see
fig. 22.2). The lining was found to be
generally degraded, fragile, and easily detachable.
Three original edges remained relatively intact, with
exaggerated cusping present along the bottom edge and some
cusping present on the two vertical edges. The right edge also
had evidence of being modified; it had been previously folded,
such as over a stretcher edge, and then later flattened (Keith et al. 2019, 6, 16n11Keith, Larry, Letizia Trevez, Marta Melchiorre de
Crescenzo, and Joanna Russell. 2019. “Artemisia
Gentileschi’s Self-Portrait as St. Catherine of
Alexandria.”
National Gallery Technical Bulletin 40:
4–17.).3
There was also evidence to suggest the top edge had been
previously cut down slightly: the tip of the martyr’s palm and
the central pearl of the saint’s crown were both missing (see
fig. 22.1).
History of Lining at the National Gallery
The National Gallery has a long history of undertaking
structural treatments, including lining, and is active in
maintaining traditional practices as well as researching and
developing new methods and technologies (Bomford 1978Bomford, David. 1978. “The Conservation Department of the
National Gallery.”
National Gallery Technical Bulletin 2: 3–10.
http://www.nationalgallery.org.uk/technical-bulletin/bomford1978.;
Reeve, Ackroyd, and Stephenson-Wright 1988Reeve, Anthony, Paul Ackroyd, and Ann Stephenson-Wright.
1988. “The Multi-Purpose Low Pressure Conservation Table.”
National Gallery Technical Bulletin 12:
4–15.;
Young and Ackroyd 2001Young, Christina, and Paul Ackroyd. 2001. “The Mechanical
Behavior and Environmental Response of Paintings to Three
Types of Lining Treatment.”
National Gallery Technical Bulletin 22:
85–104.). Aqueous glue-paste hand-linings were first undertaken for
the gallery by private liners who were commissioned by the
gallery. In a letter from the gallery archive (date unknown),
the gallery’s first director, Sir Charles Eastlake, writes to
inform colleagues that “Mr. William Morrill of 3 Duck Lane,
Wardour Street is ordinarily employed for the re-lining of
pictures in the collection.”4
In 1880, Morrill himself writes to the director: “The price of
double lining the large Weenix picture will be about 14
pounds. I should have written before but I have been very busy
with the Crivelli picture which I hope very soon to
complete.”5
While the gallery established its conservation department in
1946, it wasn’t until the late 1940s and early 1950s that its
conservators were directly employed by the gallery (Bomford 1978, 3Bomford, David. 1978. “The Conservation Department of the
National Gallery.”
National Gallery Technical Bulletin 2: 3–10.
http://www.nationalgallery.org.uk/technical-bulletin/bomford1978.).6,7
Glue paste was the only lining adhesive used at the gallery
until around 1947, when wax-resin adhesive began to be used as
an alternative adhesive until the late 1970s and the advent of
Beva 371. All linings were done by hand until the studio
bought its first vacuum hot table in 1976 (Reeve, Ackroyd, and Stephenson-Wright 1988Reeve, Anthony, Paul Ackroyd, and Ann Stephenson-Wright.
1988. “The Multi-Purpose Low Pressure Conservation Table.”
National Gallery Technical Bulletin 12:
4–15.).
Traditional aqueous glue-paste hand-lining remains part of the
conservation department’s methods for structural treatments
for canvas paintings and is chosen when appropriate for a
painting’s requirements, for example, when considering the
type and extent of damage, the painting’s overall condition,
and its treatment history. Its use, however, has evolved over
the last thirty years. The current modified glue-paste recipe
is the result of research undertaken at the gallery in the
late 1990s by Paul Ackroyd that evaluated the bond performance
and relative stiffness of glue-paste linings. Tests revealed
that a low ratio of glue to flour paste proved desirable,
providing a lining that is more dimensionally stable than
those with a higher glue content (Ackroyd 1995, 89Ackroyd, Paul. 1995. “Glue-Paste Lining of Paintings: An
Evaluation of the Bond Performance and Relative Stiffness
of Some Glue-Paste Linings.” In
Lining and Backing: The Support of Paintings, Paper and
Textiles: Papers Delivered at the UKIC Conference, 7–8
November 1995, edited by Andrew Durham, 83–91. London: United Kingdom
Institute for Conservation of Historic and Artistic
Works.). The proportion of glue now used, at 1 part glue to 6 parts
flour paste, contains far less glue than traditionally used in
the United Kingdom and is more akin to European formulations.
The gallery’s current technique is also distinct from other
traditional methods in that natural beeswax is used in the
process: as part of the facing adhesive, as a lubricant during
the lining phase, and as a moisture barrier applied after
lining (Phenix 1995, 26Phenix, Alan. 1995. “The Lining of Paintings: Traditions,
Principles, and Developments.” In
Lining and Backing: The Support of Paintings, Paper and
Textiles: Papers Delivered at the UKIC Conference, 7–8
November 1995, UKIC, Hampshire, edited by Andrew Durham, 21–33. London: United Kingdom
Institute for Conservation of Historic and Artistic
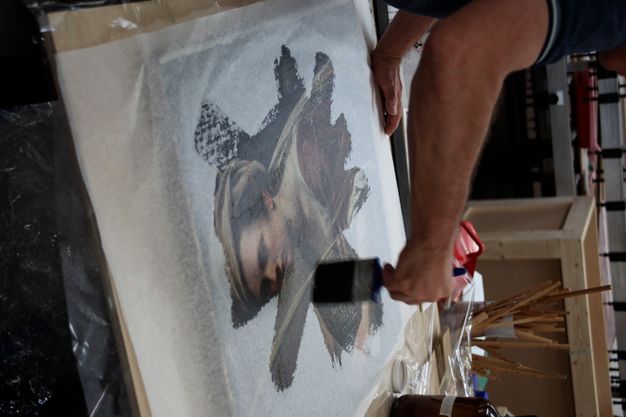
Works.). A cold wax-resin facing adhesive is used at the gallery
for paintings that do not have absorbent ground or paint
layers. It is made with dammar resin, beeswax, and mineral
spirit (a low-aromatic petroleum-based solvent) and is brushed
out thinly onto the painted surface as a cold liquid over a
paper tissue facing (fig. 22.3),
usually over a temporary varnish (see the appendix for the
recipe).
ExpandFigure 22.3Gentileschi, Self-Portrait, during treatment.
The painting was faced with a piece of Eltoline tissue
brushed over with the cold wax-resin facing mixture.Image: The National Gallery, London
There are distinct advantages to using a wax-resin facing as
part of the glue-paste lining methodology. It becomes
semitransparent during ironing and can be easily removed with
mineral spirit during the lining process, allowing the
painting’s surface to be visibly inspected without disturbing
the lining adhesive. This cannot be done, for example, with an
aqueous adhesive facing. Cold wax-resin facings are also
simple to apply and pose minimal risk of dimensional change to
the painting or of any potential for inducing shrinkage (of
either the painting or the facing tissue). They create a weak
but effective bond to protect the painted surface from
accidental abrasion during delining and provide a soft,
slightly cushioning surface. They can also be applied over
other facings if additional protection is necessary.
Treatment Strategy
The treatment to reline Gentileschi’s
Self-Portrait was chosen over other treatment
options, such as strip-lining and loose-lining, as its overall
condition was perceived as too fragile to be left unlined. The
level of degradation of the original linen (being over four
hundred years old), together with damage to the original seam
and the tear through the original and old lining, had
compromised the original canvas’s ability to support the
ground and paint layer at the required tension when the
painting was reattached to its stretcher. Relining would also
support the new canvas addition to the top edge (see “New
Canvas Addition” below) and help keep it in alignment with the
original. The painting was also impregnated with animal glue
from the previous glue lining, which could lead to future
problems with the painting’s response to moisture if it were
not supported with a new lining canvas and moisture
barrier.8
Remaining unlined would thus leave the painting in a
vulnerable state. Additionally, the unusual planned loan
conditions for the painting after treatment—including a
multivenue tour—would also be of concern if the painting were
left unlined.
Structural Treatment of the Painting
Facing and Stretcher Removal
After cleaning to remove the old varnish, restoration, and
fills, the painting was taken to the gallery’s structural
studio for relining. First, the tear deformations were
reduced, the torn canvas fibers were realigned, and the area
was treated with local moisture and weight. The loose paint
fragments at the tear edge were consolidated with sturgeon
glue, and the tear was locally faced with fine paper tissue
and wheat-starch paste, with the tissue edges feathered out.
The whole painted surface was then faced with a piece of
Eltoline tissue brushed over with the cold wax-resin facing
mixture (see fig. 22.3).
The painting was then removed from its stretcher, the old
lining tacking margins were cut through at the turnover edge,
and the painting was lifted clear. This process was hampered
somewhat, as the old lining canvas was stuck to the stretcher
along the bottom edge and left corner. Evidence of water
staining on the back in these areas indicated the lining
adhesive may have been reactivated by water, causing the back
of the lining canvas to adhere to the wooden stretcher bar.
Fortunately, these areas were easily released by sliding a
thin metal spatula between the old lining canvas and the
stretcher and easing the two apart.
Delining and Repairs to the Original Canvas
The painting was turned facedown and its edges taped to a
Melinex (clear polyester film) covered plywood board to
prevent dirt and hard grains of brittle glue-paste residue
from getting under the painting and embedding in the facing
during the removal of the old lining. (This is one noteworthy
disadvantage of wax-resin facings to guard against: debris can
easily get trapped in its waxy surface, risking damage to the
paint surface, especially during mechanical scraping.) The old
lining was then reversed, the lining fabric peeled away in
strips by hand, and the remaining glue-paste residue scraped
from the surface with a scalpel (National Gallery 2019, video 6National Gallery. 2019. “Repairing a 17th Century Canvas:
Art Restoration of Artemisia Gentileschi’s Self-Portrait.”
Video. London: The National Gallery.).9
Old insect damage, in the form of woodworm exit holes, was
found within the back of the original canvas corresponding to
the likely position of a previous wooden stretcher or strainer
(the current stretcher has no insect damage). Luckily, this
damage did not penetrate through to the paint surface, so the
holes in the canvas could be filled from the back with an
adhesive mix of Mowiol GE 04-86 (polyvinyl alcohol), chalk,
and pigment using a small metal spatula. Mowiol remains
soluble in water, so care is needed during the lining process
not to disturb the fills. Rather usefully, Mowiol is also
thermoplastic when dry and can be softened and flattened
out—with, for example, an electric spatula—to conform with the
lining process, thereby avoiding the creation of any
undulations or hard bumps behind the original canvas.
The original seam was strengthened with a PVA (polyvinyl
acetate) adhesive, Resin ‘W,’ bulked with cellulose powder to
fill any small gaps. Small losses in the original canvas
(including parts of the seam) were filled with canvas inserts
cut from new primed linen canvas and adhered in place with the
same PVA adhesive. This new primed canvas was wetted and
stretched before use to reduce its response to moisture. The
tear was then butt joined from the back with the PVA adhesive,
and cellulose powder and a few additional linen fibers were
also used to fill any small holes and gaps and add strength.
Resin ‘W’ remains sensitive to water when first dry and is
softened by heat once fully dry. When used either alone or
mixed with small proportions of cellulose powder, it makes a
good malleable adhesive/filler that will allow inserts and
repairs to be perfectly aligned with the original and conform
well with the lining process. Although PVAs are known to
become brittle with age (Down 2009Down, Jane L. 2009. “Poly(Vinyl Acetate) and Acrylic
Adhesives: A Research Update.” In
Holding It All Together: Ancient and Modern Approaches
to Joining, Repair and Consolidation, edited by Janet Ambers, Catherine Higgitt, Lynne
Harrison, and David Saunders, 91–98. London:
Archetype.;
Howells et al. 1993Howells, R., Aviva Burnstock, Gerry Hedley, and Stephen
Hackney. 1993. “Polymer Dispersions Artificially Aged.” In
Measured Opinions: Collected Papers on the Conservation
of Paintings, edited by Caroline Villers, 27–34. London: United
Kingdom Institute for Conservation of Historic and
Artistic Works.), Resin ‘W’ has been used at the gallery for some time for
discrete canvas repairs. It does harden on aging, making it
difficult to remove entirely, but it has proved durable—more
so than other, similar adhesives.10
Moisture Treatment
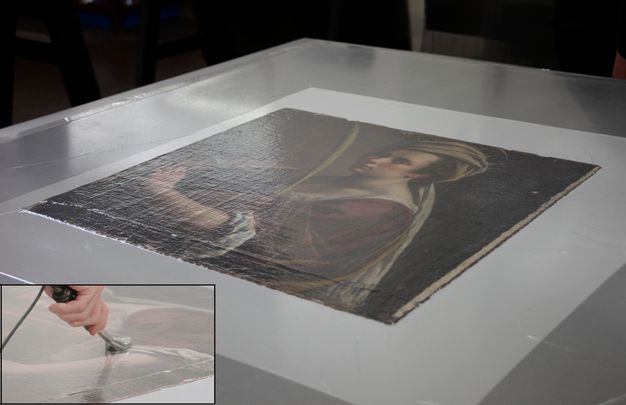
After the repairs were complete and the facing was removed,
the painting was treated with moisture using the studio’s
low-pressure suction table to reduce any undulations in the
original canvas and any cupping and deformations in the paint
layer (fig. 22.4). The painting was
sprayed on the back with distilled water and laid faceup on
the table on top of a layer of sailcloth (polyester) fabric,
which was used as a permeable release layer to prevent the
painting from sticking to the tabletop. The painting and the
whole of the table was then covered with a sheet of thin
Melinex.
ExpandFigure 22.4Gentileschi, Self-Portrait, during treatment.
The painting was treated with moisture using the studio’s
low-pressure suction table and additional pressure applied
locally using a heated spatula.Image: The National Gallery, London
The table was heated to 40°C, at 28 mbar (0.83 "Hg) for
about twenty minutes. During this time, additional pressure
was applied locally to the surface of the painting using a
heated spatula set to the same temperature as the table (National Gallery 2019, video 7National Gallery. 2019. “Repairing a 17th Century Canvas:
Art Restoration of Artemisia Gentileschi’s Self-Portrait.”
Video. London: The National Gallery.; see fig. 22.4). Raised areas and
dips in the surface topography were marked up on a Melinex
template for further examination from the back once the
painting was removed from the table. The painting was dried
out under pressure.
Using the low-pressure suction table in this way has become an
integral part of the glue-paste lining process at the gallery.
First, moisture treatments using the table provide the
opportunity to witness under controlled conditions how the
painting responds to moisture, in preparation for the upcoming
aqueous relining treatment. Second, it enables critical
inspection of the surface topography of the painting under
acute raking light and provides the chance to work on some of
the most raised areas that are considered disturbing to the
overall surface appearance.
Once dry, the painting was removed from the suction table and
returned, facedown, to the Melinex-covered board. With the aid
of the Melinex template, the marked-up areas were further
investigated and, where necessary, scraped or filled to reduce
their impact on the final surface appearance the painting
would have once lined. The filling was done with the same
Mowiol-pigment mix used for the wormholes.
New Canvas Addition
The lack of cusping along the top edge and the appearance of
the closely cropped composition led to discussions of the
original format of the painting and whether it had been cut
down or altered in shape and size (see
fig. 22.1). The decision was made to
extend the top of the painting to accommodate the tip of the
martyr’s palm frond and the central pearl in her crown (National Gallery 2019, video 9National Gallery. 2019. “Repairing a 17th Century Canvas:
Art Restoration of Artemisia Gentileschi’s Self-Portrait.”
Video. London: The National Gallery.). A piece of new primed linen canvas, similar in weave to
the original, was prepared by first wetting and stretching it,
and then a strip was cut with the weave oriented with the warp
thread vertical and the weft horizontal.11
This strip was then profiled to match the top edge of the
original canvas and attached with the same PVA
adhesive–cellulose powder mix used for the inserts and tear
mend. A heated spatula was used to secure the strip just below
the original canvas surface.
Preparation of the New Lining Canvas
Next, the lining canvas was prepared. A piece of fine-weave
linen larger than the painting on each side was stretched onto
a wooden loom, wetted, and restretched to reduce and unify the
crimp of the canvas yarns. This produces a stiffer and more
isotropic support and reduces its tendency to shrink if
exposed to high humidity. Wetting and stretching was done
three times; on the third time a deacidification solution of
magnesium carbonate was added to the water.12
The linen lining canvas was then left tensioned on the loom
throughout the lining process.
Preparation of the Glue Paste
The day before lining, the adhesive was prepared. The
gallery’s standard recipe uses rabbit-skin glue, wheat flour,
and water only. The glue is dissolved in some of the measured
water by warming gently or being left overnight. The remaining
water is warmed in a bain-marie, and the flour added and
whisked. This flour-water mix is then added to the dissolved
glue and stirred until it is thick with no lumps. The final
mix is poured into a plastic tub, covered with Melinex to
prevent a skin forming, and set aside to cool. The adhesive
should be used within twenty-four hours as no preservative is
included (see appendix below).
The Lining Process
Prior to lining, the surface of the painting was faced again
with Eltoline tissue and cold wax resin. Every step of the
lining process was then planned out, the equipment gathered,
and the method run through. This is particularly important
with a glue-paste lining, because when the painting is wet
with the glue paste it is at its most vulnerable to movement
and change, so it is important to work precisely and quickly.
The work surface was covered with newspaper (as a blotting
paper), the position for the lining canvas loom was marked up
on the paper, and the lining irons were set to around
35°C–40°C. A “lining surface” of a raised Melinex-covered base
board (the depth of the loom and with dimensions larger than
the painting) was also prepared and put to one side. The
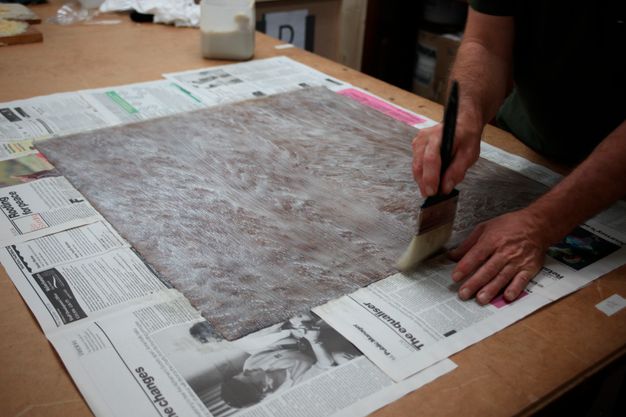
painting was then laid facedown on the newspaper, and the glue
paste was smeared over the back of the painting by hand and
worked to a smooth, thin, even layer using a brush (fig. 22.5).13
Hand application of glue paste allows for close assessment of
the surface as the adhesive is applied, and any changes can be
felt immediately.
ExpandFigure 22.5Gentileschi, Self-Portrait, during treatment.
Applying glue paste to the back of the painting.Image: The National Gallery, London
Next, the loomed lining canvas was placed directly on top of
the painting, following the premarked registers on the
newspaper. The lining canvas was pressed onto the back of the
painting by hand to lightly attach the painting so that it
could be turned over and placed, faceup, on the
(Melinex-covered) raised board. The painting surface was then
ironed over the tissue facing for forty minutes or so, with
the warm lining irons using only the weight of the irons and
no additional pressure. Once the whole surface was worked over
and the back fully saturated, the painting was placed
vertically for a couple of hours so the structure could begin
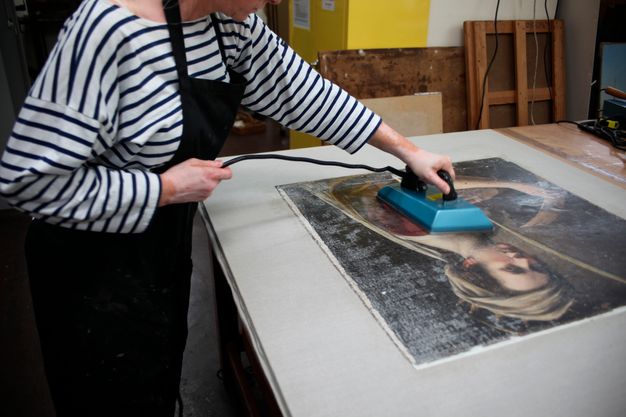
to dry. Then the painting was returned to the table and, with
the iron temperature increased slightly to 50°C–55°C, the
painting was ironed for a second time (fig. 22.6). It was then again placed vertically for a further period
to dry.
ExpandFigure 22.6Gentileschi, Self-Portrait, during treatment.
The painting was ironed for a second time using the
hand-held iron set at 50°C–55°C.Image: The National Gallery, London
The painting was returned to the table and the wax-resin
facing removed with mineral spirit so the paint surface could
be inspected for any faults, undulations, or problems with the
lining.14
A fresh piece of facing tissue was then laid on the painting,
and the surface ironed for a final time, with the iron
temperature increased to 65°C–70°C and with melted wax on the
iron plate to lubricate the iron across the tissue facing.
Work proceeded over the painting, keeping the irons moving to
prevent any hot spots and with the iron being returned to the
beeswax block to pick up more wax to keep the iron well
lubricated. This achieved a smooth and controlled lining
process. Once complete, the painting was lifted from the
lining board and propped up to allow air to circulate and the
painting to thoroughly dry out overnight.
The following day the facing tissue was removed with mineral
spirit. The tabletop was prepared with a thin blanket and
Melinex release layer, and the loomed, lined painting was
placed facedown on top of the Melinex. Beeswax was ironed into
the back of the lining canvas as a barrier to moisture. The
wax does not impregnate the original reverse because the
coherent glue-paste adhesive layer prevents this (National Gallery 2019, video 8National Gallery. 2019. “Repairing a 17th Century Canvas:
Art Restoration of Artemisia Gentileschi’s Self-Portrait.”
Video. London: The National Gallery.;
Ackroyd 1995, 89Ackroyd, Paul. 1995. “Glue-Paste Lining of Paintings: An
Evaluation of the Bond Performance and Relative Stiffness
of Some Glue-Paste Linings.” In
Lining and Backing: The Support of Paintings, Paper and
Textiles: Papers Delivered at the UKIC Conference, 7–8
November 1995, edited by Andrew Durham, 83–91. London: United Kingdom
Institute for Conservation of Historic and Artistic
Works.;
Young and Ackroyd 2001, 101Young, Christina, and Paul Ackroyd. 2001. “The Mechanical
Behavior and Environmental Response of Paintings to Three
Types of Lining Treatment.”
National Gallery Technical Bulletin 22:
85–104.).
Modifications to the Old Wooden Stretcher and Restretching
The old wooden stretcher was modified. Wooden battens were
added to the edges to accommodate the new addition and
slightly increase the overall size of the stretcher. This
ensured that the original edges of the painting were kept away
from the edge of the stretcher to reduce the risk of
delamination from the lining during restretching. The excess
visible lining would be framed out, as a new frame,
contemporary to the painting, was sourced. New keys were made
to replace the old damaged and missing keys.
The painting was cut from the loom, leaving about a 12 cm
tacking margin, and reattached to its stretcher with copper
tacks tapped into the stretcher at regular intervals. Finally,
as with all lined paintings at the gallery, the keys were tied
in with nylon wire and brass screws and cups. The tacking
margins were trimmed, folded, ironed flat against the back of
the stretcher, and attached with galvanized staples. The
painting was then returned to the restoration studio to
complete the treatment (fig. 22.7).
ExpandFigure 22.7Gentileschi, Self-Portrait, after
treatment.Image: The National Gallery, London
Conclusion
Self-Portrait as Saint Catherine of Alexandria by
Artemisia Gentileschi was a significant acquisition and
conservation project for the Gallery. A film series of the
full treatment process, including cleaning, structural
treatment, and restoration, was made and published on both the
gallery’s website (National Gallery 2019National Gallery. 2019. “Repairing a 17th Century Canvas:
Art Restoration of Artemisia Gentileschi’s Self-Portrait.”
Video. London: The National Gallery.) and YouTube and was well received. Further investigations
into the painter’s process were also undertaken (Keith et al. 2019Keith, Larry, Letizia Trevez, Marta Melchiorre de
Crescenzo, and Joanna Russell. 2019. “Artemisia
Gentileschi’s Self-Portrait as St. Catherine of
Alexandria.”
National Gallery Technical Bulletin 40:
4–17.;
Melchiorre Di Crescenzo et al. 2019Melchiorre Di Crescenzo, Marta, John K. Delaney,
Catherine Higgitt, Joanna Russell, and Marika Spring.
2019. “Artemisia Gentileschi’s Self-Portrait as Saint
Catherine of Alexandria: Hyperspectral Imaging and
Technical Investigation of a New National Gallery
Acquisition.” Paper presented at Technart 2019, Brugges,
7–10 May 2019.).
After treatment, the painting embarked on a nationwide tour to
unusual venues across the United Kingdom, the first venue
coinciding with International Women’s Day on March 8, 2019,
traveling in total to two libraries, a doctor’s surgery, a
school, and a prison.15
Thereafter, the portrait was included in the gallery’s major
exhibition, Artemisia, October 2020–January 2021,
which included forty-one works from public and private
collections and showcased the artist in the first major
exhibition of her work in the U.K.16
Acknowledgments
I would like to express my sincerest thanks to the Getty
Foundation for its generous support of the Conserving Canvas
initiative and my participation in it, to the Yale symposium
organizers for accepting this contribution to the Conserving
Canvas symposium and publication, and to my work colleagues
for their support and expert advice, in particular my
colleague and mentor Paul Ackroyd.
Appendix: Materials and Recipes
Materials List
Eltoline tissue, long-staple 100% manila fibers with good
wet strength
Resin ‘W’, Evo Stik wood adhesive, Bostik Ltd., U.K.
Mowiol GE 04-86 (polyvinyl alcohol), Kuraray Europe GmbH
Recipes
Wax-resin facing made from dammar and beeswax: 340 g beeswax,
1700 ml dammar varnish (454 g resin, 2800 ml mineral spirit),
850 ml mineral spirit.
Deacidifying solution of magnesium carbonate dissolved in
carbonated distilled water: 8.8 g magnesium carbonate, 1000 ml
water.
Glue-paste adhesive, 6:1 wheat flour and animal glue: 240 g
wheat flour, 40 g animal glue (rabbit), 1440 ml water (6 × 240
= 1440).
Mowiol and chalk mix filler at 25%: 240 g Mowiol GE 04-86,
1000 ml water, enough chalk and pigment to form a stiff,
colored paste.
This paper complements the contribution in this
publication by
Paul Ackroyd, National Gallery, London.
↩︎
The flattened right edge was to be retained in the
current treatment. See also
Keith et al. 2019Keith, Larry, Letizia Trevez, Marta Melchiorre de
Crescenzo, and Joanna Russell. 2019. “Artemisia
Gentileschi’s Self-Portrait as St. Catherine of
Alexandria.”
National Gallery Technical Bulletin 40:
4–17., 6, 16 (n.11).
↩︎
It was important to consider the weave orientation of
the strip. Having the warp thread vertical restricts its
horizontal movement when wet, thereby reducing the risk
of imposing dimensional change on the original during
this stage of treatment. When wet, the new machine-woven
canvas curls in a convex manner to the surface in the
warp direction while also shrinking in the warp
direction.
↩︎
Magnesium carbonate is not soluble in water. It is mixed
with a small amount of water into a paste, put in a soda
siphon with a quantity of distilled water (up to 1
liter), and then the release of two carbon dioxide
capsules into the siphon turns the magnesium carbonate
into bicarbonate, which is soluble in water. The
resulting water mixture is applied to the canvas. When
dry, the magnesium bicarbonate reverts to magnesium
carbonate, and this is what is left within the structure
of the canvas. See
Ryder 1986Ryder, Nichole. 1986. “Acidity on Canvas Painting
Supports: Deacidification of Two Twentieth Century
Paintings.” The Conservator 10:
31–36.. ↩︎
Figure 22.1Artemisia Gentileschi (Italian, 1593–1654),
Self-Portrait as Saint Catherine of Alexandria, ca.
1615–17. Oil on canvas, 71.5 × 71 cm (28 1/8 × 28 in.). The
National Gallery, London, NG6672. Before treatment. Image: The
National Gallery, London
Figure 22.2Gentileschi, Self-Portrait, before treatment. Detail
of the seam, likely sewn by the artist. Image: The National
Gallery, London
Figure 22.3Gentileschi, Self-Portrait, during treatment. The
painting was faced with a piece of Eltoline tissue brushed
over with the cold wax-resin facing mixture. Image: The
National Gallery, London
Figure 22.4Gentileschi, Self-Portrait, during treatment. The
painting was treated with moisture using the studio’s
low-pressure suction table and additional pressure applied
locally using a heated spatula. Image: The National Gallery,
London
Figure 22.5Gentileschi, Self-Portrait, during treatment.
Applying glue paste to the back of the painting. Image: The
National Gallery, London
Figure 22.6Gentileschi, Self-Portrait, during treatment. The
painting was ironed for a second time using the hand-held iron
set at 50°C–55°C. Image: The National Gallery, London
Figure 22.7Gentileschi, Self-Portrait, after treatment. Image:
The National Gallery, London