Structural damage to a canvas, such as tears, presents unique problems when considering and conducting conservation treatments and can be compounded when working in private conservation, as a consistent and stable environment for the exhibition, storage, and travel of a painting is not assured. When Heiber’s thread-by-thread tear-mending technique is selected as the preferred treatment method, further treatment steps, such as reinforcements to the mend, are often necessary to maintain integrity and planarity and ensure a successful outcome. This paper argues for the necessity for reinforcements to be added to tears repaired using Heiber’s technique. Four case studies of tears encountered in a private painting conservation setting are presented. These case studies present examples in which structural reinforcements of tear repairs were implemented, informed by the canvas’s material properties; the type of damage to the canvas threads; and the size, direction, and location of the tear. The reinforcements discussed focus on the incorporation of Gore-Tex sutures into the weave matrix.
31. Weaving into Heiber: Further Treatment Steps for Tear Mending
- Emily Mulvihill, Conservator and Co-founder, Current Art Conservation, New York
- Sandra Amann, Head Painting Conservator, Amann + Estabrook Conservation Associates, New York
- Elizabeth Estabrook, Head Painting Conservator, Amann + Estabrook Conservation Associates, New York
- Megan Berkey, Painting Conservator, Amann + Estabrook Conservation Associates, New York
- Sayaka Rozsa, Painting Conservator, Amann + Estabrook Conservation Associates, New York
- Gail Mitchell, Painting Conservator, Amann + Estabrook Conservation Associates, New York
Introduction
In the field of paintings conservation, there are long-established treatment techniques for addressing structural repairs, such as tears in the canvas support. These techniques range from more invasive treatments, such as linings (Bailey, Blair. 2017. “A Preliminary Investigation into Aquazol as an Alternative Lining Adhesive for Paintings.” AIC Paintings Specialty Group Postprints 30: 1–11. Chicago: AIC.; Berger, Gustav A. 1974. “Beva Lining of Torn Paintings: Three Films.” Bulletin of the American Institute for Conservation of Historic and Artistic Works 14, no. 2: 22–27., Berger, Gustav A. 1975. “Heat-Seal Lining of a Torn Painting with Beva 371.” Studies in Conservation 20, no. 3: 126–51.; Bernstein, James. 1974. “The Treatment of an Extensively Damaged Oil Painting on Canvas.” Bulletin of the American Institute for Conservation of Historic and Artistic Works 14, no. 2: 93–104.; Fieux, Robert E. 1974. “Mechanical Aspects of Vacuum Lining of Paintings.” Bulletin of the American Institute for Conservation of Historic and Artistic Works 15, no. 1: 48–50.; Goist, David C. 1977. “Treatment of a Flood-Damaged Oil Painting on a Solid Support.” Journal of the American Institute for Conservation 16, no. 2: 21–26.; Levenson, Rustin. 1974. “The Conservation of a Seventeenth-Century Dutch Portrait.” Annual Report (Fogg Art Museum): 51–57.; Slabczynski, Stefan. 1960. “The Large Vacuum Hot-Table for Wax Relining of Paintings in the Conservation Department of the Tate Gallery.” Studies in Conservation 5, no. 1: 1–16.; Stoner, Joyce Hill. 1994. “The Impact of Research on the Lining and Cleaning of Easel Painting.” Journal of the American Institute for Conservation 33, no. 2: 131–40.; Wales, Carroll. 1968. “Lining Torn Paintings on Aluminum Panel.” Bulletin of the American Group, International Institute for Conservation of Historic and Artistic Works 8, no. 2: 15–17.), to less-invasive treatments, such as patches and localized thread-by-thread repairs (Barnett, Ronnee. 1992. “Reweaving of Damage in Colorfield Paintings.” In AIC Painting Specialty Group Postprints, 19–25. Buffalo, NY: AIC.; Bustin, Mary. 2003. Alternatives to Lining: Structural Treatment of Paintings on Canvas without Lining: A Conference Held Jointly by the British Association of Paintings Conservator-Restorers and the United Kingdom Institute for Conservation Paintings Section, 19 September 2003: Preprints. London: United Kingdom Institute for Conservation of Historic and Artistic Works.; Heiber, Winfried. 2003. “The Thread-by-Thread Tear Mending Method.” In Alternatives to Lining: Structural Treatment of Paintings on Canvas without Lining: A Conference Held Jointly by the British Association of Paintings Conservator-Restorers and the United Kingdom Institute for Conservation Paintings Section, 19 September 2003: Preprints, edited by Mary Bustin and Tom Caley, 35–48. London: United Kingdom Institute for Conservation of Historic and Artistic Works.; Piotrowska, Kinga, and Sandra Amann. 2009. “Minimal-Adhesive Mend and Cast In-painting: A Treatment of a Tear on an Ed Ruscha Painting.” In AIC Paintings Specialty Group Postprints, vol. 22, edited by Barbara Buckley, Meg Newburger, and American Institute for Conservation of Historic and Artistic Works, AIC Paintings Specialty Group, 48–57. Washington, DC: American Institute for Conservation.; Proctor, Robert. 1994. “Repairing Tears in Canvas Paintings by a Reweaving Process.” AIC Painting Specialty Group Postprints, 56–60. Nashville: AIC.). After the 1974 Greenwich conference (Villers, Caroline, ed. 2003. Lining Paintings: Papers from the Greenwich Conference on Comparative Lining Techniques. London: Archetype.), there was a shift in thought away from invasive techniques and an effort to devise less-invasive techniques (Hackney, Stephen. 2004a. “Relining, Lining, De-lining.” In Minimo intervento conservativo nel restauro dei dipinti, atti del convegno di Thiene (VI): 29-30 ottobre 2004: Secondo Congresso Internazionale Colore e Conservazione, Materiali e Metodi nel Restauro delle Opere Policrome Mobili, 29–36. Padua: Il Prato.; Keck, Caroline K. 1977. “Lining Adhesives: Their History, Uses, and Abuses.” Journal of the American Institute for Conservation 17, no. 1: 45–52.).
The development of the thread-by-thread tear-mending technique, published by Winfried Heiber (Heiber, Winfried. 2003. “The Thread-by-Thread Tear Mending Method.” In Alternatives to Lining: Structural Treatment of Paintings on Canvas without Lining: A Conference Held Jointly by the British Association of Paintings Conservator-Restorers and the United Kingdom Institute for Conservation Paintings Section, 19 September 2003: Preprints, edited by Mary Bustin and Tom Caley, 35–48. London: United Kingdom Institute for Conservation of Historic and Artistic Works.; Proctor, Robert. 1994. “Repairing Tears in Canvas Paintings by a Reweaving Process.” AIC Painting Specialty Group Postprints, 56–60. Nashville: AIC.), enabled a new phase of less-invasive treatments of structural repairs in paintings conservation, which were more sympathetic to the canvas, did not alter the surface appearance of a painting, re-created the aesthetic properties of the canvas, and were reversible. Heiber’s technique involves the retwining of the torn and splayed threads and reintegrating them into the weave matrix to reestablish the overall tension of the canvas in the torn and damaged area. It is well established that a fluctuating environment causes the canvas fibers to swell and contract (Cornelius, F. 1967. “Movement of Wood and Canvas for Paintings in Response to High and Low RH Cycles.” Studies in Conservation 12, no. 2: 76–80.), placing stress on the canvas, paint layers, and any structural damage and repairs (Berger, Gustav A., and William H. Russell. 1990. “Deterioration of Surfaces Exposed to Environmental Changes.” Journal of the American Institute for Conservation 29, no. 1: 45–76.). The theory behind Heiber’s repairs is that when individual fibers are reconnected, the integrity of the canvas is restored, and the whole canvas responds uniformly to environmental fluctuations; this in turn reduces localized stress on the mend.
The success of a Heiber mend is dependent on factors such as the type of damage to the canvas threads, as well as the size, direction, and location of the tear. The two most common categories of damage to the threads are tearing from the canvas weave and cuts, and the associated bonds for each affect the ability of the mend to withstand stresses. Tears involving torn threads can be reconnected by overlapping and intermingling fibers from opposing threads and adhering them with a small amount of adhesive. This type of join creates the strongest bond and can withstand greater amounts of stress. Tears where the threads have been cut are reconnected to the opposing thread with a butt join and a small amount of locally applied adhesive. This type of join relies mostly on the strength of the adhesive rather than the combination of the canvas fibers and adhesive; it is less successful when placed under stress and less able to maintain planarity.
The size or length of the tear impacts the overall structural integrity of the canvas support. Horizontal and vertical tears are both affected by stress inherent to the overall canvas, but horizontal tears are vulnerable to the added effects of gravity and the weight of the canvas pulling on the mend. This stress is increased when the tension of the canvas is loose and there is a thick, heavy paint layer. Finally, the location of the tear and potential stress from increased vibrations may compound the stress created by all the other factors.
For all of these reasons, it is important to build on Heiber’s theories and develop additional localized treatment strategies that can be used to strengthen tear mends while being sympathetic to the canvas support. Verso reinforcements are an important last step to a tear repair when the bonds in the repair are not strong enough to withstand stress from environmental fluctuations, which can be exacerbated by the damage.
This paper presents four case studies undertaken at Amann + Estabrook Conservation Associates to describe the option of verso reinforcements as a way to bridge and support thread-by-thread mends. The process of deciding whether verso reinforcement is necessary, and if so, what materials may be appropriate, is discussed in each case.
Verso Reinforcements
At Amann + Estabrook, Gore-Tex sutures1 sewn into the weave matrix have been found to provide a passive, inert, and flexible support network that helps counter mechanical forces (Hartman, E. Laura. 2017. “When the Dog Bites: Tear Mending a Large Steven Parrino Painting Following a Dog Attack.” In AIC Painting Specialty Group Postprints 30: 55–68. Chicago: AIC.; Piotrowska, Kinga, and Sandra Amann. 2009. “Minimal-Adhesive Mend and Cast In-painting: A Treatment of a Tear on an Ed Ruscha Painting.” In AIC Paintings Specialty Group Postprints, vol. 22, edited by Barbara Buckley, Meg Newburger, and American Institute for Conservation of Historic and Artistic Works, AIC Paintings Specialty Group, 48–57. Washington, DC: American Institute for Conservation.). They are fully reversible and can be removed easily if required. The sutures also lend themselves to variations and can be adapted to suit each individual case. They can be varied in length, concentration, and sewing methods, thereby reducing the potential for telegraphing through to the face.
Gore-Tex sutures, commonly used in dental surgery, are a microporous, flexible polytetrafluoroethylene monofilament with a stainless-steel needle fused to either end of the monofilament. They are soft and easy to manipulate. They can also be dyed to match the fabric support of a painting, and thus be a discreet addition to a conservation treatment. They come in a variety of monofilament thicknesses, needle gauges, and needle types. Generally, the preferred Gore-Tex suture for most treatments where suture reinforcements are needed is the thinnest gauge: monofilament CV-8 with a needle gauge of TTc-7 and a tapered needle shape.
Gore-Tex sutures may not be suitable for every painting. For sutures to be successfully integrated into the canvas weave, they need to be sewn between overlapping warp and weft threads. The canvas fibers need to be supple enough to allow the needle and suture to pass through. If the canvas has deteriorated and become brittle, sutures can shatter the canvas fibers within the threads. For this reason, Gore-Tex sutures are more suited to modern and contemporary paintings, because they have less deterioration than considerably more aged canvases. However, each canvas must be assessed on an individual basis. In some cases, when deterioration of the canvas is not uniform, Gore-Tex sutures can be used in combination with other methods to bridge tears. Other verso reinforcements used in combination are Japanese paper “sutures” and patches infused with Beva 371.
Case Study 1: Tear Mend without Reinforcement
Painting Description and Condition
The first painting presented is by a Japanese artist and was painted in the mid-1970s. The painting measures 120 × 77 inches (304.8 × 195.6 cm) and is one of two from a diptych. The painting was executed on a plain-weave, medium-weight cotton duck canvas that was stretched onto a sturdy seven-member wood expansion-bolt stretcher. The stratified structure of the paint layer consists of a thin, evenly applied white ground layer followed by layers of sparsely applied acrylic paint, graphite, and art markers.
The painting had a 5 1/2-inch vertical tear located in the bottom left corner, 1 inch from the left turning edge. Four vertical-running threads were severed and hung loosely, while several other vertical threads, although intact, were stretched and pulled out of the weave matrix. The horizontal threads were torn the length of the tear and had splayed ends. The torn ends appeared to meet their opposing threads, which indicated that a gap between the edges of the tear had not developed. The canvas had rippled distortions that ran down both edges of the tear. Fractured paint radiated from the tear, with associated lifting and loss to the paint and ground layers. Paint fragments were also attached to the hanging vertical threads.
Discussion
The tear’s size, direction, location, and type within the overall painting are fundamental when determining the damage to the overall structural integrity of the canvas support caused by the tear. Once assessed, this helps determine how to proceed with conservation treatment. In this case, the tear was 5 1/2 inches long (13.9 cm), ran vertically, and was 23 3/4 to 28 5/8 inches (60.3–72.7 cm) from the lower edge and 1 inch (2.5 cm) from the left turning edge. The threads in the tear were torn rather than cut bluntly. The length of the tear was relatively small in proportion to the overall height of the painting—only 5%.
Under observation while in the studio, the tear did not increase in size or form distortions within the support. From this, it was determined that the overall impact of the tear on the integrity of the canvas was minimal. As the tear ran vertically, it was estimated that the tear did not bear significant weight from the canvas and was not greatly affected by gravity. The location of the tear, close to the left turning edge and approximately 25 inches from the lower edge, was predicted to be under a low amount of strain—an estimate that was again supported by the lack of distortions in area (Berger, Gustav A., and William H. Russell. 1988. “An Evaluation of the Preparation of Canvas Paintings Using Stress Measurements.” Studies in Conservation 33, no. 4: 187–204.). Finally, threads within the tear were torn and pulled out of the weave, which meant that, when rewoven, opposing threads would overlap and create a strong repair. As the tear’s size, direction, and location had minimal impact on the overall integrity of the canvas, additional verso reinforcements to the tear were not necessary; the treatment was more aesthetic than structural. This minimal approach provided the flexibility to potentially add reinforcements in the future should it be necessary.
Treatment
The painting was treated in situ while the fabric remained attached to the stretcher. The canvas was mended using the Heiber thread-by-thread repair method, working only from the face under stereo magnification, as the reverse was not available due to its being behind the stretcher bar. Broken and frayed threads were retwisted and sized with a dilute solution of methyl cellulose in distilled water. The dampened threads were then rewoven into the weave matrix to aesthetically match the original weave. The adjoining threads were connected and adhered with a bead of dilute Vinamul 3252 (ethylene vinyl acetate–based adhesive) and secured with a needle-tipped heated spatula.
Case Study 2: Butt-Join Tear Mend with Gore-Tex Suture Verso Reinforcement
Painting Description and Condition
The second painting presented was completed in the late 1960s by an artist prominent in the Abstract Expressionist movement. The painting measures 92 1/2 × 128 inches (235 × 325 cm) and was executed on a heavyweight cotton duck canvas that was stretched onto a sturdy wooden stretcher. The ground layer is an evenly applied white layer, and the paint layer, estimated to be oil, was applied in limited areas within the top half of the painting in a thin brush application.
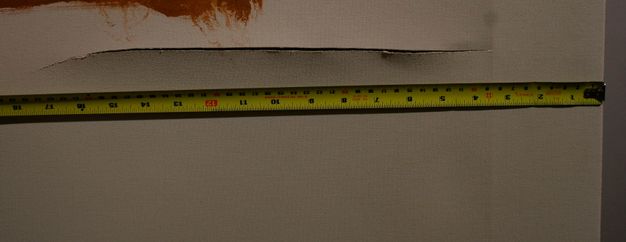
The face of the painting was accidentally slashed with a box cutter when the work was being unpacked, which left a slightly wavering, horizontal, sharply cut tear through the fabric support (fig. 31.1). The tear was located 48 1/16 to 48 3/4 inches (122–123.8 cm) from the upper edge and 3 3/8 to 17 5/8 inches (8.6–44.8 cm) from the right edge. The tear exhibits minute loss of the thin ground layer. There was some fraying of the exposed threads, and the opposing threads along the edge of the tear were not aligned. The edges of the tear tented forward, were slightly distorted, and gaped. The overall tension of the canvas was loose.
Discussion
Here again, the size, direction, location, and type of tear were major factors that influenced the treatment steps and consideration of verso reinforcements. The size of the tear was 13.5 inches (34.3 cm), which was 11% of the overall length of the edge of the painting. Because of this length, combined with the horizontal direction of the tear and its central location, it was estimated that there would be significant stress placed on the tear mend from the weight of the canvas. Another factor to consider in this case was the type of tear: a blunt cut, which meant no “reweaving” of the canvas would be possible due to the lack of overlapping threads. Mends for this type of tear mostly rely on the adhesive to bridge the tear, which makes them, generally, very weak mends (Flock, Hannah, Stefan Diebels, Elisabeth Jägers, and Wulff Possart. 2020. “Thread-by-Thread Tear Mendings in Conservation of Canvas Paintings: A Problem of Reproducibility in Bonding Qualities.” Journal of Adhesion: 1–22. Also published in Journal of Adhesion 97, no. 14: 1336–57. https://doi.org/10.1080/00218464.2020.1761797.). With these combined factors and the inherent flexibility of the canvas, it was determined that verso reinforcements of Gore-Tex sutures woven into the canvas weave were necessary to bridge the mend and create a lasting repair.
Treatment
The tear mend proceeded with a Heiber thread-by-thread repair. To facilitate this, the painting was placed facedown on a table. To access the end of the tear, which continued under the stretcher bar, a small section of the stretcher member measuring 3/4 × 3 5/8 inches (1.9 × 3.6 cm) was routed out (this was a less-invasive approach than removing a section of the stretcher or taking the painting off the stretcher entirely). Two sets of RH Engineering Trekkers2 were mounted on the horizontal crossbars that ran parallel to the tear. The Trekkers were used to reduce the gap and bridge the tear by pulling the edges together using lateral tension. When aligned, the corresponding abutted threads were connected with a minute bead of an adhesive solution, 25% sturgeon glue in distilled water combined with Solka-Floc 10 Cellulose powder at a 20:1 v/v ratio. The adhesive was then heat-set using a heated needle.
As the tear mend progressed under tension provided by the Trekkers, Gore-Tex sutures were sewn across the tear in a perpendicular direction to bridge the mend, reinforcing the torn weft threads. The suture thread was initially anchored by looping twice around a warp thread approximately 1 1/2 to 2 inches from the tear (fig. 31.2).
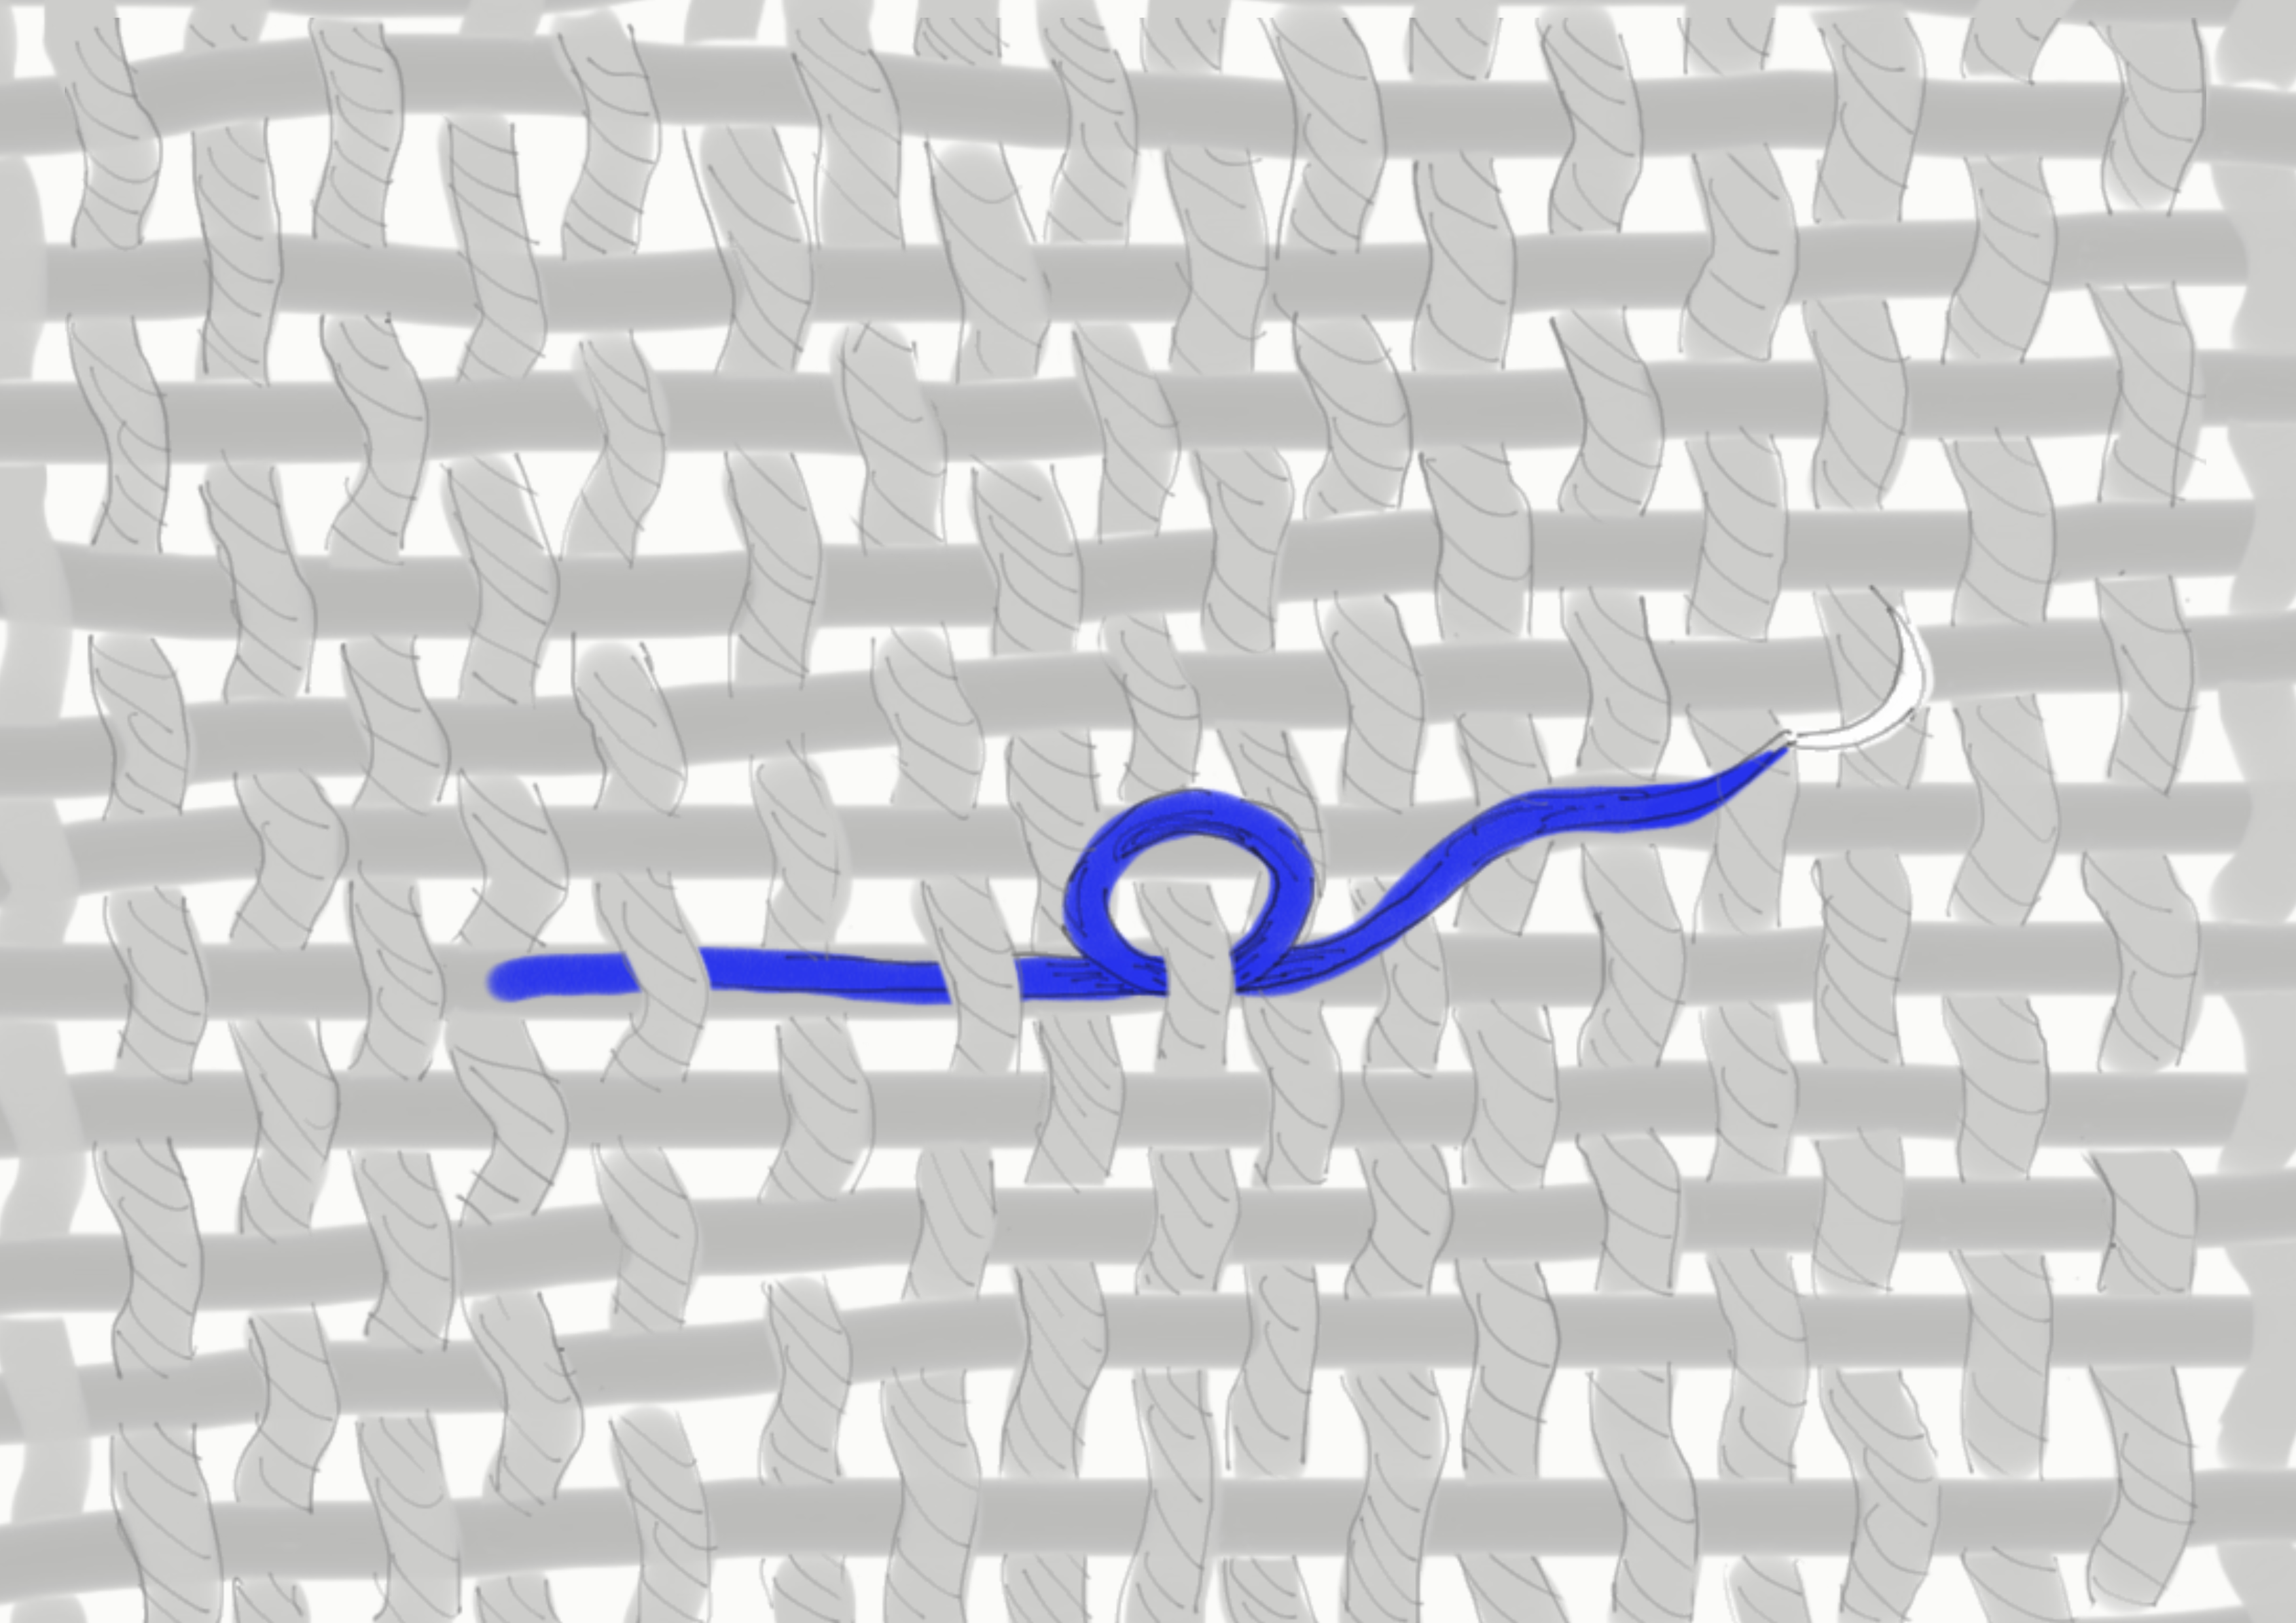
The suture was passed over three to six threads and was threaded under the next horizontal warp thread (fig. 31.3). This continued until the suture had bridged the tear, and the suture was anchored again on the opposite side. Importantly, the length of each bridging thread and the distance between each threaded warp thread was staggered so as not to form a visible pattern. In this case, the length varied from 4 to 6 inches across the tear and three to six canvas threads between each bridging suture. It was theorized that this should prevent any ridges, lines, and/or patchlike forms from telegraphing through to the face of the painting.
Case Study 3: Tear Mend with Gore-Tex Suture Verso Reinforcement of Oversize Painting
Painting Description and Condition
The third example was painted in the mid-1980s by a well-established contemporary European artist who works across mediums and uses an array of materials. The large-scale painting, measuring 84 × 150 inches (216 × 381 cm), was executed on a heavy-duty, coarse, densely woven linen. The auxiliary support was an underbuilt, seven-member wooden strainer with one horizontal and two vertical crossbars. The paint and ground layers consisted of textured multimedia layers ranging between 1/2 to 1 inch thick (1.3–2.5 cm); consequently, the painting is incredibly heavy. The ground was initially applied in a heavy impasto layer, followed by subsequent thinner layers of paint added in various manners, including drips, splashes, and by brush. The ground and paint layers had a characteristic drying-crack pattern that developed due to the artist’s process.
The work was damaged during transport, causing the center crossbar to break and tear through the face of the painting (fig. 31.4). This resulted in two horizontal tears measuring 43 inches (109 cm) and 5 inches (12.7 cm) in the canvas support, located left of the center. There was significant paint loss around the tear; fortunately, the paint fragments were saved and later collected from within the travel frame. The canvas was very loose when it came to the studio, forming a belly along the lower edge. In addition, there were distortions surrounding the edges of the tear.
Discussion
The damage to the canvas support in this case study was significant. This combination of the size, direction, location, and type of tear impacted the structural integrity of the canvas and justified the treatment steps, which included the addition of reinforcements to the reverse. The larger, 43-inch tear ran horizontally and was located slightly left of the painting’s center; the warp and weft threads had been torn and stretched from within the weave matrix. The length of the tear was significant, at 29% of the width of the painting.
It was estimated that due to the length and position of the tear, the area of damage was under significant mechanical stress from the weight of the paint layer and canvas. The heaviness of the paint layer added an extra level of complexity and potential fragility to the repair. The fact that the torn threads were available to be overlapped and reintegrated into the fabric structure, allowing for a strong mend, was the only reason a localized treatment could be considered in such an extreme case. In context, it was determined that verso reinforcements were necessary for a successful treatment, and the characteristics of the relatively new canvas would allow this to be done.
Treatment
The intention of the treatment was to reestablish the structural integrity of the canvas matrix and to ensure the longevity of the mend. This treatment was conducted in two stages: the structural features of the treatment, which required the painting to lie horizontally and faceup, and the second stage of aesthetic treatment, which required it to be positioned vertically. Due to the scope of this paper, only the tear mending and reinforcement procedures of this treatment are discussed here.
The treatment advanced with a Heiber thread-by-thread tear mend. Due to the size of the painting and the location of the tear, work was not able to progress under magnification. Fortunately, the canvas weave was coarse and magnification was not vital for the treatment. Before reweaving could commence, all the broken threads were groomed, as they unfurled readily when manipulated, becoming too thick and unruly to sufficiently interlock within the weave matrix. To improve their malleability, the threads were sized with a weak solution of isinglass with an addition of Vinamul 3252 and retwisted with tweezers.
The threads were then rewoven, connecting the overlapping and intertwining weft threads with a bead of dilute Vinamul 3252, and secured with a heated, needle-tipped microspatula. Broken weft threads that did not meet their opposing threads were extended with a small section of thread harvested from the edge of the tacking margin. The harvested threads were groomed with the same isinglass-Vinamul solution and intertwined with the torn weft threads and connected to opposing threads within the tear. The repair work progressed from both the face and reverse.
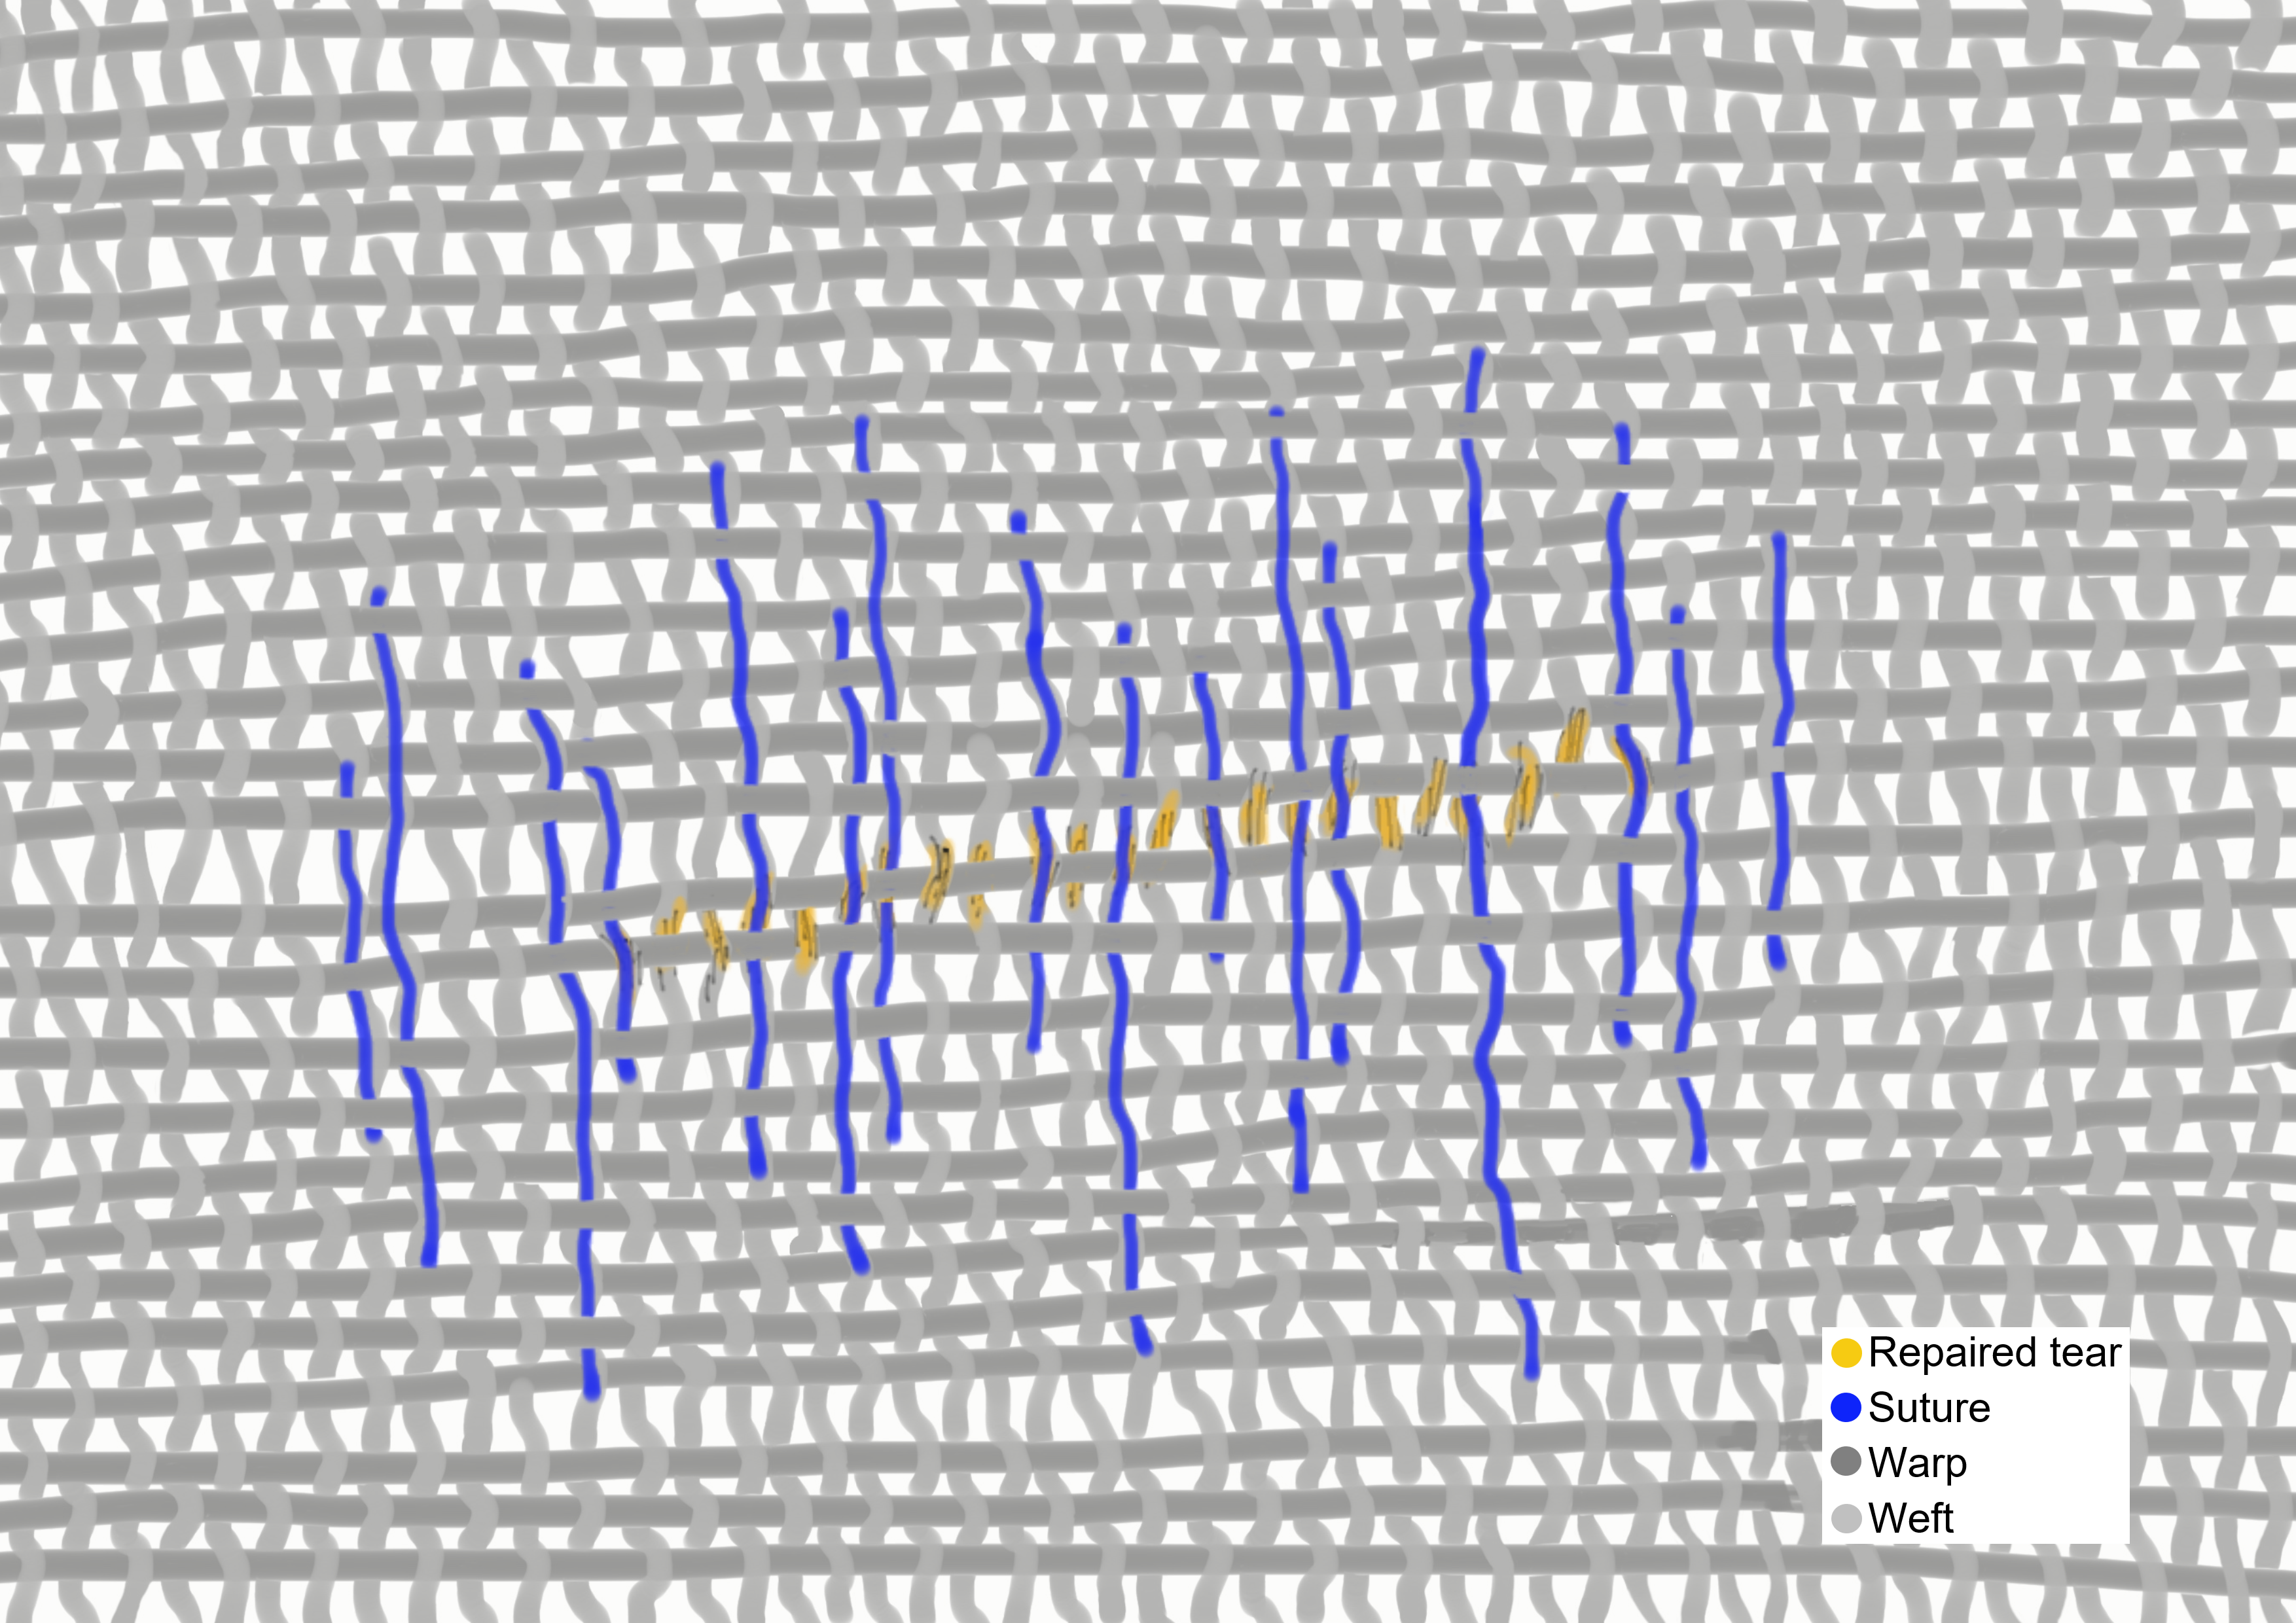
As sections were completed, Gore-Tex suture reinforcements were interwoven into the back of the weave matrix to bridge the tear (fig. 31.5). Gore-Tex monofilament size CV-5 was selected as the most appropriate suture due to its size, flexibility, and strength. Before being woven into the canvas, the Gore-Tex threads were tinted to match the tone of the canvas using Orasol dyes dissolved in ethanol. Locking forceps were used to handle the needle, and starting approximately 2 inches before the beginning of the tear, the sutures were threaded into the canvas following the weave pattern of the weft threads, which ran perpendicular to the direction of the tear. The ends were anchored and looped in the same fashion as described in case study 2 (see fig. 31.2).
The sutures were introduced every third, fourth, and fifth weft thread, and all were staggered in length. It was determined that the sutures would be threaded under every warp thread. First, this was because the canvas weave was so large the sutures could easily pass through without disrupting the bond between the ground layer and the canvas. Second, the closer and more aligned to the weft thread the sutures were, the more sympathetic the support from the reinforcements would be to the canvas weave structure, ultimately creating a stronger and more stable bridge.
Case Study 4: Tear Mend with a Combination of Verso Reinforcements
Painting Description and Condition
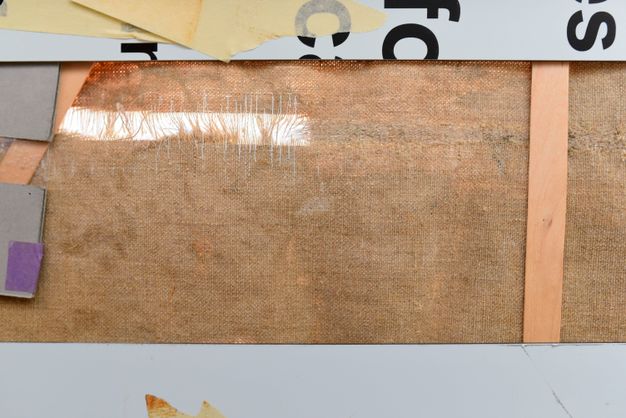
The final case study is a circular painting measuring 7 feet in diameter, completed by an American abstract artist in the early 1950s. The support is a moderate-weight, plain-weave cotton duck canvas. The canvas is unprimed, and the paint layer consists of intermittently brushed and poured oil paint in various consistencies. The major damage, located at the center bottom, was a 13 1/2-inch (34.3 cm) tear in a roughly C shape with right angles and with a section running along the turning edge (fig. 31.6). Numerous threads had been torn and pulled out of the weave matrix in both the warp and the weft directions. The loose flap of the support within the torn region had developed a mild crease from hanging in the folded position. The severed and pulled threads within the tear appeared to line up and meet their adjacent threads. Due to the lack of a priming layer and aging, the oil medium from the paint layer appeared to have leached into the unprimed canvas, embrittling and undermining the fabric. The overall tension of the canvas was also very loose.

The painting had been previously treated before the tear occurred, and the turning edge was strip-lined with muslin adhered with a Beva-like material. When the strip-lining was removed to fully access the tear, the revealed canvas was particularly degraded, discolored, and very brittle, possibly as a result of either the strip-lining adhesive or the application process. The painting also had a loose-lining, which was not torn at the time that it was damaged.
Discussion
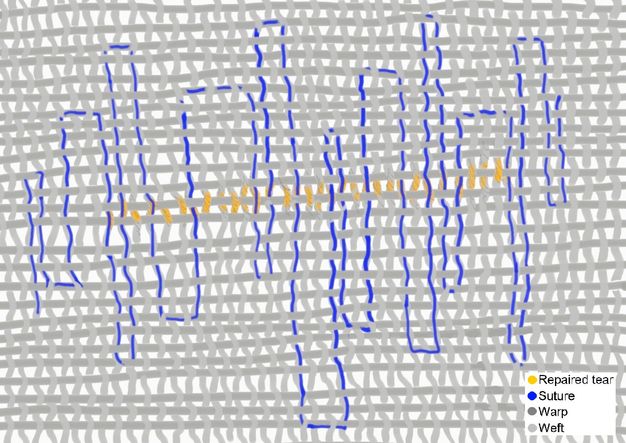
This last case study presented another unique challenge in that each of the three sections of the C-shaped tear had different properties that needed to be considered when determining the suitability for verso reinforcements. Each direction of the tear was evaluated individually to assess the impact of the direction on the tear and the painting as a whole. This resulted in a variety of reinforcements that were unique to each problem. For clarity, I will discuss each section of the tear separately: section A represents the top, horizontal tear; section B, the vertical section; and section C, the lower horizontal section along the turning edge of the painting (see fig. 31.6).
Section A was a straightforward assessment. Because the threads had been torn out of the weave matrix, the tear was able to be repaired by overlapping the threads, creating a mend that would be strong enough to mitigate the stresses placed on it by the size and direction of the tear. Section B was initially thought to be similar to section A, but as the mend progressed, it became apparent that the overlapping threads were not bridging the tear effectively. The area where the two sections intersected was also very weak and pulled open when stretched. This indicated that section B required further reinforcements to aid the stretching of the canvas in order to complete the treatment.
When assessing section C, the location and the past conservation treatment of this section were the determining factors for this part of the mend. First, the canvas fibers were in a very brittle state that was difficult to work with, as they fractured and shattered when manipulated. This meant that creating a strong bond from overlapping threads was not possible. This section was also the most vulnerable area of the tear because of the mechanical stress placed on it when the painting was stretched. Ideally, sutures would have been considered, but the brittle threads could not withstand even the mild stress of the threading process.
Treatment
Before Heiber’s thread-by-thread tear-mending technique could be applied, torn threads were groomed, organized, and sized with dilute methyl cellulose. Once the threads were organized, the broken threads were rewoven back into the weave matrix and adjoining threads were secured with a small bead of dilute Vinamul 3252. New cotton threads of a similar weight and tone to the original threads were added when adjoining threads were not long enough to reconnect or when a secure bond could not be created. To aid with the manipulation of the cotton threads and limit shattering of original fibers, the new threads were lightly moistened with distilled water, which enabled them to be maneuvered into the matrix with relative ease.
Once the mend had been completed, verso reinforcements could be added to appropriate areas (fig. 31.7). Staggered and irregular lengths of Gore-Tex sutures were threaded through the weave, running perpendicular to section B of the tear. Areas of canvas with paint on the surface were avoided because the fabric was too brittle and degraded for the sutures.
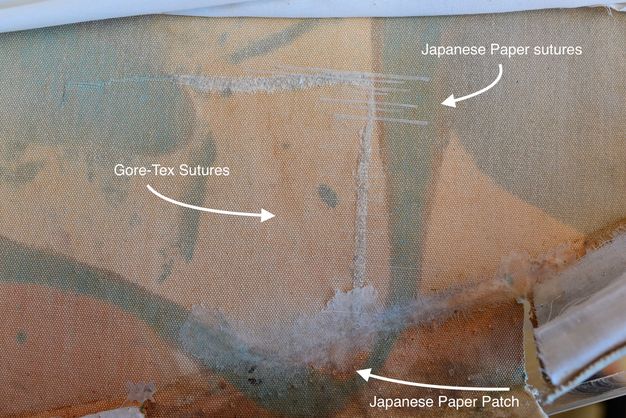
To support areas where the Gore-Tex sutures could not be integrated into the weave, Japanese paper “sutures” were used as an alternative. These sutures, approximately 1/32 inch (0.8 mm) in width and varied in length, were infused with liquid Beva 371 and minimally heat-set to the back of the canvas where sections A and B of the tear intersected, perpendicular to section B.
Section C of the tear was reinforced on the reverse with a patch of Japanese paper, the edges of which were softened by tearing and by splaying individual paper fibers. The patch was infused with Beva 371, lightly coating the individual paper fibers at the edges. Finally, it was secured using a warm tacking iron.
Conclusion
The purpose of this paper has been to introduce new methods that help bridge thread-by-thread tear mends and enhance Heiber’s method. Specifically, these methods, conducted from the reverse, create a sympathetic bridge across a thread-by-thread tear mend, using Gore-Tex sutures woven into the weave matrix. These treatments were described through four case studies, each case study demonstrating a particular application of the Gore-Tex sutures and how their application is influenced by the specific nature of the painting and the type of damage. The treatments ranged from a tear mend of a butt join with Gore-Tex suture verso reinforcement to a tear mend with Gore-Tex suture verso reinforcement of an oversize painting to a tear mend with a combination of verso reinforcements.
As demonstrated in the case studies, the Gore-Tex sutures can be altered to suit the specific painting and canvas to achieve the most successful results. However, they are not always needed, as demonstrated in the first case study, and it is important to assess the need for verso reinforcements in individual situations, as every painting is different; thus, it is important to take into consideration the characteristics of the painting. Sutures are one option available to the conservator, an important tool in the toolbox of conservation.
Notes
-
W. L. Gore & Associates. Gore Medical. Accessed March 29, 2022. https://www.goremedical.com/products/suture. ↩︎
-
RH Conservation Engineering. http://www.rhconservationeng.com/. ↩︎