The practice of minimal intervention came about as a response to invasive and prophylactic treatments of the past. Since it is the principal responsibility of the conservator to intervene, perhaps a better term would be targeted intervention. This paper seeks to illustrate how two adages, “Occam’s razor” and “the law of the instrument,” can help define a more targeted strategy wherein standard procedures can be simplified by both reexamining the causes of damage and modifying tools to better suit the task. Originally conceived as a slide presentation with multiple images, the intent of this paper is to encourage a generation of developing conservators to trust in their own hand skills and knowledge. Examples illustrate that by employing critical thinking and ingenuity, simple and more direct solutions can often be found to replace formulaic methodology and sophisticated equipment.
30. Targeted Strategies for Structural Treatments: The Law of the Instrument, Occam’s Razor, and Minimal Intervention
- Robert Proctor, Co-owner, Whitten & Proctor Fine Art Conservation
Historical Context
The 1974 Greenwich Conference on Comparative Lining Techniques might be called the seminal meeting for the field of painting conservation in the twentieth century. Implicit was an international agreement that the craft-oriented methods used for the structural treatment of paintings in the past, specifically lining paintings, be reviewed in the context of scientific investigation, and that new, informed methods must be adopted for our profession to evolve and avoid the mistakes of the past.
New tools like vacuum hot tables, low-pressure suction tables, and regulated humidity chambers were being developed and employed. Modern technology offered an expanding variety of new synthetic materials, which were being anxiously embraced, along with high-tech testing methods to evaluate these materials. All of this elicited excitement and confidence in all that was new to our profession. However, an underlying movement was stirring as well, mostly associated with a conservator named Westby Percival-Prescott, who was concerned about the notion that we must act prophylactically, and that we may be simply replacing the how and what without first addressing the why (Villers, Caroline, ed. 2003. Lining Paintings: Papers from the Greenwich Conference on Comparative Lining Techniques. London: Archetype.).
Over the next couple of decades, a more cautious approach known as minimal intervention was becoming the mantra of more and more paintings conservators. When I began my training in the mid-1980s, I was one of the young converts to this approach, even though some of my mentors considered Percival-Prescott an alarmist whose call for “a lining moratorium” was holding back progress in our field. While Percival-Prescott was advocating for caution and further investigation into both the efficacy and unintended consequences of lining, other critics soon came forward with much more scathing accusations of conservators destroying artworks due to their lack of connoisseurship and a rush to adopt new materials and methods (Walden, Sarah. 1985. The Ravished Image: Or How to Ruin Masterpieces by Restoration. New York: St. Martin’s Press.; Beck, James H., and Michael Daley. 1994. Art Restoration: The Culture, the Business and the Scandal. New York: Norton.).
A cadre of conservators were similarly advocating for what might be described as a gentler approach to treating paintings. Take, for example, the 1988 American Institute for Conservation (AIC) meeting in New Orleans. Sandwiched between the presentation of technical reports by two engineers, Gustav Berger and Marion Mecklenberg, Lance Mayer and Gay Myers presented a paper titled “Thoughts on Unlined Paintings.” In this presentation, they pondered “the ways in which conservators wrestle . . . with the actual treatment of unlined paintings” (Mayer, Lance, and Gay Myers. 1988. “Thoughts on Unlined Paintings.” In Preprints of Papers Presented at the Sixteenth Annual Meeting, New Orleans, Louisiana, June 1–5, 1988, edited by Sarah Z. Rosenberg, 222–30. Washington, DC: AIC.) and stated that “the trend toward treating paintings conservatively implies . . . changing ways of thinking . . . [toward] . . . minimal treatment of problems as they develop, rather than thinking that any conservation treatment can solve all of a painting’s past, present and future problems” (Mayer, Lance, and Gay Myers. 1988. “Thoughts on Unlined Paintings.” In Preprints of Papers Presented at the Sixteenth Annual Meeting, New Orleans, Louisiana, June 1–5, 1988, edited by Sarah Z. Rosenberg, 222–30. Washington, DC: AIC.).
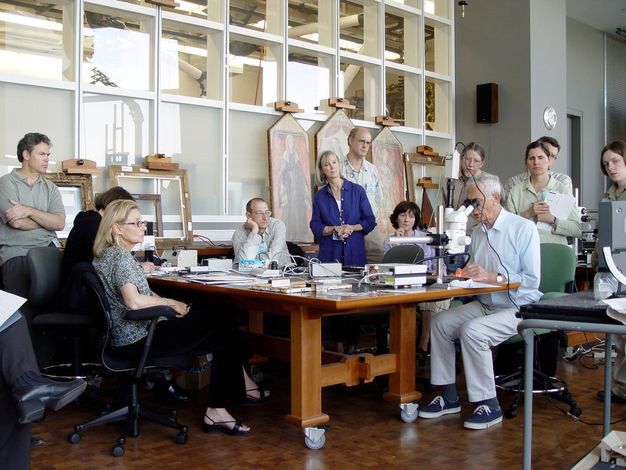
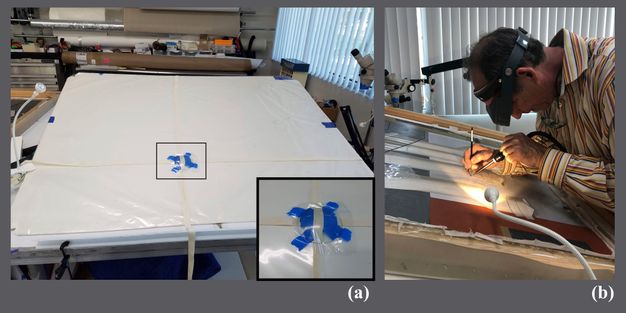
Probably the conservator most associated with this minimal approach was Winfried Heiber (fig. 30.1), a mentor for many students and like-minded colleagues even before he became a professor at the Hochschule für Bildende Künste (Academy of Fine Arts) Dresden. Today the “Heiber method” of tear mending is widely accepted as the primary technique for avoiding the “need” to line a torn painting.
Oddly enough, through my discussions with Heiber over the years, he rejected the term minimal intervention to describe the philosophy he followed, pointing out that simply adhering a new canvas to the reverse of a painting, and then filling and retouching a tear, could be considered less of an actual intervention than manipulating each thread of a tear and addressing all of the physical demands and tensile stresses throughout the multiple layers of a torn painting.
His approach might be better described as targeted intervention. The goal is to treat the damage locally, restore each and every layer of the painting, and limit the work to the specific area of damage. His process could almost be described as putting time in reverse to bring the painting back to a predamaged state. At the Tear Repair Seminar and Workshop held at the Art Institute of Chicago, September 7–9, 2000, Heiber compared a lined painting to a Ming Dynasty vase filled with cement and placed on a shelf. He observed that while it might be next to impossible to break the vase and that the cement remains visibly undetectable to the viewer, the inherent nature of the vase had been terribly compromised. In broader terms, he would remind us that one thing to be cherished about most paintings is their inherent fragility.
The subtitle of this paper is based on two common adages. The first is the law of the instrument: “When all you have is a hammer, everything looks like a nail”—a caution against letting the tool define the treatment rather than the treatment defining the tool. The second is Occam’s razor: “When faced with a problem, the simplest solution is usually the best.” Applied to conservation treatments, this translates to providing simple but effective solutions by looking more closely into the materials and actual mechanics of how something becomes damaged.
This paper presents some simplified methods and tools I have either developed or modified to facilitate local, targeted structural treatments of canvas paintings.
Work Stretchers
Work stretchers can be indispensable when treating tented paint caused by a shrunken canvas, particularly when the damage is in an area where the stretcher bars get in the way.
Figure 30.2 illustrates the design of a work stretcher developed by Heiber. The painting’s tacking margins are flattened and clamped between two padded wood blocks. On the end of one of each pair of blocks is a nylon strap by which the painting is suspended in a stretcher. This modular work stretcher is made from sections of aluminum with wood edges. The painting can be tensioned overall in the four corners using a hex wrench or locally by pulling the straps and restapling them.
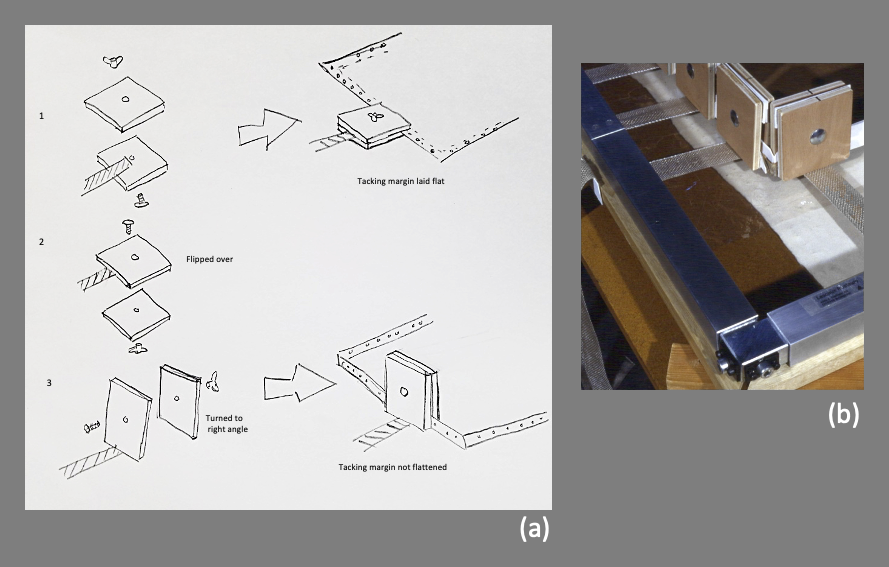
I modified the system to avoid flattening the tacking margins by flipping the blocks over and turning them on edge. Since the tension is equilibrial, the tacking margins remain at a right angle (fig. 30.3). Alternatively, easily sourced items (such as Hollytex, packaging tape, and bulldog clips) can be used to suspend paintings in standard artist’s stretchers (see fig. 30.3). Beva film is applied to the Hollytex and the stretcher to ensure that the tape sticks.
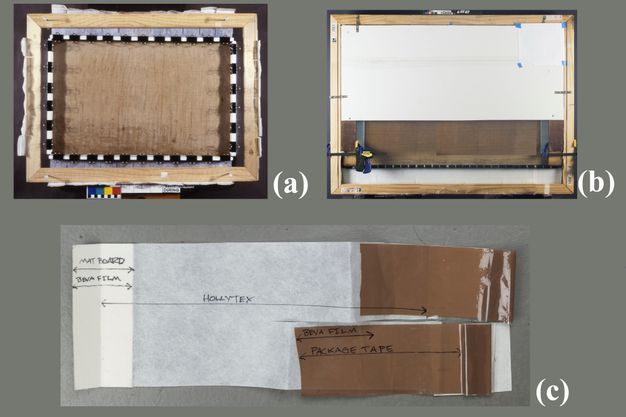
Often, damage is seen only along the bottom of a painting. In these cases, only the bottom stretcher member may need to be removed. A stretcher can be assembled to “hug” the three unaffected sides—either clamped together or held with mending plates. (Tip: Place holes where they can be reused for the backing board.)
Relaxing Tented Paint
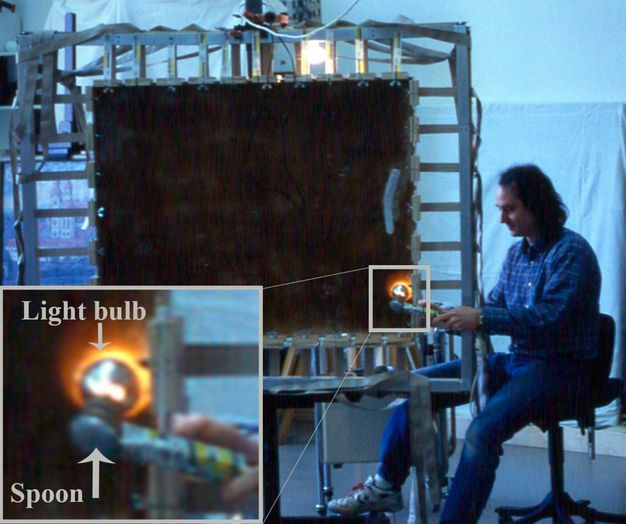
Heiber modified the so-called burnt finger technique commonly used to treat tenting paint (fig. 30.4). After infusing the canvas with an adhesive (usually wax works best), a light bulb is used on the reverse of the canvas to liquify the adhesive and stretch out a small area of canvas so that the paint can be set down without overlap using pressure from a padded clay shaper—or better yet, silicone shapers or a handmade Teflon tool. After a day’s work, tension is increased along the bottom member to reduce the bulges created by the light bulb. The light bulb can be attached to a handle to extend the user’s reach and a spoon attached to the opposite side to provide a cool surface for the adhesive to set under pressure.
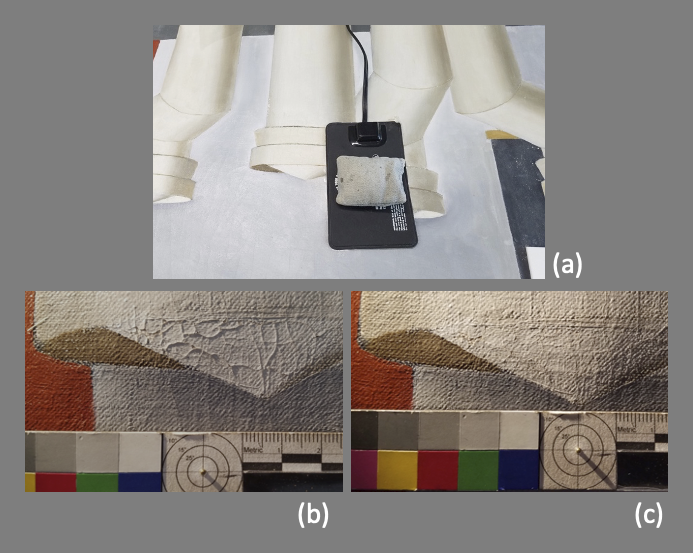
Another alternative that is particularly useful when the reach is too far is to use a watch glass to press on the back of the canvas (fig. 30.5). A board is cut to fit behind the back of the painting, and two lengths of twill tape, running vertically and horizontally, are taped to the bottom of the glass. A piece of silicone-release Mylar is placed over the glass to cover the entire surface. When the painting is in place, the twill tape can be used to move the glass without excessively moving the painting. (The painting is slightly lifted each time the watch glass is moved, then gently set down.)
Next, adhesive is locally fed into cracks and under lifting paint while a hot-air tool and silicone shaper are used to set the paint down on the front. To remove the distortion created by the watch glass, a reptile warming mat (purchased at a pet store) is placed behind the painting. A piece of silicone-release Mylar is used to protect the painting and a small sandbag weight is used for pressure (fig. 30.6).
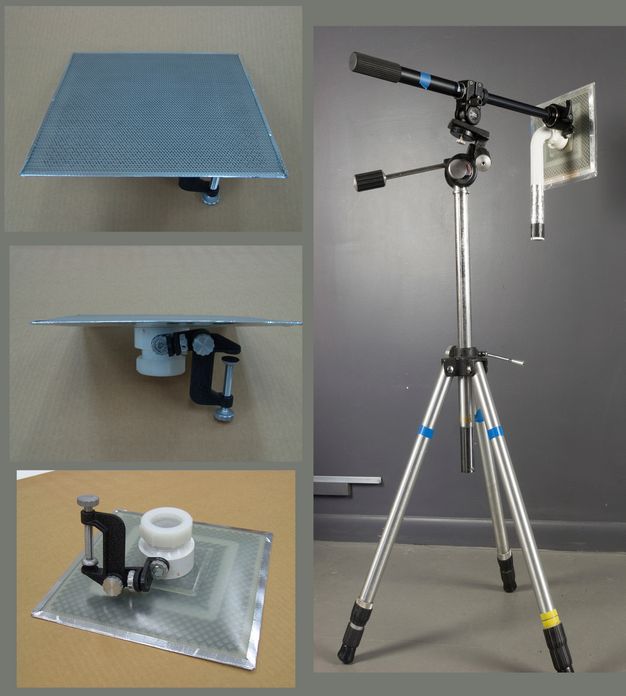
Suction Platen
A suction platen may be the most versatile tool for local interventions. My design has a thin profile to fit under stretcher members and a baffle system inside to keep the suction even across the surface (fig. 30.7). The 8 × 8 inch size keeps it lightweight while maintaining a usable surface area and allowing it to fit within most stretchers, even those with tight crossbars. The advantages over full-size suction tables include nimbleness and ease of treating smaller areas. Furthermore, the tacking margins need not be flattened and rebent.
Retensioning Tears
While the Trecker, designed by Heiber (Demuth, Petra, and Winfried Heiber. 2000. “Der Trecker: Eine Spannkonstruktion fur die Rissverklebung.” Restauro 106, no. 5: 344–47.), is very useful for pulling the edges of tears together, its weight and size can make using it awkward, particularly in tight spots close to the stretcher bars.
As seen in figure 30.8, a simple aluminum corner brace can be attached directly to the stretcher, with a piece of Fome-Cor used as a spacer so that the edge of the aluminum does not quite touch the reverse of the canvas. A thin piece of plastic G‑10 is slipped under the stretcher to protect the canvas from the edge of the aluminum. Unwaxed dental floss is attached to opposing sides of the tear with either Beva film or Command strips, then threaded under the aluminum. Pushpins are tied to the other ends of the threads. Tension can be incrementally increased to bring the edges of the tear together by pulling on and repositioning the pins.
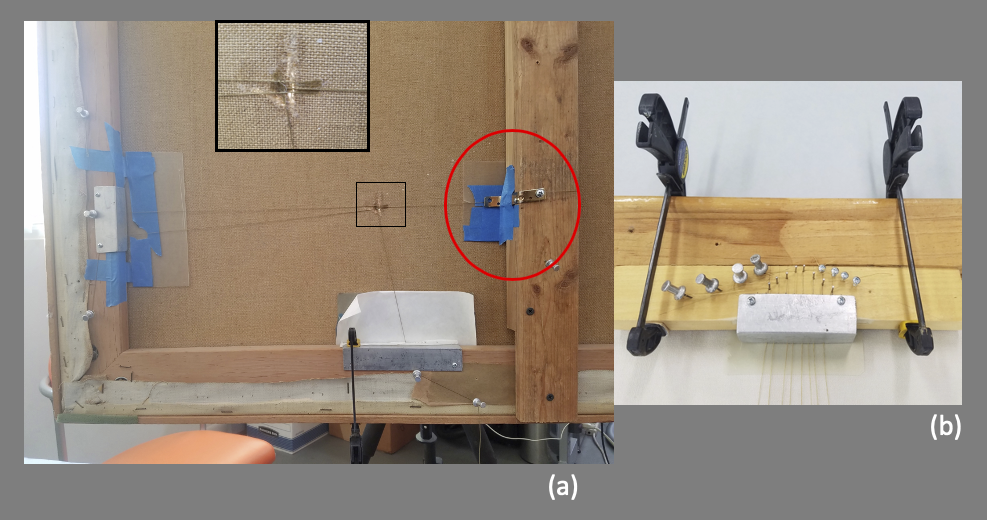
Alternatively, a small board can be clamped to the inside of the stretcher to avoid putting any holes in the painting stretcher, as shown in the mock-up in figure 30.8. Screws can be used in place of the pushpins, with the threads wound around the screws. The tension can then be increased with greater control by slightly turning the screws.
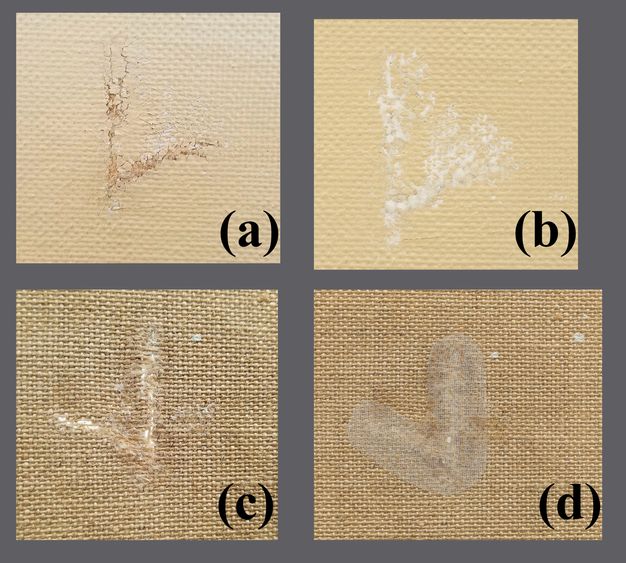
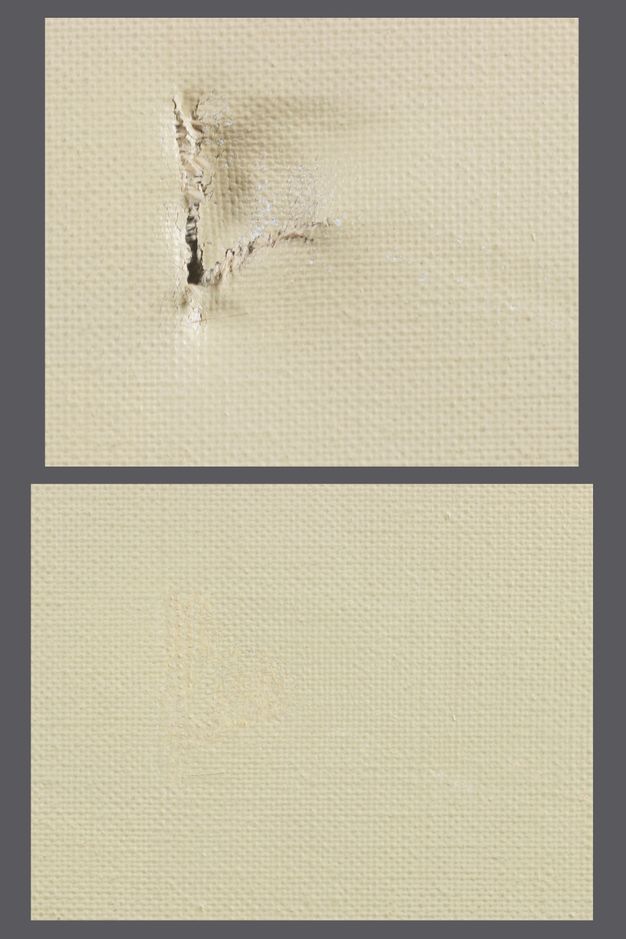
Figure 30.9 includes before-treatment details of a large painting (60 × 90 inches) with a small but fairly distorted tear where this technique was applied. Where only one or two threads are needed to pull a small puncture together, bent mending plates (see fig. 30.8) can be used instead of angled aluminum edging or fabricated Treckers.

A suction platen was used during the tear mending to humidify the area to remove planar distortions, and again while filling. Using the platen at low suction during filling allows the wet fill material to be drawn into the canvas voids—which helps keep the tear in plane—and to take on the weave texture of the canvas. A small, thin piece of Stabiltex impregnated with Beva can be used to cover the mend both to act as a moisture barrier for the repair and to add a second line of security if the mend were ever to fail (fig. 30.10). Figure 30.11 shows the difference at the tear site before and after treatment.
Conclusion
Honoring the artist’s intent, understanding the forces that hold paintings together and those that make them fall apart, and having a keen respect for the original materials and an understanding of modern materials, reversibility, and retreatability are the factors to keep in mind when caring for damaged or changed paintings on canvas. Over the years, it has become clearer that our profession does not lend itself to a one-size-fits-all approach, no matter how technically sophisticated or well engineered these materials or equipment may be (the law of the instrument), and that the better we understand the nature of the problem at hand, the more it can lead us to simpler and more refined solutions (Occam’s razor).
Those of us involved in structural canvas treatments are constantly discovering better methods and adjusting what we do to suit each painting we treat. For instance, since presenting at the Conserving Canvas conference at Yale, Petra Demuth, who teaches Heiber’s tear-mending techniques, has demonstrated substitutions for the Trecker that are more nimble and far easier to set up and use. It was an honor to be invited to share my current techniques, but my work continues to evolve, and what I do next year may be different from what I have done in the past.
Appendix: Materials
Hollytex: spun-bonded nonwoven polyester fabric, TALAS, New
York.
https://www.talasonline.com/Hollytex
Beva 371b film: ethylene vinyl acetate–based film adhesive. A
variation on the mixture of Beva 371. Beva 371b is composed of
ELVAX (500 g), aldehyde resin N (300 g), A-C copolymer
(ethylene vinyl acetate adhesive), Cellolyn 21 (40 g/l), and
paraffin dissolved in 1000 g of toluene. Available from
Conservator’s Products Company.
http://www.conservators-products.com/products.htm
Mending plates and corner angles. Available from most hardware stores.
Silicone color shapers. Available from Jerry’s Artarama and
similar art supply stores.
https://www.jerrysartarama.com/brushes-tools/color-shapers/colour-shapers/colour-shaper-sets
Mylar: pure D polyester in a clear, uncoated state. Sourced
from TALAS, New York.
https://www.talasonline.com/Mylar-Rolls
Reptile warming mat. Available from most pet stores, such as Petco.
Fome-Cor: rigid polystyrene core laminated with paper or
plastic on both sides. The rigid, strong, flat panels are
water resistant and dimensionally stable. The foam is
acid-free, but the laminated surfaces may contain acidic
material. Sourced from Laird Plastics, Houston.
https://lairdplastics.com/all-products/fome-cor-board/
G-10: high-pressure fiberglass laminate soaked in epoxy resin. Sourced from Allied Plastic Supply, Dallas.
Stabiltex fabric: fine polyester multifilament fabric.
Originally manufactured by Sefar AG, Switzerland but
discontinued. Silk crepeline can be used as an alternative, as
can prepared Beva-Tex. Available from Conservator’s Products
Company.
http://www.conservators-products.com/products.htm