The previous conservation treatments of Anthony van Dyck’s Equestrian Portrait of Charles I present a history of lining. Having been lined with a glue-paste adhesive twice in the late nineteenth century, the painting was relined with a wax-resin adhesive in 1952, and in the recent treatment was relined with Lascaux 375, an equivalent heat-seal adhesive to Beva 371. This article describes the recent treatment, starting with the removal of the wax-resin lining, and includes the repairs to the original canvas and the relining, which was carried out in two separate stages on a heated low-pressure table while the painting was held in a vacuum envelope.
8. The Relining of Van Dyck’s Equestrian Portrait of Charles I
- Paul Ackroyd, Conservator, National Gallery, London
Introduction
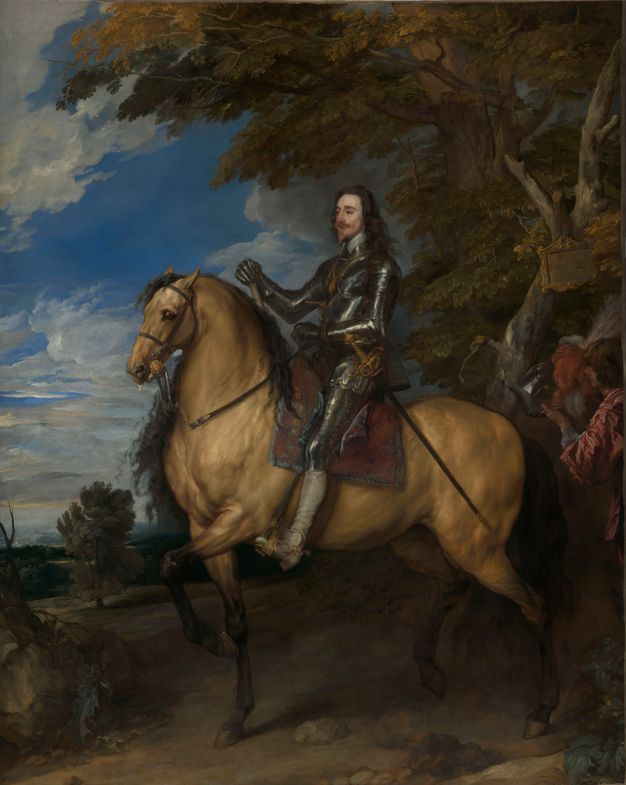
The Equestrian Portrait of Charles I by Anthony van Dyck (NG 1172), painted around 1637–38 and monumental in scale (368 × 292.5 cm), imposingly depicts the king as the divinely chosen ruler of Great Britain, celebrating the union between England and Scotland following the accession of Charles’s father, James I, to the throne in 1603 (fig. 8.1). Van Dyck’s choice of an equestrian portrait not only demonstrates the king’s horsemanship but is also deliberately reminiscent of equestrian statues in ancient Rome that were intended as assertions of temporal power. It was painted toward the end of a period of relative prosperity in England and set in a tranquil English landscape, shortly before the country was plunged into a bloody civil war in which Charles lost the throne—and his head, when he was executed on January 30, 1649. The depiction of this poignant moment in English history has ensured its popularity with visitors to the National Gallery and its importance within the collection. Only rarely has it been taken off display, and it normally hangs in room 31, where it creates an imposing impression and forms a vista to draw the public into the gallery as they enter through the Central Hall.
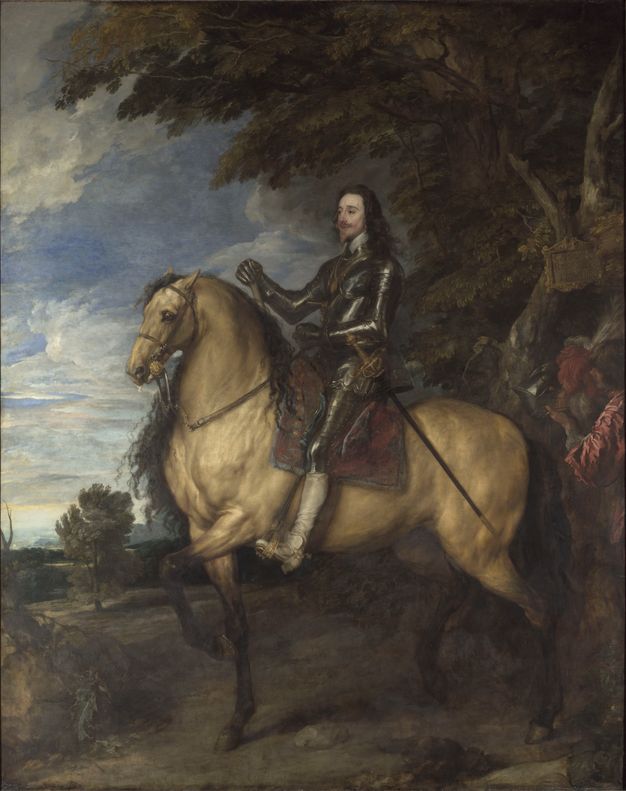
Van Dyck painted the portrait on a twill weave canvas with a black ticking pattern, which has a central horizontal join (fig. 8.2); it bears Charles I’s original cipher at the center of the reverse. This type of canvas, commonly used for domestic upholstery, was probably chosen for its strength and toughness and because it could be obtained in large widths, making it an attractive choice of material for large paintings. The canvas was prepared with a red-brown ground followed by a thick, oil-based gray priming.
The decision to fully retreat the picture in 2018 was based on the fact that the lining canvas was detaching from the original and the previously applied varnish and retouchings had discolored significantly. All lining activity at the National Gallery since the late 1970s has entailed the relining of paintings—that is, the replacement of an old and degraded lining with a new one. On the occasions when previously unlined pictures have required structural attention, less-invasive forms of treatment than lining have been selected. In the case of the Van Dyck, the recent relining was a nonimpregnating, nap-bond treatment carried out with an equivalent of Beva 371, Lascaux Heat-Seal Adhesive 375, using a vacuum-envelope technique.
Early History and Ownership
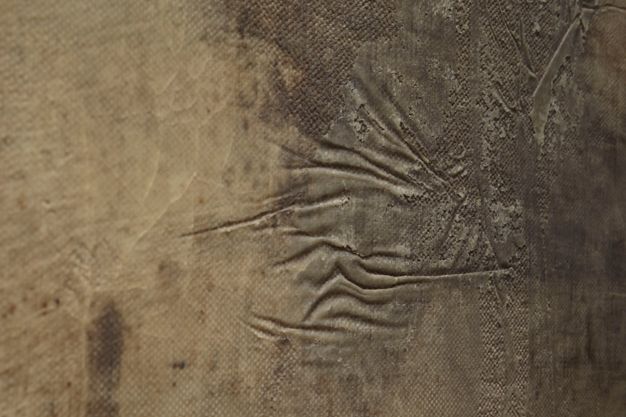
The painting’s checkered early history has affected its condition. In 1650, shortly after Charles I’s execution, Cromwell sold the painting to Sir Balthazar Gerbier, who resold it to Gisbert van Ceulen in Antwerp, from where it was sold yet again to Duke Maximilian II Emanuel, elector of Bavaria and governor of the Spanish Netherlands (Martin, G. 1972. The Flemish School circa 1600–circa 1900. London: National Gallery.). In 1698, the painting was looted from Munich by Emperor Joseph I, who gifted the picture to the first Duke of Marlborough in 1706. From then, it remained in the United Kingdom at Blenheim Palace until the National Gallery acquired it in 1885 for the sum of £17,500. Throughout all these changes in ownership, the painting would have been rolled up and transported by horse and cart or by ship. The raised, horizontal craquelure in the picture is indicative of the painting having been rolled, as are the large number of splits and losses at the sides (fig. 8.3). A series of vertical losses at the right edge also suggest that the rolled canvas was tied too tightly, crushing the paint in these areas.
Since the painting entered the National Gallery’s collection it has rarely traveled. During World War I, the picture was evacuated to Overstone Park, outside of Northampton. During World War II, it went first to Penrhyn Castle, and then in 1941 to the Manod slate mine in Wales. On both of these latter occasions, it was transported upright on its stretcher in a large wooden case strapped to the back of a lorry. On its journey to Manod, the truck had to pass through a tunnel that was not tall enough to accommodate the height of the case. This had been anticipated, and the road had been dug up beforehand to make extra height, but even so there was insufficient headroom for the truck to pass through, and the truck’s tires had to be deflated (Clark, K. 1977. The Other Half: An Autobiography. London: John Murray.; Davies, M., and F. I. G. Rawlins. 1946. “The War-Time Storage in Wales of Pictures from the National Gallery, London.” Transactions of the Honourable Society of Cymmrodorion. London: The Honourable Society of Cymmrodorion.). On its return trip to the National Gallery in June 1945, the painting traveled mostly by train. More recently, in January 2018, the painting was lent to the Royal Academy’s exhibition Charles I: King and Collector, and it again remained on its stretcher for the short journey across London.
Early Relining Treatments
Before the recent treatment, which began with a cleaning in June 2018, the painting had already been lined at least four times; as a result, it presents a potted history of lining at the National Gallery. It was acquired already lined, almost certainly with a glue-paste adhesive, and relined immediately after acquisition with glue-paste by William Morrill, a private liner who regularly undertook work for the gallery. Morrill was the second generation of a dynasty of liners renowned for their tough, durable linings—which, by today’s standards, often produced overly flat picture surfaces. In the case of the Equestrian Portrait, this was achieved at the expense of squashing the impasto in the picture, leaving moated depressions around these areas.
It is worth emphasizing the durability of the Morrill family’s linings, a number of which still remain on National Gallery paintings, and they have stayed in a stable condition despite now being around 170 years old. In 1889, however, four years after his initial lining, Morrill was asked to reline the painting again, because it was considered that the central join protruded too much. This time he did another paste relining but using two lining canvases. However, this lining created further damage. Morrill cut away all the excess canvas at the back of the join and completely removed the stitching in the central section as well but left the stitching intact at the ends of the join. During the relining, the two original pieces of canvas shrank apart, leaving a 4–5 millimeter gap across the center of the join, and at the points where the stitching remained, the painting bulged away from the lining canvas, forming large air pockets. The bulge at the left was ironed flat, leaving a slight depression, but ironing the one at the right created a raised crease in the original canvas and a 50-centimeter-long vertical line of paint loss. A similar crease was made in the center of the bottom edge. Additionally, during the lining removals that Morrill undertook, fragments of old glue became trapped underneath the picture, causing holes and indentations in the picture surface, mostly around the edges.
By 1952, Morrill’s lining canvases had embrittled, tearing at the turnover edges, and the surface of the painting had become undulated. By this time the gallery no longer used private restorers, having established a conservation department in the late 1940s. Arthur Lucas, who later became the gallery’s chief restorer, decided to remove Morrill’s double lining using a mixture of water and ethanol to soften the glue layers, and to then reline the painting with a single piece of linen adhered with a wax-resin mixture (58% plain beeswax, 40% dammar resin, 2% stand oil) using heated hand irons. There was a vogue for wax-lining at the gallery from shortly after the war until the late 1970s, when it was supplanted by Beva 371. Lucas’s decision to reline the picture may have been considered legitimate at the time, but nowadays it might be considered more appropriate to flatten the undulations and repair the edges of the lining by adding a strip-lining.
Lucas’s lining also had its problems. The water and ethanol used to remove Morrill’s lining made the original canvas buckle and undulate, and these problems were not addressed with any flattening treatments before relining. The relining was initially carried out with the painting facedown, and the lining canvas, stretched onto a loom and prepared with the wax resin, was placed on top of it—a standard procedure at the time. The lining canvas was ironed from the reverse, lightly tacking the painting to the lining, which was then turned faceup so that the ironing could continue over the facing tissue covering the front of the picture. The temperature of the irons was reduced, and the wax adhesive did not get hot enough to form an even layer nor form a good bond between the two canvases. The result was that the rippled undulations caused during the delining remained and, due to the considerably uneven distribution of wax, more pronounced lumps and bumps were created in the picture surface (fig. 8.4). By 2018, the painting was detaching from the lining, particularly at the edges.
The Recent Treatment
Removal of the Old Lining
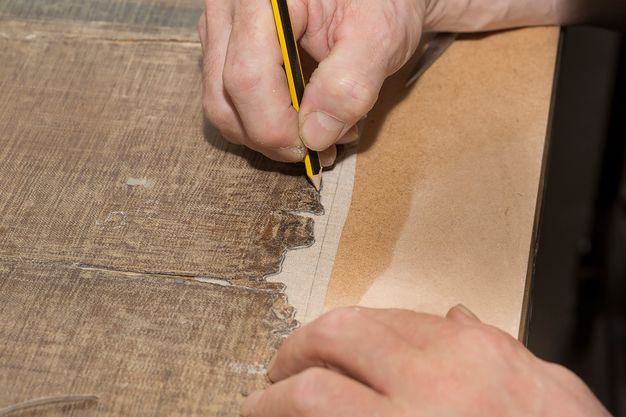
After cleaning, a template was made of the damages and distortions at the front by marking these areas onto thick sheets of Melinex (polyester film), so that they could be accurately located on the back of the picture during the later stages of the treatment.
The central join was then faced with Japanese tissue adhered with a wheat-starch and sturgeon-glue adhesive to provide extra reinforcement to this area. This was followed by an overall facing of Eltoline tissue and a beeswax and dammar adhesive, diluted in mineral spirit and applied cold. The intention was to enable the removal of the overall facing without affecting the Japanese tissue, so that the join would remain reinforced during a future rolling operation when the painting needed to be turned faceup after the removal of the wax-lining from the reverse.
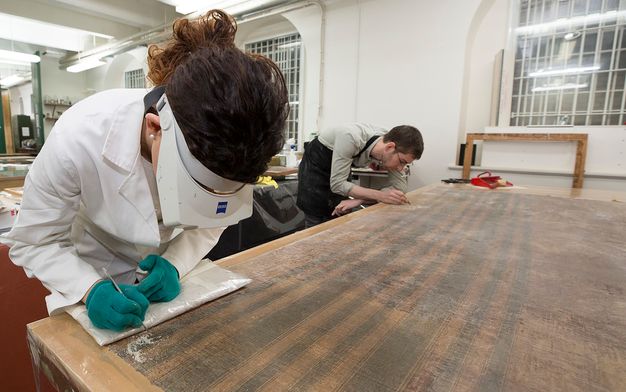
The painting was taken to the relining studio and placed facedown on a large table covered with silicon-coated Melinex. The stretcher was removed and the lining canvas peeled away in strips—a relatively easy task given that the lining canvas had already become detached in parts and the adhesive had become weak and brittle.
The bulk of the wax resin, particularly the thicker areas—up to 7 or 8 mm thick—was scraped from the back of the original using sharpened metal strips, leaving a thin film of the wax resin, which was then removed with scalpels (see fig. 8.2). A certain amount of the wax-resin adhesive remained impregnated within the original canvas, but no attempt was made to extract this using solvents as the adhesive had not darkened the thick oil-based red ground and gray priming layers. Throughout the treatment, the center of the painting was reached by kneeling on large cushioned pads.
Structural Repairs
Once the old lining adhesive had been removed, the repairs to the canvas were carried out. The splits at the sides of the canvas were repaired with Evo-Stik Resin ‘W,’ an aqueous PVA adhesive. Many of the splits, as well as losses at the edges and small holes in the center of the picture, required inserts of new, oil-primed linen canvas adhered with the same PVA adhesive and then heated with a hot spatula and placed under weights until dry (see fig. 8.3).
The old, hard oil-based filling material used across the join was generally well adhered, and so was left in place apart from small, localized sections that had cracked and needed replacing with inserts of new canvas. The join was reinforced at the back with a 5-centimeter-wide strip of Stabiltex, a thin, gauze-like polyester that was preimpregnated with Lascaux 375 and attached using a hot spatula.
Abrasions to the back of the canvas caused by the previous delinings had left the red ground visible in several areas at the back, and these were consolidated with an aqueous acrylic adhesive, Primal B60A. The hollow areas were then filled with Mowiol GE 4-86, an aqueous polyvinyl alcohol binder, mixed with chalk and tinted with pigments to match the canvas color.
Moisture-Flattening Treatments
Many of the broader undulations in the canvas had disappeared with the removal of the wax resin, but some remained, particularly in the central area of the picture. The entire painting was given a flattening treatment by locally moistening the back of the canvas and covering it with boards and weights while the areas dried overnight. This was done section by section, starting from the center and working out toward the edges. The Melinex template made at the outset proved useful in locating specific areas of distortion, such as the creased areas of canvas, which were also moistened and massaged flat with a hot spatula. This proved reasonably successful. Attempts were also made to flatten the numerous small depressions in the picture surface caused by the fragments of old glue pressed into the paint surface, as well as the moated depressions around areas of impasto. These treatments, however, had little effect.
Turning the Painting Faceup
The painting was then ready to be turned faceup. It had been planned to do this by rolling the painting onto a large wooden roller, and then unrolling it faceup. However, given the number of splits and the amount of damage at the sides, there was a risk that rolling might cause further splitting. It was therefore decided to adhere a temporary strip-lining to the facing at the front of the painting so that it could be attached to its stretcher and then turned over. The strip-lining consisted of Saatifil PES 120/41, a thin polyester adhered with Beva film heat-sealed with spatulas from the back of the canvas. The stretcher, fitted with a polycarbonate panel, was placed over the reverse of the picture, and the strip-lining was then stapled to the stretcher. A further polycarbonate panel was slid under the front of the painting and taped around the back of the stretcher. The painting, stretched onto the stretcher and sandwiched between the two polycarbonate sheets, was then lifted off the table and turned faceup onto the table, which was covered with freshly siliconed Melinex.
The stretcher, the temporary strip-lining, and facings were all removed, and the losses in the painting were filled with Mowiol and chalk, tinted to match the color of the original gray priming. Following this, the painting was slid faceup onto the paneled stretcher, sandwiched between the polycarbonate panels and Melinex, and set aside while the lining canvas and vacuum envelope were prepared.
Preparation of the Lining Canvas
The lining canvas was prepared in an upper studio, as the ceiling height in the lining studio was too low to accommodate the wooden loom. The canvas—a single piece of linen with double warp and weft yarns—was stretched onto an expandable loom and wetted and prestretched three times to reduce the canvas’s potential to shrink. The final wetting was done using a deacidifying solution of magnesium bicarbonate in distilled water with the intention of improving the longevity of the lining and its future removability (Ryder, Nichole. 1986. “Acidity on Canvas Painting Supports: Deacidification of Two Twentieth Century Paintings.” The Conservator 10: 31–36.).
The lining canvas was sized with one part Lascaux 375 to three parts mineral spirit, applied by brush. This not only provides a uniform appearance at the back after lining but also aids future reversibility by ensuring that more of the adhesive remains stuck to the lining canvas, rather than to the back of the original. Knots in the canvas were more readily removed (with scalpels) after the sizing, and both sides of the canvas were lightly sanded to give a smooth surface before a further six coats of Lascaux 375, diluted 1:1 in mineral spirit, were brushed onto one side of the canvas, with twenty-four hours drying time allowed between each coat. This produced an even adhesive layer that completely covered the canvas texture. The Lascaux 375 adhesive was not applied to the back of the painting, as that would have produced an overly strong bond between the two canvases and would impair the future removal of the lining.
The lining canvas was then removed from the loom and rolled onto a wooden roller, which was then taken to the lining studio.
Construction of the Vacuum Envelope
The vacuum envelope consisted of three lower sheets of thick Melinex taped together with good-quality cellophane tape and covered with overlapping sheets of silicon-coated Melinex, which were taped at the edges to the thick Melinex (fig. 8.5). The lining canvas was unrolled on top of the silicon-coated Melinex with the adhesive layer faceup, and the painting was then positioned on top of the lining adhesive.
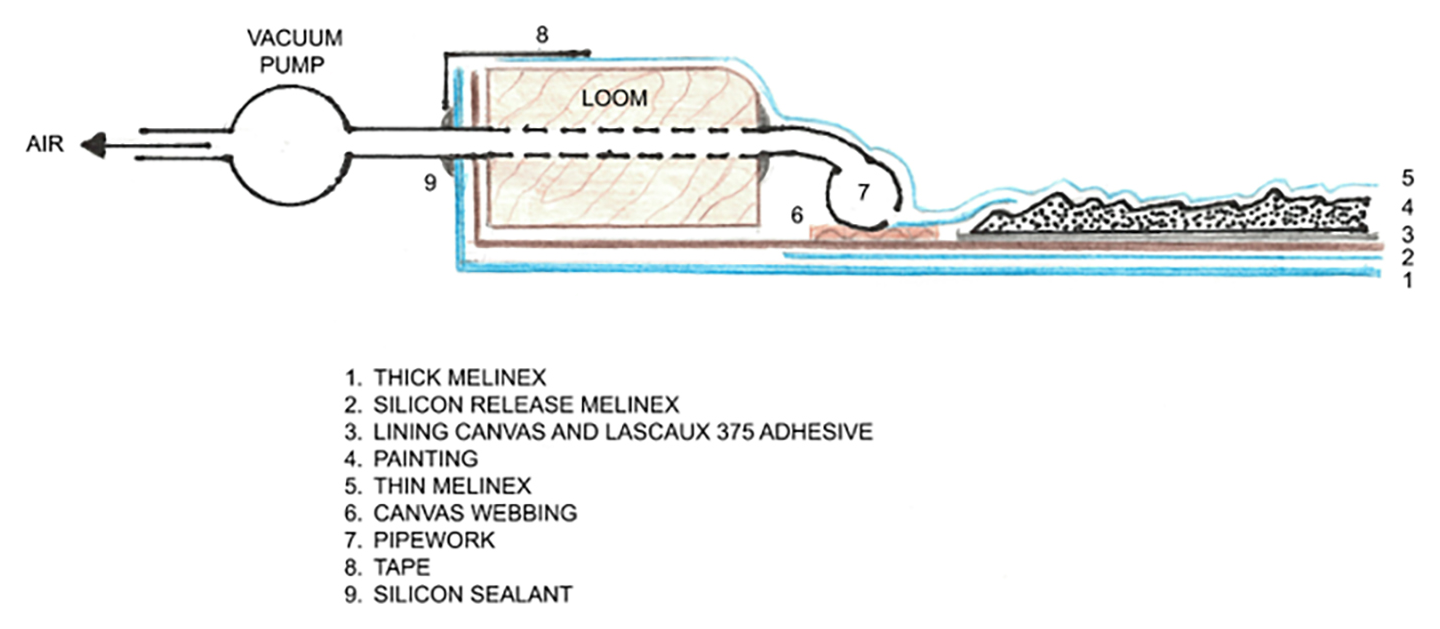
The same loom used in the preparation of the lining canvas was positioned around the edges. The two long sides of the loom were reinforced with wooden strips to prevent it from bowing when the materials were stretched onto it, and holes were also drilled through the short sides of the loom to accommodate the tubing, which would later be connected to the two vacuum pumps (see fig. 8.5).
The lining canvas was first stretched onto the loom using staples. The thick Melinex was also stapled to the loom through a layer of tape to stop the Melinex from tearing, and the staples were then covered with more tape to prevent air leakage from within the envelope. The loom was lightly keyed out at the corners so that the lining canvas and Melinex were reasonably taut.
Strips of siliconed Melinex were taped around the edges of the picture to stop the exposed areas of Lascaux 375 at the edges of the painting from sticking to the top sheet of Melinex when the adhesive was heated (see fig. 8.5). This enabled the extraction of air from the central areas of the picture and ensured that the entire painting could be maintained under vacuum pressure throughout the lining process.
The air extraction system consisted of plastic plumbing pipes drilled with holes at regular intervals and placed around the edges of the picture and positioned on top of canvas webbing, which further aided the extraction of air (see fig. 8.5). The tubes connecting the pipework to the pumps were inserted through a hole at each end of the loom and sealed in place with silicon sealant.
The top sheet of thinner Melinex, three sheets taped together, was placed over the picture and taped to the top of the loom. Previously, the wooden keys in the corners had been covered with foam, and the edges of the loom rounded, in order to avoid any sharp edges inside the envelope that might tear the thin Melinex when under vacuum.
Apart from its size and the air extraction system, the construction of the envelope did not differ significantly from the one presented by Gerry Hedley, Stephen Hackney, and Alan Cummings at the Greenwich lining conference in 1974 (Hedley, Gerry A., Stephen Hackney, and Alan J. Cummings. 2003. “Lining in a Vacuum Envelope with a Traversing Infrared Heat Source.” In Lining Paintings: Papers from the Greenwich Conference on Comparative Lining Techniques, edited by Caroline Villers, 83–86. London: Archetype.). As they discovered, the rigidity of the underlying thick Melinex is important in preventing areas of impasto and surface distortions in the painting from becoming “centered,” or partially pushed out to the back of the lining when under vacuum.
The pumps were not fitted with pressure gauges, and three holes were drilled into the tubing at both ends to introduce air leakage and thereby a reduction in pressure. This number of holes was sufficient to allow the top layer of Melinex to be comfortably pushed away from the paint surface.
The Relining
A large Willard Multi-purpose Low Pressure Table with a surface area of 4 × 2 meters was used as the heat source. The painting, being larger than the table, had to be heated in two stages. Heating one half of the painting while the other remains cool presents a problem, however: as the first section is heated, the envelope and the materials inside it expand and can cause undulations between the heated and unheated areas. Several means were used to obviate this:
-
The unheated section was warmed with domestic electric blankets covered with foil to retain the heat. This achieved a temperature of around 32°C on the picture surface.
-
Four fan heaters were placed under the envelope pointing upward and toward the edge of the lining table. This gave a temperature of 38°C–40°C on the area of the painting above the edge of the table.
-
A centimeter-thick strip of Plastazote foam was taped along the edge of the table to raise the envelope away from the tabletop and create an air gap that would reduce the temperature at this point.
The envelope was moved onto the Willard table with the half overhanging (not on the table) supported with adjustable props (fig. 8.6). For half an hour before the table was heated, the vacuum pumps were left running at full strength, with all the holes in the tubing covered with tape. This ensured that any air trapped between the lining canvas and painting was extracted.
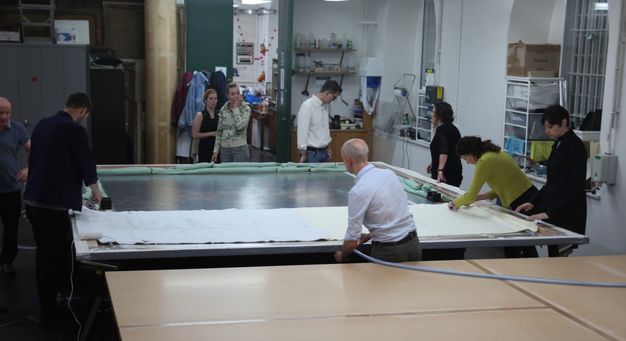
The holes in the tubing were then untaped and the pressure reduced. The table’s heaters, set at 70°C, were switched on, and at around 45°C, the temperature at which the adhesive begins to soften, local areas of the painting were treated with hot spatulas to improve small remaining surface distortions. The temperature at the top surface was independently monitored with thermocouples, and once these had reached 68°C, the envelope was lifted off the table and the second half was then positioned, with a slight overlap between the two sections. The electric blankets were removed and the foil placed over the already heated section.
Despite the measures used to prevent undulations from occurring, these did begin to appear, but they disappeared instantly when the props at the unheated end were raised, increasing the air gap between the envelope and the edge of the table, and thereby reducing the temperature at this point.
Once the entire painting had been heated, it was carried, still under vacuum, to a large table, where it cooled within fifteen minutes. The envelope was dismantled, and the following day the painting was restretched onto its existing stretcher using copper tacks, and the keys were secured.
Conclusion
The treatment did much to improve the surface appearance of the painting by removing the lumps and undulations created by the 1952 wax relining and also provided a more durable support for the picture than had been previously achieved. Although improvements were made to the raised creases that were a result of Morrill’s second relining, the flattened and moated areas of impasto remained unchanged. After the relining had been completed, the painting was retouched and revarnished before being returned to display in room 31 (fig. 8.7).
Acknowledgments
The National Gallery is grateful to the Getty Foundation for its generous support of the relining of the Van Dyck, which enabled the participation of seven conservators from the United Kingdom and abroad. Thanks are also due to the participants: Gerrit Albertson (Metropolitan Museum, New York), Francesca Bettini (Opificio delle Pietre Dure, Florence), Eva and Lucia Martinez (Museo del Prado, Madrid), Luigi Orata (private conservator, Florence), Camille Polkownik (Hamilton Kerr Institute, Cambridge), and Lisette Vos (Rijksmuseum, Amsterdam), and all my colleagues in the Conservation Department who assisted at various times throughout the project, particularly Lynne Harrison and Juraj Grac.
Appendix: Treatment Details
Materials
Eltoline tissue: long fibered 100% manila fibers with good wet strength
Resin ‘W’: Evo-Stik wood adhesive, Bostik Ltd., United Kingdom
Saatifil PES 120/41: Preservation Equipment Ltd., Diss, Norfolk IP22 4HQ, United Kingdom
Lascaux Heat-Seal Adhesive 375: A. P. Fitzpatrick Fine Art Materials, London E1 5QJ, United Kingdom
Linen lining canvas with double warp and weft threads available in 4.2 m roll widths: Claessens Canvas, 8790 Waregem, Belgium
Mowiol GE 4-86: polyvinyl alcohol, Kuraray Europe GmbH
Stabiltex: No longer commercially available
Recipes
Wax-resin facing adhesive made from dammar resin and beeswax: 340 g beeswax/1700 ml dammar varnish (454 g resin/280 ml mineral spirit)/850 ml mineral spirit
Wheat-starch facing adhesive made from 25 g wheat starch/100 ml distilled water/25 ml sturgeon glue (10% solution in distilled water)
Deacidifying solution of magnesium carbonate in distilled water: 8.8 g magnesium carbonate/1000 ml distilled water prepared in a domestic soda siphon in which two carbon dioxide capsules were discharged to form an aqueous solution of magnesium bicarbonate
Mowiol and chalk filler: 240 g Mowiol GE 4-86/1000 ml water with enough chalk and pigment to produce a stiff paste