1. After exploring the unit theme of "City Wildlife" in the Open Court Reader, discuss the concept that "every picture tells a story" with students. Explain to students that photographs also have the narrative elements they have been studying in their Open Court stories, but that the character, setting, and sensory details are presented in a different form than words.
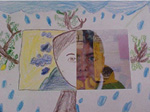
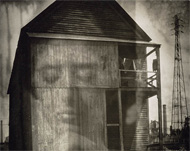
2. Show students samples of Edmund Teske's photographs that use montages and double exposures, and which include images related to the "City Wildlife" unit. Have a discussion with the class about the artworks, how they were made, and what the subject mater is. List out common characteristics among the images. Identify and define the terms "photograph," "negative," "double exposure," "landscape," and "narrative art." Review the concepts of "setting," "character," and "sensory details" and identify them in the photographs. The following questions can elicit responses:
• What types of lines do you see?
• Look at the shapes in this work of art. Which are organic shapes and which are geometric shapes?
• Where do you see texture? How would you describe it?
• Where do you see the shapes and lines repeated to create a pattern? What is your evidence?
• What was the first thing you noticed about the photograph? Would you consider this the focal point/emphasis of the photograph? What makes you say this?
• What else caught your eye?
• What do you think is happening in this work of art? What do you see that makes you say that?
• Which figure, shape, or object is the main character? How do you know? What sensory details can you find in the character?
• What are some sensory details in the setting of the photograph? What do you see that makes you say that?
3. Explore samples of narrative writing in the "City Wildlife" unit, children's literature, and the students' own writing samples. Ask the class to discuss how the elements of setting, character, and sensory details are expressed differently in photography and in narrative writing.
4. Show students how to load film into the camera. Explain how to create a double exposure. Break the class up into pairs. Each pair will first take pictures of a setting, such as trees or other natural elements in the schoolyard, Concept/Question bulletin boards, or "City Wildlife" projects that they have created in the class. Keep track of the order in which each student takes a picture.
5. When each student has taken one picture, rewind the film, but do not rewind it all the way. You will need to use the same film again. To do this, you need to stop the film before it is rewound back into the film cartridge. As you are rewinding, listen to hear the winding stop. You'll also feel the tension loosen as you turn the handheld winder. When you remove the film from the camera, a small tab should stick out of the roll. Take the film out and show it to the students. Explain that you are going to load the film again so that each student can take a picture of a character on top of the setting photographs they have already taken.
6. After reloading the film, go outside and have students photograph each other as the characters. Make sure the pairs take pictures in the same order they did in Step 4. It is sometimes best for students to photograph each other against a white wall. If you don't, photos may get too busy visually. Rewind the film and take it to a store to get the negatives developed into positives (prints) and get a CD (optional) made of the images.
7. After film is printed, have students cut each print in half, by cutting through the middle of the face in the image. Glue the cut prints onto white drawing paper. Using colored pencils, have students draw the other half of their faces and bodies with polygons and organic shapes, applying their knowledge of shapes to create patterns and texture. They may also render some of the patterns and textures found in the photograph.
8. When finished with their artwork, have students share their masterpieces with the class. Each student should explain their use of shape, color, pattern, and texture, as well as the setting, character, and sensory details in their own artworks. Have students reflect on their work by asking the following questions:
• What does the image you created have in common with Teske's photos? How are they different?
• What is the setting? Identify and locate some sensory details in the setting.
• Is there a story in this work of art?
• What polygons are in your masterpiece?
• Where did you use organic shapes?
9. Explain to the students that they will create "diamonte poems" that explore the character and setting in the multimedia artwork they created. Define a diamonte poem: A seven-line poem that compares two things that are different from each other. Remind students to use sensory words in their poetry. Discuss the use of poetic imagery as it pertains to setting, character, and sensory details in writing and in photography. Poetic imagery is also discussed in the Open Court Reading 2000, Level 3 story "Home Place."
10. Pass out "Poetry Diamonte" worksheet. Review the template on the worksheet and have students create their poem. After students write their diamonte poem, remind them that their own ear is the best detective and have them edit their poem by reading it aloud. They can then decide which words don't sound right or resonate well. They can then creatively transform a negative to a positive by changing the words.
11. Pass out the second worksheet: "Poetry Gem Diamonte." Share the following statement by Edmund Teske: "A word polished to brilliance can make the most precious gem." Encourage students to polish their words into gems by using a thesaurus to find synonyms. Once they have found the word that they like best (the gem), they can use the second worksheet to replace the old word in their poems with the gem to create a new poem.
12. Mount the artwork and poetry together. Have students present their artwork and poems orally to class and celebrate their accomplishments! |
 |
 |
|
| Facade, Chicago, Composite with Shirley Berman, Edmund Teske, 1956. © Edmund Teske Archives / Laurence Bump and Nils Vidstrand, 2001 |
|
|
|
Common Core Standards for English Language Arts
Grades 3–5
SPEAKING AND LISTENING
3.1 Engage effectively in a range of collaborative discussions (one-on-one, in groups, and teacher-led) with diverse partners on grade 3 topics and texts, building on others' ideas and expressing their own clearly.
4.1 Engage effectively in a range of collaborative discussions (one-on-one, in groups, and teacher-led) with diverse partners on grade 4 topics and texts, building on others' ideas and expressing their own clearly.
4.3 Identify the reasons and evidence a speaker or media source provides to support particular points.
5.1 Engage effectively in a range of collaborative discussions (one-on-one, in groups, and teacher-led) with diverse partners on grade 5 topics and texts, building on others' ideas and expressing their own clearly.
5.3 Summarize the points a speaker or media source makes and explain how each claim is supported by reasons and evidence, and identify and analyze any logical fallacies.
LANGUAGE
3.1 Demonstrate command of the conventions of standard English grammar and usage when writing or speaking.
3.3 Use knowledge of language and its conventions when writing, speaking, reading, or listening.
3.6 Acquire and use accurately grade-appropriate conversational, general academic, and domain-specific words and phrases, including those that signal spatial and temporal relationships (e.g., After dinner that night we went looking for them).
4.2 Demonstrate command of the conventions of standard English capitalization, punctuation, and spelling when writing.
4.6 Acquire and use accurately grade-appropriate general academic and domain-specific words and phrases, including those that signal precise actions, emotions, or states of being (e.g., quizzed, whined, stammered) and that are basic to a particular topic (e.g., wildlife, conservation, and endangered when discussing animal preservation).
5.6 Acquire and use accurately grade-appropriate general academic and domain-specific words and phrases, including those that signal contrast, addition, and other logical relationships (e.g., however, although, nevertheless, similarly, moreover, in addition).
Visual Arts Standards for California Public Schools
Grade 4
Artistic Perception
1.2 Describe how negative shapes/forms and positive shapes/forms are used in a chosen work of art.
1.5 Describe and analyze the elements of art (color, shape/form, line, texture, space and value), emphasizing form, as they are used in works of art and found in the environment.
Creative Expression
2.1 Use shading (value) to transform a two-dimensional shape into what appears to be a three-dimensional form (e.g., circle to sphere).
2.6 Use the interaction between positive and negative space expressively in a work of art.
Aesthetic Valuing
4.1 Describe how using the language of the visual arts helps to clarify personal responses to works of art.
Language Arts Standards for California Public Schools
Grade 4
Literary Response and Analysis
3.5 Define figurative language (e.g., simile, metaphor, hyperbole, personification) and identify its use in literary works.
Writing Applications
1.4 Write fluidly and legibly in cursive or joined italic. |
|
|
|