Students will be able to:
• discuss the composition of space within a landscape painting.
• construct a model that demonstrates foreground, middle ground, and background in a landscape.
• demonstrate their knowledge of the following visual arts concepts—space, depth, foreground, middle ground, and background—by making an original, imagined landscape painting. |
 |
|
|
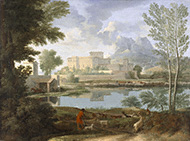
• image of Poussin's painting Landscape with a Calm
• Worksheet: Landscape Composition Templates
• paper, scissors, pencils, tempera paints, paintbrushes, glue sticks, color copy paper, and paper plate paint palettes |
|
|
|
1. Instruct students to look carefully at Poussin's Landscape with a Calm. Do not reveal the title of the artwork. Use the following to prompt discussion:
• Begin by describing what you see in the painting. Chart students' responses. (They will see trees, a lake, mountains, buildings, and a large palace.)
• Go through the charted list with students, and circle all of the things listed that they might find in nature. Point out that there are more natural objects in the painting than man-made objects, like the buildings and palace.
• What term do we use to refer to a picture of natural scenery? (Discuss the term landscape with students.)
2. Explain to students that they are now going to separate the painting into three sections and construct a model of it. Use the Landscape Composition Templates to illustrate the three zones of the painting. Make copies of the templates on three different colors of paper. Have students choose a partner, and then pass out copies of the each template to each pair of students. Next, have students cut out two of the templates along the dotted lines. (The third template will be used as a background for the other two parts.) Finally, when students are ready to glue the three sections together, have them refer to the painting to see what parts should go in what order.
3. Explain that artists often divide landscapes into three sections to break up the space of the picture and differentiate the things that are closer to you in the painting from things that are farther away. Inform students that the three parts they have assembled are called the foreground, middle ground, and background of the painting (see glossary). Have them label each section of their models.
4. Have students refer back to their models. Ask them to notice how some objects are covering up part of what you can see in the middle ground and background in the picture. Introduce the term overlapping (see glossary). Focus attention back on the painting. Have students find examples of overlapping in the painting (e.g. the trees in the foreground, and the palace and the mountains in the background). Explain that this is another technique used by artists to create the idea of depth or space within a painting.
5. Introduce the concept of relative size by having students participate in the following small group activity to illustrate the illusion of spatial depth.
• Pair up partners to make groups of four students. Have each group select four objects of similar size from their desks or the classroom (books, notebooks, etc.).
• Tell students to line their items up, leaving about one foot between each object. Have students get on eye level with the objects and look down the line of objects. Ask students which objects look largest. Have students hold up their thumb and place it in front of their eyes while looking down the row. Ask students to share their findings. Make the connection that perceived size is related to how close up or far back things are from your eyes. Explain that the same is true within the painting.
6. Continue looking at the painting and ask students to consider the following questions; chart their responses:
• What is the largest thing you see in the painting? Where is this object located in the painting (the foreground, middle ground, or background)? If students are having difficulty seeing this, have them use their hands and fingers to measure and compare the lengths and widths of objects in the painting (e.g. the trees in the right or left foreground are both longer and wider than the palace or mountains in the background). This technique should help them answer the remaining questions as well.
• What is the next largest thing you see in the painting? Where is this object located in the painting (the foreground, middle ground, or background)?
• What are the smallest things you see in the painting? Where are these objects located in the painting (the foreground, middle ground, or background)?
Explain to students that the objects in the foreground are larger than objects in the middle ground and background because the artist is using another technique (like overlapping) to create a sense of space in the painting. This technique is called relative size or scale (see glossary).
7. Explain to students that the artist painted the objects in the foreground larger than objects in the middle ground or background in order to make them appear closer to you. In real life, objects in the background are farthest away so they appear smallest in relation to other objects that are closer to you. Have students point out some cases where this is so (e.g., the shepherd in foreground is larger than the horse and rider in the middle ground, and the horse and rider are much larger than the shepherds tending sheep in the background).
8. Speculate about the painting's title with students:
• What do you think the title of this painting might be?
• What do you see in the painting that makes you want to give it this title?
Give students some background information, including the artist's name and the title Landscape with a Calm. Compare Poussin's title to the titles that students gave the painting.
9. Explain to students that Poussin has painted an imaginary landscape. Share the background information available in the Image Bank about how Poussin painted idealized, classical landscapes.
10. Next, tell students that they will be making their own imagined landscapes. Explain that the landscapes they create should have a clear foreground, middle ground, and background (like their models), and that they should use both overlapping and scale, or relative size, to create spatial depth as they saw in Landscape with a Calm.
11. Pass out art supplies for the landscape painting activity—tempera paints, brushes, pencils, paper, palettes. Have students paint their imagined landscapes (they may want to sketch out their painting first). Walk around and assist, showing how they can use overlapping and relative size to create depth in their individual works.
12. Once students have finished their landscapes, have a class showing of their work. Ask each student to share their answers to the following questions with the class.
• Was the landscape you painted totally imaginary or did you use real places and/or things you know to create this scene? If so, point them out and explain.
• Show the class where the foreground, middle ground, and background, are in your painting.
• Point out examples of overlapping and relative size in your painting.
|
|
 |
|
| Landscape with a Calm, Nicolas Poussin,1650–1651 |
|
|
|
Have students write a friendly letter (complete with the date, salutation, body, closing, and signature) describing to friends or family their trip to their imagined landscape (as if it were a real place). Before conducting the letter-writing exercise, ask students to look at the Poussin landscape again. Use the following questions:
• If you were inside this landscape, what would you see?
• What would you smell?
• What would you hear?
• What might you taste?
• What could you touch?
Have students ask themselves the same questions about their own landscapes and make a list of their answers. Suggest that they incorporate these descriptions into their friendly letters.
Landscape with a Calm has a companion painting, titled Landscape with a Storm, that is housed in a museum in Rouen, France. Ask students to imagine what it that other painting might look like, and have them paint their versions of the storm.
Consider comparing the Poussin landscape to a later landscape painting that is also part of the Getty Collection—Italian Landscape by Jean-Baptiste-Camille Corot. Use a Venn diagram to have students map out the similarities and differences between the paintings. |
|
|
|
Common Core Standards for English Language Arts
Grades 3–5
SPEAKING AND LISTENING
3.1 Engage effectively in a range of collaborative discussions (one-on-one, in groups, and teacher-led) with diverse partners on grade 3 topics and texts, building on others' ideas and expressing their own clearly.
3.6 Speak in complete sentences when appropriate to task and situation in order to provide requested detail or clarification. (See grade 3 Language standards 1 and 3 for specific expectations.)
4.3 Identify the reasons and evidence a speaker or media source provides to support particular points.
4.6 Differentiate between contexts that call for formal English (e.g., presenting ideas) and situations where informal discourse is appropriate (e.g., small-group discussion); use formal English when appropriate to task and situation. (See grade 4 Language standards 1 and 3 for specific expectations.)
5.1 Engage effectively in a range of collaborative discussions (one-on-one, in groups, and teacher-led) with diverse partners on grade 5 topics and texts, building on others' ideas and expressing their own clearly.
5.3 Summarize the points a speaker or media source makes and explain how each claim is supported by reasons and evidence, and identify and analyze any logical fallacies.
Visual Arts Standards for California Public Schools
Grade 3
1.0 Artistic Perception
Students perceive and respond to works of art, objects in nature, events, and the environment. They also use the vocabulary of the visual arts to express their observations.
Develop Perceptual Skills and Visual Arts Vocabulary
1.3 Identify and describe how foreground, middle ground, and background are used to create the illusion of space.
Analyze Art Elements and Principles of Design
1.5 Identify and describe elements of art in works of art, emphasizing line, color, shape/form, texture, space, and value.
2.0 Creative Expression
Communication and Expression Through Original Works of Art
2.3 Paint or draw a landscape, seascape, or cityscape that shows the illusion of space.
4.0 Aesthetic Valuing
Students analyze, assess, and derive meaning from works of art, including their own, according to the elements of art, the principles of design, and aesthetic qualities.
Derive Meaning
4.1 Compare and contrast selected works of art and describe them, using appropriate vocabulary of art. |
|
|
|


